Monday, December 30, 2019

Doodlebug Design | Winter Wonderland Yeti Card

Have you seen the Yeti in the Doodlebug Design Winter Wonderland Collection?  He is just so stinkin' cute...I'm a tad obsessed with him!  I thought he deserved to be featured prominently in my next project, so I created this card with him in mind!


I had a lot of fun making the little scene in this card.  I used the mountains, fox and Yeti from the Odds & Ends pack.  I added the tree & little bird from the Icons Stickers, then finished it off with some of the acetate snowflakes from the Snowflake Odds & Ends.  I thought it would be cute to have them peeking in a window!  The window is backed with acetate as well.  Here's a close-up.


I just love the Yeti's little tooth... adorable!  I finished the card with some little hearts from the Winter Hugs Shaped Sprinkles and a sentiment banner I created.
Have you created any projects using the Winter Wonderland Collection?  Be sure to tag Doodlebug Design on Facebook and Instagram.  We would love to see your creations!  That's it for me today, thanks for stopping by to peek!

Doodlebug Products Used
Winter Wonderland Collection

Other
Acetate Sheet
Silhouette Cameo


Sunday, December 22, 2019

Doodlebug Design | Christmas Magic Mug Box Card

I was very excited to see that the new Christmas Magic Cut Files were available in the Lori Whitlock SVG Shop!  Of course I had to play right away... I designed this box card using one of the files... take a peek...


I just love that little gingerbread man!  Now for the fun part!  This card is available exclusively in the Lori Whitlock SVG Shop here!  Following is the tutorial to assemble the card.
1)  These are the pieces that come with the file.
2)  First assemble the goodies... glue the stripes on the candy canes, the tops on the pink candies and piece the gingerbread man together.
3)  Add the candies to the center insert.  The outlines are there to guide placement.
4)  A little note on adding tiny pieces... and pieces that need particular placement.  When I cut the stripes for the candy cane, I left them in "order."  I then used the negative to help with the stripe placement.  Another helpful hint... I use a "pick-me-up" tool to help place small pieces.  It has a slightly sticky end that holds on the piece so you can more easily place it.
5)  Add the strips to the tops of both mugs to make the "lip" of the mug.
6)  Fold the 2 side pieces along the score lines.
7)  Attach the sides to one of the mug pieces.  They should be flush with the top of the mug.
8)  Glue the other side of the mug to the other tabs on the sides.

9)  Fold the tabs on the center insert so they go backward.  Add some adhesive to just the tabs.
10)  Slide the insert piece into the mug.  The bottom of the insert should be level with the bottom of the mug front and back,  and the tabs should just touch the back of the back mug.  Press the tabs to the side pieces to keep in place.
11)  The complete mug!

I embellished my mug a bit more using some shaped sprinkles and a sentiment from the Christmas Magic Chit Chat pieces.  The mug folds flat for mailing too!  If you make one, be sure to tag Doodlebug Design on Facebook and Instagram!  We would love to see what you make!  That's it for me today, thanks for stopping by to peek!

Doodlebug Products Used:

Christmas Magic Collection
Dot Stripe Petite Prints Collection


Other:  Electronic Cutting Machine

Monday, December 16, 2019

Doodlebug Design | Winter Wonderland Snow Globe Card

I am so excited to be kicking off a couple of weeks of Winter Wonderland inspiration on the Doodlebug Design Blog.  If you haven't seen this collection yet, you're in for a treat!  The colors, the icons, the patterns... its all so yummy.  The whole collection immediately made me think of a snow globe, so I designed this card to showcase some of the cute icons.


I have to say, not much makes me happier than a Doodlebug Snowman... and this collection is full of them!   Isn't he adorable?    I combined some elements from the Odds & Ends, with some stickers from the Icons Sticker Sheet to make this fun little scene.  To finish the look, I added some of the acetate Snowflake Odds & Ends. If you look close, they seem to be floating!  The winter wonderland sticker is from the This and That Stickers.  Here is a close-up of the scene...


Would you like to make a snow globe card?  Well you can!  I created an SVG file for the card base, and you can fill it with Doodlebug Odds & Ends, Stickers and more!  This SVG file is available exclusively through the Lori Whitlock SVG Shop here.  Here's a quick tutorial showing how I put it all together.


 1)  These are the pieces included  with the SVG File.**  I cut 2 of the back piece so I could have the patterns I wanted showing.  I simply glued them together to form the back piece.
**The remaining pieces are from the Winter Wonderland Odds & Ends, Snowflake Odds & Ends, Icon Stickers and This & That Stickers.
2)  Glue the acetate piece to the snow globe frame.
3)  Add the snow mounds to the background piece as shown
4)  Fold the side pieces along the score lines.


5)  Glue the side pieces to the back of the card as shown.  You want the bottom of the side to be flush with the bottom of the back piece.
6)  Repeat with the other side piece
7)  Next I added the trees.  The larger is from the Odds & Ends Package and the smaller is from the Icons Sticker Sheet.
8)  I then decorated the insert.  The Snowman and bird are from the Odds & Ends pieces and the bunny is from the Icon Stickers.


9)  Fold the tabs on the insert back, and adhesive to just the tabs.  Slide it between the sides of the card, pressing to stick the tabs to the sides.  The bottom of the insert should be flush with the bottom of the back piece.
10)  Add adhesive to the other tabs on the side pieces and add the front of the card to the tabs.  The front is placed in the same manner as the back in steps 5 & 6.
11)  As an afterthought, I added some of the acetate snowflakes to the card.  I glued some on the inside of the acetate piece so they looked like they were floating, some to the back ground piece and a couple others to the snowman and trees.

If you make a Doodlebug snow globe card, we would love to see it!  Be sure to tag Doodlebug Design on Facebook and Instagram, so we can view your creations!  That's it for me today, thanks for stopping by to peek.

DOODLEBUG PRODUCTS USED
Winter Wonderland Collection

OTHER PRODUCTS
Acetate Sheets
Cutting Machine
Foam Tape

Tuesday, December 10, 2019

Lori Whitlock | December Creative Team Blog Hop


Hi Everyone!   It's time for the December Creative Team Blog Hop over at Lori Whitlock!  You should have arrived here from Traci's Blog.  Here's the order for today's hop!

Lori Whitlock
Traci Penrod

Kathy Skou {you are here!}
Anita Mulcahey
Brandie Adams
Aimee Kidd
Ashley Cook

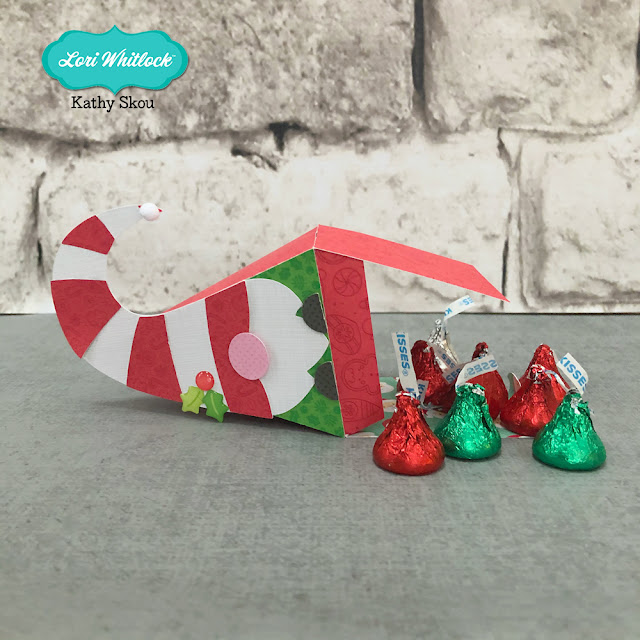
I made the new Gnome Pyramid Box (SVG, Coming to Silhouette Soon)  I just love his little hat!  The bottom opens to reveal a fun treat inside!


I pieced him together using some Doodlebug Christmas Magic Papers and Sprinkles and a little pom-pom for his hat!

There's a sale happening in the Lori Whitlock SVG Shop!  Use code DEC2019 to get 25% off all SVGs and Commercial Licenses!


Also, how about a free file!!  This file is free for today only!  No code or minimum required.


Finally, how would you like to win a $20 Coupon to Lori's SVG Shop!


Your next hop stop is Anita!  That's it for me today, thanks for stopping by to peek!

Monday, December 2, 2019

Doodlebug Design | Christmas Magic Mason Jar Card

 During the holidays, I like to bake for my neighbors and close friends, but time doesn't always allow me to bake as much as I'd like!  Perfect solution... a jar full of Doodlebug Christmas Magic!  I designed this fun Mason Jar Box Card and filled it with some of the candy and gingerbread Chit Chat pieces!  How "sweet" is that?!  Take a peek..


Here's a side view... 


I completed the card with a little tag from the Christmas Magic 6x6 pad...


Now for the fun part!  I've created an SVG file for the Mason Jar Card Base and it is available exclusively in the Lori Whitlock SVG Shop here!  The file only includes the Jar card base, you can fill it with almost anything!  It's pretty easy to assemble, I've outlined the steps below.


1.  Start by cutting the pieces of the file.  You will need a transparency sheet for the front of the card.  They are widely available in Office Supply Stores and on-line.
2.  Glue the darker grey cardstock pieces behind the jar covers.
3.  Glue the jar frame to the transparency jar.
4.  Glue the single cover to the background jar piece.

5.  Fold the score lines on the bottom piece.  Fold the longest strip in half along the score line and glue onto the base towards the center.  This is the piece to which you will glue your jar "fillings."
6.  Attach the front and back Jar pieces to the base as shown.  Make sure the edges are flush so that it will stand properly.
7.  Glue the attached jar lids to the backside of the jar back, making sure the covers are aligned.
8.  On the left is the card ready to be filled.  On the right are the Chit Chat pieces I used to fill my jar.

9.  I started by attaching a few of the gingerbread men together using foam tape between the layers to give them some dimension.
10.  Add some adhesive to the feet of the gingerbread men and glue them to the strip on the base.
11.  Add some Candy pieces to the back of the jar using foam tape for dimension.
12.  To add more items, I cut 2 of the 1" scored strips, and added some candies to them.

13.  Glue the bottom of the strip with the candies and attach to the base of the jar in front of the gingerbread men.
14. Repeat step 12 with another gum drop
15.  Add that strip to the jar base as in step 13.
16.  Once all of your pieces are in the jar, add some adhesive to the back of the front jar lid and attach up and over the front jar piece.  I also tied on one of little tags from the Christmas Magic 6x6 pad with some Doodle Twine.


This card folds flat and will fit in a 5x7 envelope.  We would love to see your creations using this file and the Christmas Magic Collection.  Be sure to tag Doodlebug Design on Facebook and Instagram so we can see what you've made!  That's it for me today, thanks for stopping by to peek!

DOODLEBUG PRODUCTS USED
Christmas Magic Collection
Dot Stripe Petite Prints Collection
Doodle Twine


OTHER
Transparency Sheet
Foam Tape
Adhesive
Electronic Cutter