Showing posts with label tutorial. Show all posts

Monday, November 29, 2021

Doodlebug Design | Great Outdoors Pop Dot Cards Tutorial

I have always loved creating projects with lots of dimension... whether it be a 3d project, layout or card! I also love making little "scenes" with all of the adorable Doodlebug icons.  I decided to combine all of my loves using the Great Outdoors Collection along with the Great Outdoors Doodle Stamps to create some fun pop dot cards!  Take a peek...


I started with the adorable bear and fishy from the Great Outdoors Doodle Stamps.  I find coloring so relaxing!!!!  I layered on some of the pine trees and a night sky using papers from the 6x6 pad for my grass, sky and water.  To finish, I added the Happy Bear-thday sentiment from the Chit Chat pieces.


When you look closely, you can see all of the dimension in the card.


Next I made a sweet little card using the Moose and bunny stamps.  I added some mountains in the background, along with more of the pine trees.


And here is a close up of the card's layers...


Would you like to make some pop dot cards of your own?  I have a quick tutorial showing how I pieced them together.  To start, I created some cut files for the base of the cards.  You can get them on my blog here.  If you don't have a cutter, you can still make them.  The dimensions of the base pieces are as follows...

White Cardstock - (cut 3) 4.25" x 5.5" rectangle - with a 3.25" circle cut from the center.
White Cardstock - Card Base 8.5" x 5.5" - Fold in half
Patterned Cardstock - 4" x 5.25 rectangle - with a 3.5" circle cut from the center


On the left are the white pieces that make up the card base.  For each layer I cut some of the Great Outdoors 6x6 papers to create waves and grassy hills.  I also added a piece of the stars paper to the card base.  It will show through the holes in the layers.  I added my stamped pieces to each layer.  On the right you can see how I attached the patterned papers to the backs.  A good way to see where you want to add all of your images is to stack the layers before you assemble your card so you can see how everything lines up.


Next you want to start adding your layers to create your scene.  I started with the back-most piece with the trees and grass.  I added pop dots (you can use foam tape, or nothing if you prefer)  I centered this piece on my main card base and attached.


I then added the 2nd layer directly on top of the first, making sure everything was lined up.  There are pop dots between these layers.  To end, I added the 3rd layer, also with pop dots.  To finish I added the chit chat sentiment to the card front.

This cards can be mailed, but you will need a slightly larger envelope to mail if you've added pop dots.  If you have a cut file for an A2 Envelope I would size it up slightly to accommodate the layers, or you could use a 5x7 envelope.

The best part is that you can use any of your Doodlebug Doodle Stamps or even the Icon and Mini Icon Stickers to create fun little scenes with these bases!  If you do use the files along with your Doodlebug collections, be sure to tag us on Facebook & Instagram.  We love to see your creations.  That's it for me today, thank you for stopping by to peek!

DOODLEBUG PRODUCTS USED
Great Outdoors Collection
Great Outdoors Doodle Stamps and Doodle Cuts

OTHER
Pop Dot Card Base Cut File
Silhouette
Copic Markers
Pop Dots (or foam tape)


Monday, December 14, 2020

Doodlebug Design | Night Before Christmas Ornaments

Growing up, my grandmother used to give each of her grandchildren a new ornament each Christmas.  Many of those still decorate my tree.  I started the tradition with my own daughter and my niece and nephews, each year I would make them a new ornament.  Now I'm onto the next generation with my great niece.  Every year I try to come up with a new ornament idea.  Last year I took an on-line ornament class from Lori Whitlock.  The ornaments had little scenes under a plastic dome.  I thought it would be fun to make some featuring the icons from the Night Before Christmas Collection.  They turned out so cute!  Take a peek...


I created little scenes using the stickers from the icon sticker sheet, some sprinkles and papers from the 6x6 pad.    I filled a couple with some glitter snow to make mini "snow globes"  and added some doodle twine and tags from the chit chat pieces.  I love how they came out! Here are some close-ups...


These cute little globes are really easy to make and they make such an impact!  I put together a little tutorial below.  
I started by gathering my supplies.  I purchased the plastic domes and glitter snow on Amazon.  For this ornament, I cut a 3" circle from the Snow Magical paper (6x6 pad) and a slightly larger scalloped circle (approx 3 3/8") from the red side of the jolly st. nick paper, and then cut another circle from white cardstock which I trimmed across to be my "roof."  Also included for this ornament are the Santa in chimney and reindeer stickers from the icons sticker sheet.

Glue the snowflake circle centered on the scalloped circle.  Make sure this is centered.
Add some foam tape to the back of the half circle piece and add to bottom of the snowflake circle, making sure it lines up.

Start building your scene... I added some glue and foam tape to Santa, the foam tape is on the top half to help it keep aligned with the already popped up roof piece.  A hint to working with stickers... it's easier to work with them if you make them "unsticky" first.  I use some cornstarch on the backs, but you can also use baby powder.
Add some foam tape to the back of the reindeer and place him next to Santa.  

Make sure none of the stickers are outside of the inner circle.  

Add about 1 tablespoon of glitter snow to the inside of one of the domes.
Add a thin strip of glue around the edge of the inner circle.  I used Zip Dry Glue.  I like it because it holds well and dries clear.  If you get any on the inner circle wipe it away so the snow won't stick.

Add the circles to the dome (while upside down).  Make sure you align the top of your design with the hanger on the dome.

I made a couple of other scenes as well... one with a kitty and tree and another with Santa in the snow. Here is what they looked like before I added the dome and snow.

I've already given one away and it made the recipient very happy!!   You could also use the Night Before Christmas Doodle Stamps to make these fun ornaments.   If you make any please be sure to tag Doodlebug on Facebook and Instagram.  We always love to see your creations!

DOODLEBUG PRODUCTS USED
Night Before Christmas Collection
Doodle Twine
Buffalo Check-Woodgrain 6x6 pad
Doodlebug Sprinkles

OTHER
Silhouette Cameo
Foam Tape
Zip Dry Glue

Thursday, April 30, 2020

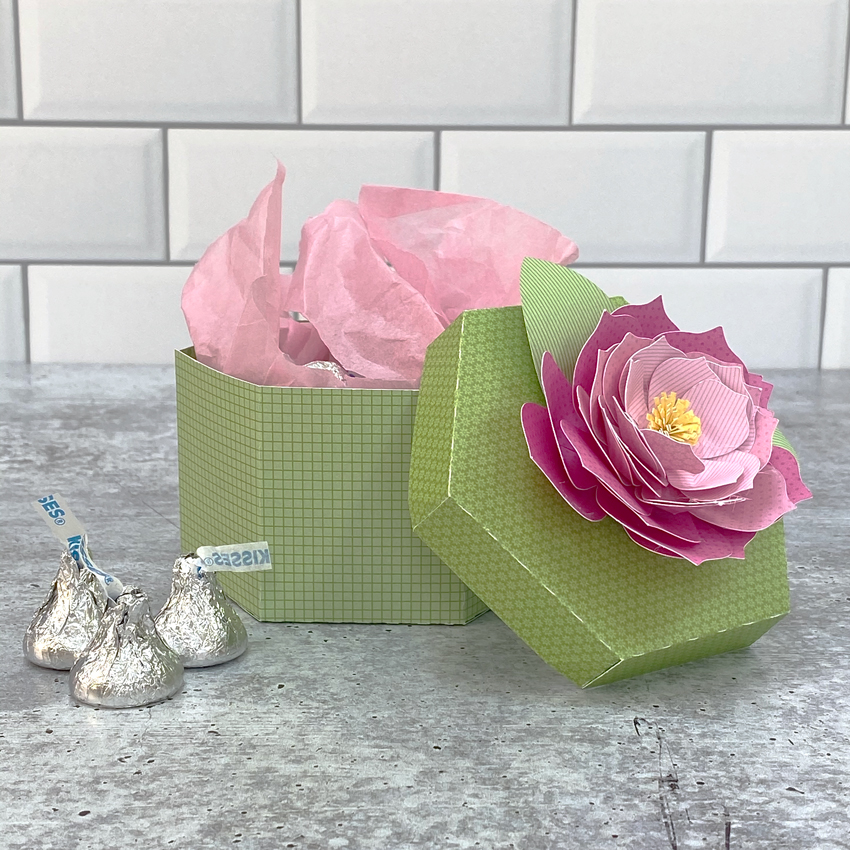
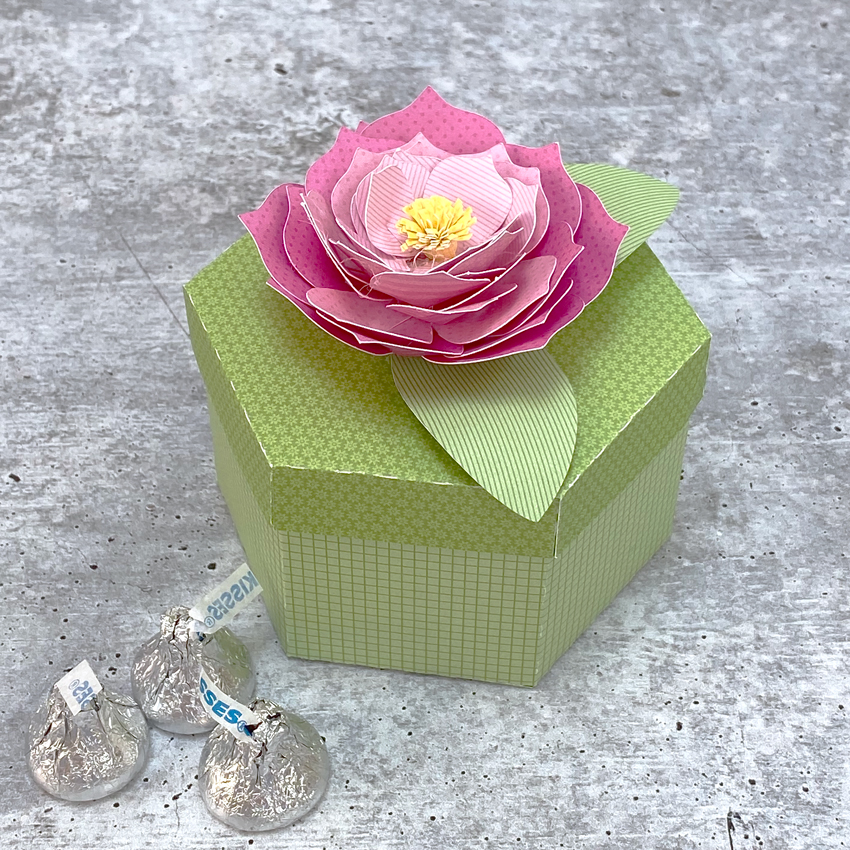
Lori Whitlock | Hexagon Box with Dahlia

Hi Everyone!  I'm up on the Lori Whitlock Blog today with a tutorial showing how to assemble the new Hexagon Box with Dahlia (SVG, Silhouette)  It's the perfect size for a little treat or gift!  It would be a great way to package up a Mother's Day gift or a little something for someone special!  Take a peek...


I pieced this together using some Petite Prints from Doodlebug Design.  Stop by Lori's Blog here for a full tutorial.  That's it for me today, thanks for stopping by to peek.


Monday, February 10, 2020

Doodlebug Design | Love Notes Flower Mason Jar Box Card

I love fresh flowers, they really brighten up a room.  We have a farm stand near us that sells little bunches of flowers in Mason jar vases.  They are so fun, and make the perfect gift!  When I saw the jar with flowers in Doodlebug's Love Notes Odds & Ends pack, I thought it would make a fun card... flowers that would always be bright and cheery!


I used a combination of Petite Prints and Love Notes Papers for the card.  The jar sides are made from transparency material.  I finished it off with a little tag from the Kissing Tag Paper and some Doodle Twine.  The card folds flat for mailing.


I created an SVG for this card and it is available exclusively in the Lori Whitlock SVG Shop.  Here is a quick tutorial to help you piece it together.

1)  Start by cutting the pieces.  Glue the jar shapes to the 2 larger transparencies.  Add the stems to the smaller transparency.  Add the flowers to the top piece and the inside pieces to the jar lid.
2)  Fold the base piece as shown.  Glue the two sides of the Jar to the base.
3)  Add the longer folded strip to the bottom of the jar, making sure it is centered.
4)  Add one of the smaller folded strips to the top of the transparency with the stems.
5)  Glue the transparency with the stems to the inside of the jar lids as shown.  Make sure it is centered.
6)  Add the cover to the Jar, gluing in place.  Add a little adhesive to the folded strip on the bottom of the card to hold the bottom of the transparency insert.
7)  Add the remaining folded strip to the back of the flowers piece and fold out the ends.  
8) Glue to the top of the jar lid, centering.

This card can be used for a number of occasions including Valentine's Day, Mother's Day, Birthdays and "just because."  If you make one, be sure to tag Doodlebug Design on Facebook and Instagram, we would love to see your creations!  That's it for me today, thanks for stopping by to peek!

Doodlebug Products Used
Love Notes Collection
Linen Gingham Petite Prints

Other
Transparencies


Sunday, December 22, 2019

Doodlebug Design | Christmas Magic Mug Box Card

I was very excited to see that the new Christmas Magic Cut Files were available in the Lori Whitlock SVG Shop!  Of course I had to play right away... I designed this box card using one of the files... take a peek...


I just love that little gingerbread man!  Now for the fun part!  This card is available exclusively in the Lori Whitlock SVG Shop here!  Following is the tutorial to assemble the card.
1)  These are the pieces that come with the file.
2)  First assemble the goodies... glue the stripes on the candy canes, the tops on the pink candies and piece the gingerbread man together.
3)  Add the candies to the center insert.  The outlines are there to guide placement.
4)  A little note on adding tiny pieces... and pieces that need particular placement.  When I cut the stripes for the candy cane, I left them in "order."  I then used the negative to help with the stripe placement.  Another helpful hint... I use a "pick-me-up" tool to help place small pieces.  It has a slightly sticky end that holds on the piece so you can more easily place it.
5)  Add the strips to the tops of both mugs to make the "lip" of the mug.
6)  Fold the 2 side pieces along the score lines.
7)  Attach the sides to one of the mug pieces.  They should be flush with the top of the mug.
8)  Glue the other side of the mug to the other tabs on the sides.

9)  Fold the tabs on the center insert so they go backward.  Add some adhesive to just the tabs.
10)  Slide the insert piece into the mug.  The bottom of the insert should be level with the bottom of the mug front and back,  and the tabs should just touch the back of the back mug.  Press the tabs to the side pieces to keep in place.
11)  The complete mug!

I embellished my mug a bit more using some shaped sprinkles and a sentiment from the Christmas Magic Chit Chat pieces.  The mug folds flat for mailing too!  If you make one, be sure to tag Doodlebug Design on Facebook and Instagram!  We would love to see what you make!  That's it for me today, thanks for stopping by to peek!

Doodlebug Products Used:

Christmas Magic Collection
Dot Stripe Petite Prints Collection


Other:  Electronic Cutting Machine

Thursday, October 10, 2019

Lori Whitlock | Gift Bag

Have you seen the new sticker sets in the Lori Whitlock SVG Shop?  There are 2 new Birthday Sets (Birthday Stickers (SVGSilhouette), Birthday Stickers 2 (SVGSilhouette)) and a new set of Fall Stickers (SVGSilhouette).  These stickers can be used for a number of different projects... in addition to planners, you can use them on cards, gift bags, etc.  Individual stickers can be resized... larger for a gift bag for instance or you can print a few of the same stickers to make cards in multiples.  I used the new fall stickers to decorate a little gift bag.  Take a peek...


I used Echo Park Paper's My Favorite Fall to make the bag, along with Lori's Gift Bag with Scallop Handle (SVG, Silhouette).  Head over to Lori's Blog to see a tutorial showing how to print and cut stickers for various projects.
Have a great day!

Thursday, June 13, 2019

Lori Whitlock | Baby Shoe Favor Tutorial

Looking for a really cute Baby Shower Favor?  How about this adorable little Baby Shoe (SVG, Silhouette).   

This little shoe is easy to assemble and can be made in any color to match your shower theme! 
Start out by cutting the pieces.  You have 2 bottom pieces (each the same size) and the top of the shoe.

On the "wrong" side of one of the bottom pieces, I measured up about one inch from the heel and drew a line. (the bottom pieces both have a wider end which is the top of the shoe, and a narrower end which is the heel.)  You don't need to do this part, I just found it easier to place where to start gluing on the shoe top.


Starting at the 1" mark, glue the top of the shoe to the bottom piece going in the direction of the top of the shoe.


Continue all the way around the shoe, making sure there are no gaps.   When  you  are  done, there will be an overlap of one tab.


Add a little adhesive in the overlap of the top piece and secure.


Add the second bottom piece to the bottom of the shoe to cover the tabs.


All that is left is to glue the shoe strap  down and decorate!  I added a button to the strap and a little bow to the shoe top.  Now to fill it with a sweet treat!


This tutorial will also help with the assembly of the Explosion Box Baby Shoes File (SVG, Silhouette).  That's it for me today, thanks for stopping by to peek!

Thursday, February 7, 2019

Lori Whitlock | Silhouette Pop Up Creator Tutorial

Hi Everyone, I’m on the Lori Whitlock blog today with a fun tutorial showing how to use the Silhouette Pop Up Creator which is available in Silhouette Design Studio starting with version 4.1.  This is such a fun way to use all the shapes in your Silhouette Library!  I made this sweet kitty Valentine card using the cat from Lori Whitlock's Bobble Head Card Cat (SVG, Silhouette) and the Pop Up Creator.


To start, you want to select your shape.  Then trace your shape using the trace tool in Silhouette.  You also want to create two card base pieces, my first piece (pink) is 8.5" h x 5.5" w.  The second piece is slightly smaller at 8.375" x 5.375".  I added a dashed score line to the larger piece using the line creator and centered it so the card would fold in half.  I added a solid line and centered it to the smaller piece.  This line will be used as a guide and deleted later.


Next move everything off your mat, but the traced shape.  Select the shape by clicking on it and then click on the Pop Up Panel button on the right hand side.

Click on the Convert Selected Shapes in the Pop Up Menu.  This will add lines to your shape.


The Pop Up Creator creates a number of "support struts" that will make your shape pop out.  For cutting simplicity, it's easier to have fewer of these struts.  By increasing the number in the Minimum Strut Width, the number of struts will decrease.  I kept enlarging my number until I had 3 struts.  This is a good number for support and will take less time to cut.


Next you want to adjust the base width.  This is the size of the connection that will connect the bottom of your shape to the base.  I increased the number in the base width until the supports were just slightly narrower than the feet of my cat.


One final adjustment to the shape... You will want to increase the length of the score lines by increasing the Dash Pitch Number.  This will make for easier, shorter cutting time.


Now you want to add the pop up shape to your smaller card base.  Add the smaller base to your mat.  Move the Pop up shape so that the bottom most score lines align with the temporary center guide line you created.  Next, select both the card base and the pop up shape and align them so that they are centered using the Transform button.  Make sure the bottom score line is still aligned flush with the temporary guide line.


Delete your temporary guide line, and extend the score line on the bottom of the pop up shape by clicking on the red dot and dragging almost to the edge.  Repeat for the other side.


You can adjust how deeply the shape pops out by clicking on the dot on the center of the shape and dragging down to make it stick out more, or up for less.  Make sure that the height of the pop up shape is not higher than the height of your card when closed or it will stick out of the top.


Once you're happy with the placement, select both the pop up shape and the base, right mouse click and select group.


One more optional step.  If you look at the card I created you'll notice I cut patterned paper to cover the inside of my card which molds itself around the pop out shape.  This is actually pretty easy to do.  Start by creating a copy of your card base.  Select the copy (only) by clicking on it then right mouse click and select make compound path.


Click on the resulting shape to select and then click on the Offset Panel button on the right menu.

Click on the Internal Offset Button, then change the Distance number to be 0.8.  This creates the panel shapes inside the card base.


Drag the inside shapes out to separate and delete the remaining shapes.  I colored them blue in this picture so you can see them.


One final thing before cutting, when you send the pop up piece to cut, you'll notice the top of the shape's lines are grayed out.... this is correct, those lines are not meant to be cut.


Once you've cut all your pieces, they are easy to assemble..


Cut all the pieces and assemble the shape piece if needed.  Add the decorative panels you cut to the inside of the card.  The second picture (B.) shows how to fold the pop out piece.  Add the shape over the pop out design piece, and then glue the pop up base into the slightly larger base, making sure that you do NOT add any adhesive under the pop out pieces.

All that's left is to embellish!  I created a print and cut sentiment using Lori's Abby Font (SVG, Silhouette) and added a bow sticker and enamel hearts.  I also decorated the front of the card as well.  The papers are from Lori's Easter Wishes and Spring Fling collections by Echo Park Paper.


That's it for me today, thanks for stopping by to peek!