Showing posts with label 3D. Show all posts

Monday, March 2, 2020

Lori Whitlock | Rainbow Box

I have another rainbow project that I created for Lori Whitlock today!  This fun Rainbow Box (SVG, Silhouette) is the perfect way to package up a little something for someone special!  Take a peek...


It could be used as a table decoration for a St. Patrick's Day or Spring themed party!  It would also make a super cute gift set paired with the Rainbow Box Card in my last post.  I pieced this one together using some petite prints from Doodlebug Design and a fun little heart shaped sprinkle from Doodlebug's Love Notes Collection.  So bright and cheery!  That's it for me to day, thanks for stopping by to peek!


Monday, November 18, 2019

Doodlebug Design | Christmas Magic Gingerbread House Advent Calendar

Have you ever seen something in a store and said to yourself, "I could totally make that...?"  I always say this, but do I ever really make these items... not so much!  This year I saw the cutest Advent Calendar in a popular home furnishings catalog.  It was a "mountain" of little houses one for each day of December ...all lit up.  I decided I would make a Gingerbread House version using Doodlebug Design's Christmas Magic Collection!  Take a peek...


This was so a labor of love, but I'm thrilled with the results.  I started by making 25 of the little houses from some Kraft Petite Prints.   I thought they looked like gingerbread!  I added the little roofs using the papers from the Christmas Magic 6x6 pad.  I then set to decorating each of the houses using some Christmas Magic Doodle pops, Icon Stickers, Mini Icon Stickers and some of the Shaped Sprinkles.  Here are some close-ups of the individual houses...


For the doors I used Sprinkles Vellum.  The doorknobs on all of the houses are Peppermint Twist Shaped Sprinkles and the numbers are the Abigail Alphabet Stickers.   The layers between the houses were made from some Lily White Sugar Coated Cardstock.  All of the houses are "velcro'd " on so I can easily disassemble and pack away after the holidays.  To light it up, I added some remote control tea lights behind the houses... they're perfect because they don't get hot!  Even better, the doors of each of the houses open to hold a little treat!


Have you made any projects using Christmas Magic?  Be sure to tag Doodlebug Design on Facebook & Instagram!  We would love to see your creations.  That's it for me today, thanks for stopping by to peek!

Doodlebug Products Used
Christmas Magic Collection
Dot Stripe Petite Prints
Gingham Linen Petite Prints
Floral Graph Petite Prints
Sprinkles Vellum
Sugar Coated Cardstock
Abigail Alphabets


Monday, September 9, 2019

Doodlebug Design | I ❤️ Travel Cut Files!!

Hold on to your hats... I have some exciting news... the new Doodlebug Design I❤️Travel cut files are coming this week!!  I was so excited to get a sneak peek and decided to celebrate by using one of the files for my project today!


I made a little box card featuring the I ❤️ Travel Camera File.  I added a shaker to the lens piece and filled it with some seed beads.  I finished the card with some glitter sprinkles and a sentiment from the I ❤️ Travel Chit Chat Pieces!

Be sure to be on the look out for the new files in the Lori Whitlock SVG Shop and the Silhouette Store!  Also be sure to tag Doodlebug Design on Facebook & Instagram if you use one of the files in a project, we would love to see your creations!  That's it for me today, thanks for stopping by to peek!

DOODLEBUG PRODUCTS USED
I ❤️ Travel
Gingham Linen Petite Prints
Dot Stripe Petite Prints
Glitter Sprinkles

I ❤️ Travel Camera Cut file (coming soon!)

Monday, August 19, 2019

Doodlebug Design | School Days Box Card

I just love the Odds & Ends in the Doodlebug Design School Days Collection.  There are so many cute icons, and the rainbow of Doodlebug colors in the art supply icons makes me so happy!  I thought it would be fun to add them all to a box card, take a peek...


I used Lawn Fawn's Box Card Die to make the card base.  I then set to decorating it with some of the fun papers in the collection including the grid side of the Spelling Bee Paper and the fun paint-splattered side of the Good Measure Paper.    I thought it was cute to have the easel saying "you color my world" to the art supplies!  I finished it off with some of the little You're a Star Shaped Sprinkles.  This would be a great card for a teacher, friend or just because!
Have you made any projects using the School Days Collection?  Be sure to tag Doodlebug Design on Facebook and Instagram so we can see your creations!  That's it for me today, thanks for stopping by to peek! 

DOODLEBUG PRODUCTS USED
School Days -This & That
School Days - Spelling Bee
School Days - Good Measure
School Days - Chit Chat Pieces
School Days - Sprinkles - You're A Star
Petite Prints Collection - Gingham and Linen - Stone Gray

OTHER PRODUCTS
Lawn Fawn Box Card Die
Foam Tape
Adhesive

Thursday, August 15, 2019

Lori Whitlock | Teacup Box Card

I'm up on the Lori Whitlock Blog today with a tutorial showing how to assemble this fun Teacup Shaped Box Card.  These cards make such a pretty gift and can be displayed long after it is received!


I pieced this one together with some papers from Lori's My Favorite Fall Collection from Echo Park Paper.  I love the color combination!  For full details see my post on Lori's Blog here.  That's it for me today, thanks for stopping by to peek!


Monday, August 12, 2019

Doodlebug Design | School Days Pop Up Card

Happy Monday folks!  I'm excited to be kicking off a couple of weeks of School Days inspiration on the Doodlebug Blog. This year back to school is a little bittersweet for me... my daughter is starting her last year of college.  I can't believe she's almost done and that I'm old enough to have a college senior!  I will be happy to be done with tuition bills though!  Since I don't have a first day of school picture yet, I decided to make a little card with the collection.  If you haven't seen the little icons in this collection yet, you're in for a treat.  They are all so cute, but these little crayons just make me ridiculously happy!  Take a peek...


I immediately envisioned the crayons popping out of an  old school crayon box (remember... the 64 crayons with the sharpener in the back??)  I fashioned the box from the Very Primary and Arithmetic papers.  They were the perfect colors!  I added in the crayons with some foam tape to give them some dimension and completed the look with the sentiment from the This & That Stickers and some You're a Star Shaped Sprinkles.  Here  is a close-up..


I kept the front of the card simple, using a chit chat sentiment and the crayon stickers from the Icons Sticker sheet... and how cute is that crayon paper???


We would love to see your projects featuring the School Days Collection!  Be sure to tag Doodlebug Design on Facebook and Instagram so we are sure to see them!  That's it for me today, thanks for stopping by to peek!

Doodlebug Products Used
School Days - 6 x 6 Paper Pad
School Days - 12 x 12 Cardstock Stickers - This & That
School Days - Cardstock Stickers - Icons
School Days - 12 x 12 Double Sided Paper - Spelling Bee
School Days - 12 x 12 Double Sided Paper - Arithmetic
School Days - 12 x 12 Double Sided Paper - Playground Plaid
School Days - 12 x 12 Double Sided Paper - Very Primary
School Days - Chit Chat - Die Cut Cardstock Pieces
School Days - 12 x 12 Double Sided Paper - Color Me Happy
School Days - Odds & Ends - Die Cut Cardstock Pieces
School Days - Sprinkles - Self Adhesive Enamel Shapes - You're A Star
swimming pool mini paperclips 
limeade mini paperclips

Other Products
Lawn Fawn Stitched Rectangle Dies
Lawn Fawn Everyday pop-ups
Lawn Fawn stitched hillside border
Foam Tape

Monday, July 29, 2019

Doodlebug Design | I ❤️ Travel Shadowbox Card

I am so excited to be kicking off a couple of weeks of the fun new I ❤️ Travel Collection on the Doodlebug Blog today!  I've been waiting for Doodlebug to create a travel collection and this one does not disappoint!  My box came last week and I immediately dug in and have a lot of projects started!  For my first project, I created a fun shadowbox card... take a peek...


I love the little smiley faces on the sun and hot air balloon and thought they would make a cute card!  I used elements from the Chit Chat, Odds & Ends and Icon Stickers to make my little scene.  Oh and how could I forget, one of the cute little clouds from the Hello Sunshine Shaped Sprinkles.  


The card stands up on it's own, so it can easily be displayed.  I embellished the outside of the card with some of the new papers in the collection.  Here's a close-up of the inside...


I love how the layers give it such dimension!  That's it for me today.  Make sure to stop by the blog all this week and next for more I ❤️ Travel inspiration from the design team, you won't be disappointed!

Doodlebug Products Used
 I Heart Travel -  Icons Stickers
I Heart Travel  - Plaid To Be Here
I Heart Travel - Love This
I Heart Travel - Chit Chat
I Heart Travel - Odds & Ends
 I Heart Travel - Sprinkles - Hello Sunshine
 Petite Prints Gingham and Linen - Swimming Pool


Thursday, June 13, 2019

Lori Whitlock | Baby Shoe Favor Tutorial

Looking for a really cute Baby Shower Favor?  How about this adorable little Baby Shoe (SVG, Silhouette).   

This little shoe is easy to assemble and can be made in any color to match your shower theme! 
Start out by cutting the pieces.  You have 2 bottom pieces (each the same size) and the top of the shoe.

On the "wrong" side of one of the bottom pieces, I measured up about one inch from the heel and drew a line. (the bottom pieces both have a wider end which is the top of the shoe, and a narrower end which is the heel.)  You don't need to do this part, I just found it easier to place where to start gluing on the shoe top.


Starting at the 1" mark, glue the top of the shoe to the bottom piece going in the direction of the top of the shoe.


Continue all the way around the shoe, making sure there are no gaps.   When  you  are  done, there will be an overlap of one tab.


Add a little adhesive in the overlap of the top piece and secure.


Add the second bottom piece to the bottom of the shoe to cover the tabs.


All that is left is to glue the shoe strap  down and decorate!  I added a button to the strap and a little bow to the shoe top.  Now to fill it with a sweet treat!


This tutorial will also help with the assembly of the Explosion Box Baby Shoes File (SVG, Silhouette).  That's it for me today, thanks for stopping by to peek!

Saturday, May 4, 2019

Doodlebug Design | Hap-pea National Scrapbooking Day

Happy interNational Scrapbooking Day! We are celebrating all day over on the Doodlebug Design Blog.  I hope that you're able to get into your craft space and create today!  I was lucky enough to find some time to play today...so I pulled out my Doodlebug stash and my Silhouette and got to work!  As soon as I saw the adorable little vegetables in the Hoppy Easter Cut Files Collection, I knew I had to create a card for my gardening friend!  I saw the pea file, and my mind started churning... I decided to make a 3D box card with it!  Take a peek...


I started with the Hoppy Easter Peas File to make the pea pod box shape and the Hap-pea Birthday sign.  I added faces to the peas (I used the faces from the Simply Spring Bees file)  It needed one more thing so I decided to add little birthday hats to the peas.  I made the hats using the Sweet Party Hats File from the Fairy Tales collection.   The card folds flat for mailing.  I know my friend will love it!  Are you using any Doodlebug Cut Files or Collections for a project today?  Make sure to tag Doodlebug Design on social media, we'd love to see your creations!


Products Used:

Petite Prints Collection - 12 x 12 Double Sided Paper - Dot and Stripe - Citrus
Petite Prints Collection - 12 x 12 Double Sided Paper - Dot and Stripe - Limeade
Petite Prints Collection - 12 x 12 Double Sided Paper - Dot and Stripe - Grasshopper
Petite Prints Collection - 12 x 12 Double Sided Paper - Dot and Stripe - Kraft
Petite Prints Collection - 12 x 12 Double Sided Paper - Dot and Stripe - Beetle Black
Hoppy Easter Collection - 6 x 6 Paper Pad
Glitter Sprinkles - Self Adhesive Enamel Dots - Bon Bon

Cut Files:
Hoppy Easter - Peas(SVG, Silhouette)
Sweet Party Hat Fairy Tales (SVG, Silhouette)
Simply Spring Bees (SVG, Silhouette)

Other:
Pinsetter Font (for sign)

Monday, April 15, 2019

Doodlebug Design | Hoppy Easter Cut Files

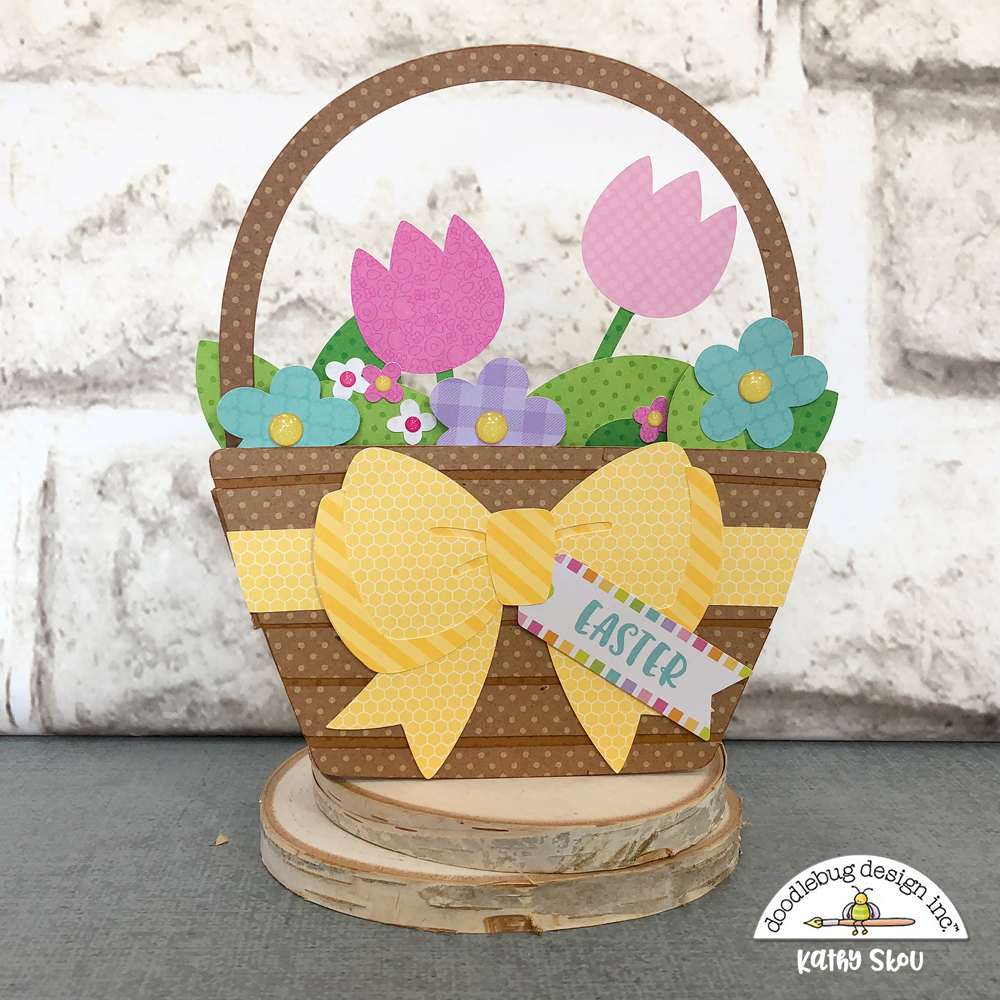
Have you seen the new Hoppy Easter Cut files available in the Lori Whitlock SVG Shop the Silhouette Store?  I can describe them in two words... cuteness overload! The bunnies, the chicks... absolutely adorable!  I decided to design some box cards with the files so that they can be displayed as decor as well!  Take a peek...


I started with the sweet little Hoppy Easter - Bunny 3 file.  I love how he is peeking out from the flower pot!  I used a combination of Hoppy Easter Papers and Dot Stripe Petite Prints to piece him together.  To complete the card I added some Glitter Sprinkles and the Hoppy Easter Odds & Ends banner piece.


For my next card I used the Hoppy Easter Basket of Flowers file.  I think this is one of my absolute favorites!  I combined papers from Hoppy Easter, Simply Spring and some more Dot Stripe Petite prints to make it, and finished it with some sprinkles and the Easter tag from the Odds & Ends pieces.  I think this would also make a nice card for Mother's Day!


For my last card I used the sweet little chicky from the Hoppy Easter Chick in Eggs File.  I made a full egg for the back drop to make him look like he's just hatching and finished him with some flowers and speech bubble from the Odds & Ends pack.  


Have you created any projects using the Hoppy Easter Collection or Cut files?  We would love to see what you made, so be sure to tag Doodlebug Design on Facebook (@Doodlebug Design) and Instagram(@doodlebugdesign).  That's it for me today, thanks for stopping by to peek!


Products Used:

Hoppy Easter Collection - 12 x 12 Double Sided Paper - Jellybean Plaid
Hoppy Easter Collection - 12 x 12 Double Sided Paper - Sunday Dress
Hoppy Easter Collection - 12 x 12 Double Sided Paper - Hoppy Easter
Hoppy Easter Collection - Odds and Ends - Die Cut Cardstock Pieces
Hoppy Easter Collection - 6 x 6 Paper Pad
Simply Spring Collection - 12 x 12 Double Sided Paper - Bright Bunch
Simply Spring Collection - 12 x 12 Double Sided Paper - Bee Happy
Simply Spring Collection - Sprinkles - Self Adhesive Enamel Shapes - Spring
Glitter Sprinkles - Self Adhesive Enamel Dots - Bumblebee
12 x 12 Double Sided Paper - Dot and Stripe - Lilac
12 x 12 Double Sided Paper - Dot and Stripe - Lily White
12 x 12 Double Sided Paper - Dot and Stripe - Grasshopper
12 x 12 Double Sided Paper - Dot and Stripe - Limeade
12 x 12 Double Sided Paper - Dot and Stripe - Lemon
12 x 12 Double Sided Paper - Dot and Stripe - Bon Bon
12 x 12 Double Sided Paper - Dot and Stripe - Kraft
Kitten Smitten Collection - Matte Sprinkles - Self Adhesive Enamel Dots - Cat 


Thursday, April 11, 2019

Lori Whitlock | Easter Egg Diorama

I have a tutorial on the Lori Whitlock Blog today showing how to assemble this adorable little Easter Egg Diorama (SVG, Silhouette)  It's such a cute little decoration and reminds me of those sugary eggs with their cute little spring scenes!  Take a peek...


I used papers from Doodlebug's Simply Spring and Hoppy Easter collections to piece it together.  The little bunny is from the Hoppy Easter Odds & Ends.  I used it in place of the bunny that came with the file.


For full assembly details head over to Lori's blog here.  That's it for me today, thanks for stopping by to peek.

Monday, March 18, 2019

Doodlebug Design | Simply Spring Shadow Box Cards

It's been a long winter here in the New England... I'm more than ready for some spring and good weather!  So you can imagine how excited I was to get my Doodlebug box full of then new Simply Spring Collection.  I love every single thing about this collection!  The colors, the patterns, the embellishments... I've said it before and I'll say it again, only Doodlebug can make a bug that is cute!  I immediately ran into my craft room and started playing! I created these fun Shadow Box cards...


I love Shadow Box Cards, and the Odds & Ends Pieces from the Simply Spring Collection made it so easy to create fun little scenes.  I started with the cute little blue birds, and the punny Happy Birdie to You sentiment from the Chit Chat pieces.  How cute is that little bumble bee from the Little Critters Shaped Sprinkles??


My next card features the cute little frog from the Odds & Ends, and the Hoppy Birthday Sentiment.  For my little scene I added a couple of Doodlebug cut files, the Fox Tails are from the On The Farm Cut File Collection and the Lily Pad is from the Pot O' Gold Cut Files.  To finish it off I added the cute little dragon fly from the Little Critters Sprinkles.


For my last card I used a lot of the flowers from the Odds & Ends to make a little "garden" for the little bumblebees to fly around.  I also added a couple of the cute little flower shaped sprinkles from the May Flowers Shaped Sprinkles.


I have so many more ideas for this fun collection, I may have to stock up on more!!  Have you made anything using the Simply Spring Collection?  Be sure to tag Doodlebug Design on Social media, we would love to see your creations!  That's it for me today, thanks for stopping by to peek!

Products Used

Hoppy Spring double-sided cardstock
Blue Skies double-sided cardstock
Bright Bunch double-sided cardstock
Bee Happy double-sided cardstock
Under My Umbrella double-sided cardstock
Simply Spring 6x6 Paper Pad
Simply Spring Chit Chat Pieces
Simply Spring Odds & Ends
Simply Spring Blooming Bugs doodlepops
May Flowers Shaped Sprinkles
Little Critters Shaped Sprinkles
limeade dot-stripe petite prints
bon bon dot-stripe petite prints 
Fox Tails On The Farm SVG File
Frog Girl Pot O' Gold SVG File


Wednesday, March 13, 2019

Lori Whitlock | Easter Bunny Truck Box Card

Have you seen the newest Truck Box Card from Lori Whitlock?  This Box Card Truck Easter Bunny (SVG, Silhouette) is absolutely the cutest!


That bunny tail is absolutely adorable... and I love the little license plate!  I put the card together using some Simply Spring and Petite Print papers from Doodlebug Design.  This card would look so cute as a seasonal decoration and it folds flat for mailing!

That's it for me today, thanks for stopping by to peek!

Wednesday, February 6, 2019

Lori Whitlock | A Purrfect Valentine

Have you seen Lori Whitlock's new Shadow Box Card Scene Valentine Bundle? (available individually in the Silhouette Store here)  I just love these little cards, they are so cute and so easy to assemble since the characters are done using Print and Cut!  Being a cat lover, of course I had to make the cute Cat version (SVG, Silhouette) of the card....


I used the Lori's new Easter Wishes Collection for Echo Park Paper to piece it together.  The colors are perfect for Valentine's and Spring!   For a full tutorial for Lori's Shadow Box Scene Cards, see her YouTube Channel here.   That's it for me today, thanks for stopping by to peek!

Tuesday, December 11, 2018

Lori Whitlock | December Creative Team Blog Hop


Hi Everyone!   It's time for the December Creative Team Blog Hop over at Lori Whitlock!  You should have arrived here from Traci's Blog.  Here's the order for today's hop!

The Christmas Season is in full swing!  I decided to make this fun A2 Santa Chimney Box Card (SVG, Silhouette) to have on hand for someone special!


The papers, sprinkles and sentiment are from Doodlebug Design.

There's a sale happening in the Lori Whitlock SVG Shop!  Use code DEC2018 to get 30% off all SVGs and Commercial Licenses!


Also, how about a free file!!  This file is free for today only!  No code or minimum required.


Finally, how would you like to win a $20 Coupon to Lori's SVG Shop!


a Rafflecopter giveaway

That's it for me today, your next stop on the hop is Brandie!  Have a great day!


Monday, November 12, 2018

Doodlebug Design | Christmas Town Advent Calendar

The holidays are upon us!  I was so excited to see the new  Doodlebug Design Christmas Town Collection... the little characters and icons are too cute! I thought they would be adorable as part of an Advent Calendar... so I decided to make one!   I worked with my Silhouette Model Maker Software and designed my first SVG file!  I work for Lori Whitlock so she helped me to fine-tune the details.  I'm so happy with the results, and it's even cuter using the new Christmas Town Collection!  Take a peek...


For the tree base and star I used some new Dot-Stripe Petite Prints in Grasshopper and Lemon.  I added the little pockets using some of my favorite patterned papers from the Christmas Town collection including the Festive Flurry, Christmas Cookies, Snow Much Fun, Christmas Jammies, Berry Christmas, and Merry Hearts.  I then decorated each pocket using the Icon Stickers Sheet, Mini Icons, Baby Hearts Shape Sprinkles, Holly Berries Shape Sprinkles, and Festive Flurry Shape Sprinkles.  Here are some close-ups of the pockets...


It's going to be so fun to countdown with this sweet {literally lol} calendar! The tree file is available in the Lori Whitlock SVG Shop and will be available in the Silhouette Store Soon!   Be sure to stop by the Doodlebug Design Blog all week for more Christmas Town Inspiration from the Design Team!  That's it for me today, thanks for stopping by to peek!