Showing posts with label paper crafts. Show all posts

Wednesday, July 29, 2020

Lori Whitlock | Purse with Pocket

How cute is this little purse?  It's the new Purse with Pocket SVG file from Lori Whitlock.  Take a peek...


The checked paper is from Lori's Forward in Faith Collection for Echo Park Paper.  It makes the purse look like something you'd find in Nordstrom!  This bag is the perfect size to hold a gift card or a small present.    
That's it for me today, thanks for stopping by to peek!

Sunday, September 29, 2019

Doodlebug Design | Candy Carnival Shadow Box Card

I'm excited to be kicking off a few weeks of Doodlebug Design Candy Carnival inspiration!  If you haven't seen the collection yet, you're in for a treat!  The colors and adorable icons are sure to put a smile on your face!  I received my box and immediately dug in to create this fun Trick or Treat Shadow Box Card.  Take a peek...


The Odds & Ends are one of my all-time favorite Doodlebug embellishments.  They make it so easy to create cards and layouts.  I started with the little girl in the kitty costume and the black kitty Doodlepop... because black kitties are my favorite ... I added a night sky scene and some pumpkins along with the little bat sticker from the Icon Sticker Sheet to create a fun Halloween scene.  I finished it off with some of the Halloween Night Star shaped sprinkles and a sentiment from the Chit Chat pieces.  

This collection has my mind in a whirl... so many projects, so little time!  I can't wait to create more!  Have you created anything with Candy Carnival?  Be sure to tag Doodlebug Design on Facebook and Instagram...we would love to see your projects!  That's it for me today, thanks for stopping by to peek!

Doodlebug Products Used
Candy Carnival Collection
Dot Stripe Petite Prints

Monday, September 9, 2019

Doodlebug Design | I ❤️ Travel Cut Files!!

Hold on to your hats... I have some exciting news... the new Doodlebug Design I❤️Travel cut files are coming this week!!  I was so excited to get a sneak peek and decided to celebrate by using one of the files for my project today!


I made a little box card featuring the I ❤️ Travel Camera File.  I added a shaker to the lens piece and filled it with some seed beads.  I finished the card with some glitter sprinkles and a sentiment from the I ❤️ Travel Chit Chat Pieces!

Be sure to be on the look out for the new files in the Lori Whitlock SVG Shop and the Silhouette Store!  Also be sure to tag Doodlebug Design on Facebook & Instagram if you use one of the files in a project, we would love to see your creations!  That's it for me today, thanks for stopping by to peek!

DOODLEBUG PRODUCTS USED
I ❤️ Travel
Gingham Linen Petite Prints
Dot Stripe Petite Prints
Glitter Sprinkles

I ❤️ Travel Camera Cut file (coming soon!)

Tuesday, July 16, 2019

Lori Whitlock | Wooden Flower Crate Box Card

I have a peek of one of the new files added to the Lori Whitlock SVG Shop this week!  Check out this fun Box Card Wooden Flower Crate File (SVG, Silhouette).  Its so bright and cheery and reminds me of our local farmer's market!


I pieced this card together using some Petite Prints from Doodlebug Design.  This card is a great all-purpose cards, and is certain to brighten someone's day!  Be sure to stop by the Lori Whitlock blog to see all of the new files being released this week!  That's it for me today, thanks for stopping by to peek.

Monday, March 11, 2019

Lori Whitlock | Chick Favor Box

Hi Everyone!  Spring and Easter will be here before you know it!  Lori has a number of new favor boxes in her shop, and this adorable Chick Favor Box (SVG, Silhouette) is perfect for Spring gift giving!


The box is really simple to assemble, just fold up the sides of the box and glue in place, then add the embellishments. I added some wiggle eyes for my chick box... because everything is more fun with wiggle eyes!  The papers are Dot Stripe Petite Prints from Doodlebug Desig.  The box is the perfect size to hold a small gift or bag of treats.  Lori has a bundle of these cute Animal Favor Boxes here in here shop and they are also available individually in her shop and the Silhouette Store.


That's it for me today, thanks for stopping by to peek!


Monday, September 3, 2018

Doodlebug Design: More So Much Pun Cards

There are so many puns in the So Much Pun Collection, it's perfect for a pun-fanatic like me!  The only problem I have is choosing which ones to use next!  I finally narrowed down my selection to make these "punny" cards!


Every time I see the sweet little faces on the pill bottle and pills I laugh.  I decided to add them all along with the tissue box from the Odds & Ends into a doctor bog box card.  Who wouldn't "pill" better looking at these cute faces!  The bag was assembled using some of the new Dot Stripe Petite Prints.


I fell in love with all of the adorable dinosaurs in the Odds & Ends and knew I wanted to use a few of them on a card.  I decided to make a little shadowbox so that I could feature a bunch!  I used the Palm Tree side of the T-Riffic Cardstock and the Kraft Dot-Stripe Petite Prints for the box and then added a few of the dinosaurs to the various layers.  As always, there was the perfectly punny sentiment in the Chit Chat Pieces.


Like the pills, the faces on the pieces of pop corn make me smile!  I made a fun slider card where one of the cute little popcorn pieces pops up out of the popcorn container!  I love the Check side of the Fantas-Taco Cardstock and the Order pad side of the Perfect Combo Cardstock!  I mixed them with the Ladybug and Lily White Floral-Graph Petite Prints to make some fun layers!


Make sure to stop by the Doodlebug Design blog all this week for more So Much Pun Inspiration!  That's it for me today, thanks for stopping by to peek!


Tuesday, March 13, 2018

Lori Whitlock: March Creative Team Blog Hop


Hi Everyone!   It's time for the March Creative Team Blog Hop over at Lori Whitlock!  You should have arrived here from Traci's Blog.  Here's the order for today's hop!

Today is the third Nor'easter  in the last 8 days here in Massachusetts.  Expecting 12-16 inches of snow.  So I needed a little spring!  I made Lori's Bobble Head Sheep Card (SVG, Silhouette) and used the happy spring sentiment!


I used papers from Lori's Sweet Baby Boy and Sweet Baby Girl collections from Echo Park Paper.


Also, how about a free file!!  This file is free for today only!  No code or minimum required.


Finally, how would you like to win a $20 Coupon to Lori's SVG Shop!


a Rafflecopter giveaway


That's it for me today, your next stop on the hop is Brandie!  Have a great day!


Monday, March 5, 2018

Doodlebug Design: Abigail Font Stickers

Hi Everyone!  Today I have some fun cards I created for Doodlebug Design.  I love a good font and the Abigail Font Stickers do not disappoint!  They are a sweet, handwritten font that are fun to mix and match with other Doodlebug Font Stickers and words from the This and That Sticker Sheets!  I used them to make some punny (I can't resist a good pun...) cards, take a peek!


I love making and receiving interactive cards!  For my first card, I created a penny slider easel card using the Rainbow with Clouds cut file from the Fairy Tales Collection and the cute little acetate sun from the Spring Things Odds & Ends Collection..  The cloud paper is from the Spring Things 6x6 Pad and the other papers are from the Petite Prints Collections.


The Abigail Font Stickers in Bumblebee were perfect for my sentiment!  And when you tip the card, the little sun moves along the rainbow!


My next card is a slider card I created using the base of this cut file from Lori Whitlock and papers, stickers and Odds & Ends from the Kitten Smitten Collection.


The Abigail Stickers in Bumblebee coordinated perfectly with the word sticker from the Kitten Smitten This and That Sticker Sheet!  Now for the fun part, when you pull the tab of the card, the kitties get close together!  So cute!!


My last card is a bobble card featuring Papers, Stickers, Odds & Ends and Tiny Heart Shape Sprinkles from the So Punny Collection.


The little tea cup is on a spring and wobbles!  The Abigail stickers in Cupcake were perfect for my sentiment!
Be sure to stop by the blog over the next couple of weeks for more projects featuring the Abigail Font Stickers!  That's it for me today, thanks for stopping by to peek!


Monday, February 19, 2018

Doodlebug Design: Interactive Chit Chat Cards

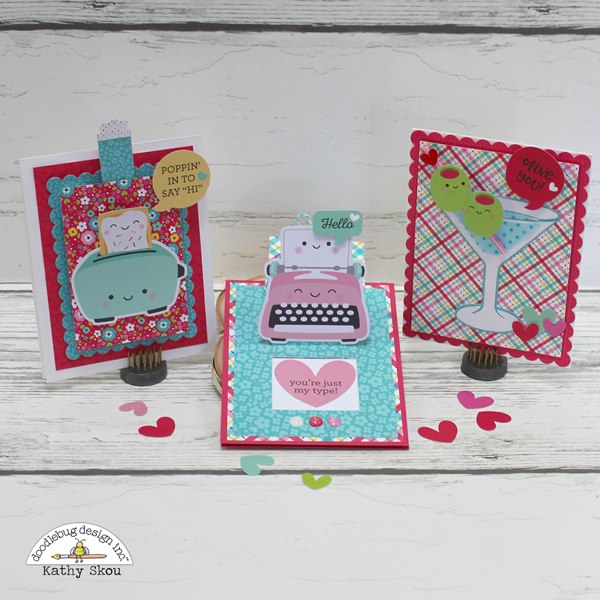
Hi Everyone!  I have some fun cards I created for Doodlebug today!  I just love how easy card making has become now that we have the Chit Chat pieces!  Along with the Odds & Ends, they have made it SO easy to put together an awesome card!  I decided to make a few interactive cards focusing on the Chit Chat pieces from the So Punny collection.  Take a peek...


I had such a fun time with these cards!  The first card is a slider card.  I cut a slot in the toaster piece so that the pop tart could "pop out" when the slider tab is pulled.  All I needed to complete the card is the adorable chit chat sentiment!  


My next card is also a type of slider card.  I started with the base of this cut file, and then added the fun typewriter from the Odds & Ends and the two sentiments from the Chit Chat Pieces.  The great thing about the Chit Chat speech bubbles is that if you like, you can cut off the "tail" and just have the sentiment !  I did that with the heart "just my type" piece.  All you do is pull the tag piece of the card and the Chit Chat Sentiment is revealed!


For my last card I used some Action Wobble Mini Springs to make the olives like little bobble heads!  When you tap them they wobble!


All I needed to complete the card is the "olive you" Chit Chat speech bubble and I also added some of the little Chit Chat hearts as well.

Since seeing the cards in action is much more fun than still pictures, I put together this fun little video showing the cards in action.


That's it for me today, thanks for stopping by to peek!


Thursday, February 15, 2018

Lori Whitlock: Using Pattern Fills in Silhouette

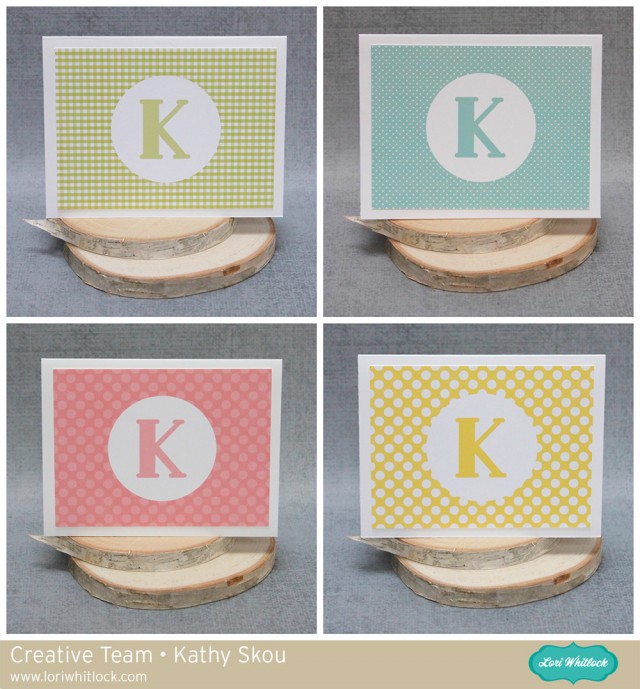
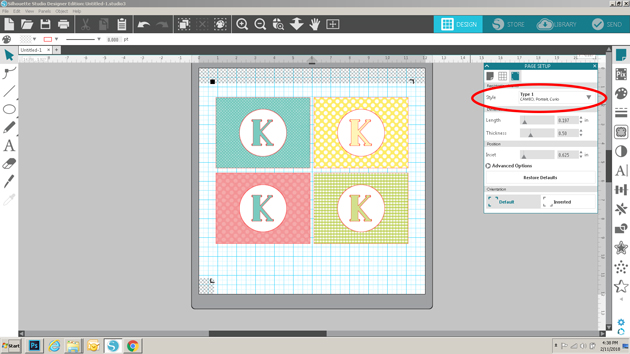
Hi Everyone!  Today I have some fun monogrammed note cards I created using Lori Whitlock's Pattern Fills and my Silhouette.  When I was younger, I always had note cards lying around in case I needed to write a thank you or thinking of you card.  These days with email and texting, it seems like a lost art, but I still think it's important to send a hand written note for some situations!  I created these to have on hand, in case nothing but a hand written note would do!

Before I show how I created the cards, I thought it would be helpful to show how to add these patterns to your Silhouette Library.  Once you've purchased the files from Lori's Shop (they are not available through the Silhouette Store) you want to unzip the file.  Next you will want to open your Silhouette Library, and also open another window showing the Fill files on your computer.  To add them in bulk to your library, select all of the files at once, click and drag them over to the Patterns category of your library as shown below...
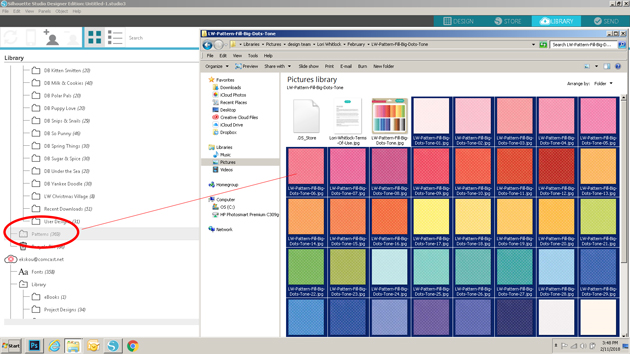

This will add all of the files to your Silhouette library at once, and they will be available for use through the Patterns category of the Fill function.  Now for the cards themselves.  I actually didn't create the whole card in Silhouette, just the front layer.  By creating just this layer, it enabled me to get more per piece of paper since I wasn't cutting the entire card.  I started by opening my Silhouette software and creating a 3.75" x 5" rectangle.  This is the size of my front layer and allows for a .25" border all around. (my note cards are standard A2 sized or 5.5" x 4.25")


Next, I added the fill to this rectangle.  To do this I clicked on the fill button (the paint palate icon), then selected fill pattern (the dotted button).  This brings up all of the fills I've loaded to my Silhouette Library.  I scrolled down until I found the pattern.  I clicked on my shape to select it, then clicked on the pattern fill I wanted.


The next step was to create the Monogram Circle.  I started by drawing a circle using the shape tool.  I sized it to be 2.5".   I filled that circle with white using the Fill function, selecting the circle and clicking on the white square.


For the letter I chose Lori's Deco Font (Lori's Shop, Silhouette) and sized my letter to 100.


I wanted my letter to be the same color as my background.  To do this, I first selected my letter by clicking on it, and opened the Fill Window.  I clicked on the dropper icon, then moved over to a blue area on my background piece and clicked.  This added the background color to my letter.


The last steps of design were simply to center everything for printing.  I first centered the letter in my circle using the Transform Panel.


Using the same buttons, I then centered the circle on my background.


Once everything was centered, I selected all portions of the design, right mouse clicked and selected group.  This is a very important step.  It allows you to cut just the outside of the design when using the Silhouette  print and cut function.


I created a few different cards using the same method and some different fills.  I then set up the printer registration marks by selecting Page Set Up, Registration marks and Type 1 Cameo.  I have a wide format printer, so I can print 12" x 12".  If you're using a standard printer, you would set up the paper size to be 8.5" x 11" (from the page set up menu) and you would need to print 2 per page rather than 4.


I then sent the file to print.


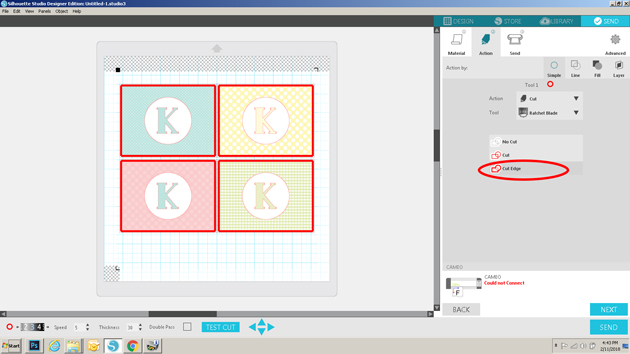
Once printed, I clicked on send, selected my media, then most importantly selected cut edge under action.  Since I grouped each of the cards to be one file, this will insure that only the edges of the card fronts are cut.  I then sent it to cut.


To finish my cards, I glued the front layers to a standard A2 Card ( paper cut to 5.5" x 8.5" then folded in half for card).


These would make a fun gift for a friend or family member!  I've also used the same process to make thank you notes for my daughter to send to companies she has interviewed with for her summer internship!  The possibilities are endless.   That's it for me today, thanks for stopping by to peek!

Wednesday, January 10, 2018

Doodlebug Design: Cream & Sugar Cards

Hi Everyone!  Today I have some fun cards I created using the fabulous Doodlebug Design Cream & Sugar Collection!  I have to say that this is one of my all time favorite collections.  The little coffee cups, the sugar cubes, the sweet treats... all just too cute!  Take a peek...


For my first card, I used the coffee cups from the Odds & Ends Package and the cute "punny" sentiment from the Cake Sprinkles Double Sided Cardstock .  The card base is from this cut file that I altered to fit my needs.  I like this card because it can be used for Valentine's Day or you could send it "just because."


My next card is a shaker card.  I just love shaker cards!!!  I started by cutting a heart shape in my base, then filling the shaker with some Doodlebug sequins and some X's and O's I cut out using my Silhouette.  The sweet candy hugs and kisses from the Odds & Ends pack and the Hugs & Kisses sentiment from the Cake Sprinkles Double Sided Cardstock topped it all off!


My last card I think is my favorite.  I love puns.  I use them liberally.  It makes my daughter roll here eyes.  So when this idea popped into my head, I couldn't resist.  I used the donut and the coffee cup from the Odds & Ends, and added some speech bubbles I made using the Booville Bubble Sayings cut file, and finished it with the Happy Valentine's Day sticker from the This & That Sticker Sheet.  The easel card base was made using this cut file.


I can't wait to send these out!  That's it for me today, thanks for stopping by to peek!


Tuesday, January 9, 2018

Lori Whitlock: January Creative Team Blog Hop


Hi Everyone!   It's time for the January Creative Team Blog Hop over at Lori Whitlock!  You should have arrived here from Traci's Blog.  Here's the order for today's hop!
For my project I created some Valentine's Day themed Hand Sanitizer Holders!  Because Valentine's Day is smack in the middle of cold & flu season!  I know many teachers who would love one of these!


I started with the base of the Hand Sanitizer Holder Snowflake .(in Silhouette Store)  Instead of the snowflake, I re-sized and cut both the 3 Succulents File (in Silhouette Store)  and the typewriter from the A2 X-Card Typewriter (in Silhouette Store) file and added them to the front of the holder.  I created the little "punny" tags using the Tag Dingbats Font (b)(in Silhouette Store)  and Lori's Perfect Type Font..(in Silhouette Store)  The papers are Gingham Linen Petite Prints from Doodlebug Design.

 And now a few things for you!  First, Lori is having a 30% off Sale in her SVG Shop!  Just use code DEC2017 to get the discount!


Also, how about a free file!!  This file is free for today only!  No code or minimum required.


Finally, how would you like to win a $20 Coupon to Lori's SVG Shop!


a Rafflecopter giveaway

That's it for me today, your next stop on the hop is Anita  !  Have a great day!