Showing posts with label So Punny. Show all posts

Tuesday, January 8, 2019

Lori Whitlock | January Creative Team Blog Hop


Hi Everyone!   It's time for the January Creative Team Blog Hop over at Lori Whitlock!  You should have arrived here from Lori's Blog.  Here's the order for today's hop!

Lori Whitlock
Kathy Skou {You are here}
Anita Mulcahey
Brandie Adams
Brigit Mann
Michelle Zerull
Aimee Kidd
Ashley Cook
Cathy Harper
Corri Garza


I made Lori's new Valentine's Mailbox 2 file!  It's so cute and it can hold a little treat!


The papers and heart sprinkles are from Doodlebug Design's So Punny Collection.

I put together a quick tutorial showing how to assemble the mailbox.


1. Cut pieces and add decorative panels to the mailbox base and door. I added 1/4" score tape to the tabs.
2. Add the door to the mailbox base by tucking the tab to the back of the base piece and securing with adhesive.
3. Use the edge of your table or a dowel to curl the mailbox top, and adhere to mailbox base.  Add the handle by inserting into slots and gluing in place.
4.  Add the bottom piece to the mail box base, folding the mailbox base around it and securing.  Fold up the final side of the mailbox and secure.
5. Add the top shoot inside support piece inside the box, flush with the bottom score line of the mailbox opening.
6.  Bring mailbox top up and around the top of the base, gluing the tabs inside the box to complete.


There's a sale happening in the Lori Whitlock SVG Shop!  Use code JAN2019 to get 25% off all SVGs and Commercial Licenses!


Also, how about a free file!!  This file is free for today only!  No code or minimum required.


Finally, how would you like to win a $20 Coupon to Lori's SVG Shop!


a Rafflecopter giveaway

That's it for me today, your next stop on the hop is Anita!  Have a great day!


Monday, April 16, 2018

Doodlebug Design: Sprinkle Cards

I'm kicking off a couple of weeks of  projects focusing on embellishments on the Doodlebug Design Blog this week.  I have to admit, I have a hoarding issue when it comes to Doodlebug Sprinkles.  Original, Glitter, Shaped... I absolutely love them all and I make sure that every project I use them on is "sprinkle worthy."  So when the Design Team was challenged to feature Sprinkles and other embellishments I set out to come up with some very "worthy" projects... take a peek...


I love using sprinkles with Doodlebug's Cut Files, they are the perfect way to "dress" them up.  I started with the new Sweet Summer Strawberry Margarita SVG file from the Lori Whitlock SVG Shop for my first card. I used papers from the Gingham Linen Petite Prints, Down on the Farm and So Punny 6x6 Pads.  I added some Ladybug Glitter Sprinkles to the "dots" on the strawberries, some Cupcake and Bubblegum Glitter Sprinkles for the cheeks and some Beetle Black Sprinkles for the eyes. To finish it off I added a "sugared rim" to my margarita using some Lily White Chunky Glitter.


For my next card, I started with this SVG file for the card base.  I added a porthole circle to the front with some sprinkles "rivets" from the Black and White Assortment Glitter Sprinkles Pack.  I wanted it to look like my fish were floating so I cut the inserts for the card from transparency material.  For my under sea scene I used the Sea Weed SVG from the Under the Sea cut files, one of the Minnows Mini Doodle-pops and some Anchor's Aweigh and Under the Sea Shaped Sprinkles.


For my last card, I started with the Jar of Hearts SVG file from the Flea Market Collection to create a shaker card.  I added a few of this flower from the Easter Express collection. To embellish the flowers, I added the smallest sprinkles around the centers (Limeade Glitter Sprinkles, Bumblebee Glitter Sprinkles, Tangerine Glitter Sprinkles and Lily White Sprinkles.   I added some larger glitter sprinkles to my Jar for the "marbles" and finished it off with a Ladybug Shaped Sprinkle!  The sweet sentiment is a speech bubble from the So Punny This and That Sheet.  I cut off the tail, and punched a hole so I could tie it on with twine.


Be sure to stop by the Doodlebug blog over the next couple of weeks for more Embellishing ideas from the Design Team!  That's it for me today, thanks for stopping by to peek!


Monday, February 19, 2018

Doodlebug Design: Interactive Chit Chat Cards

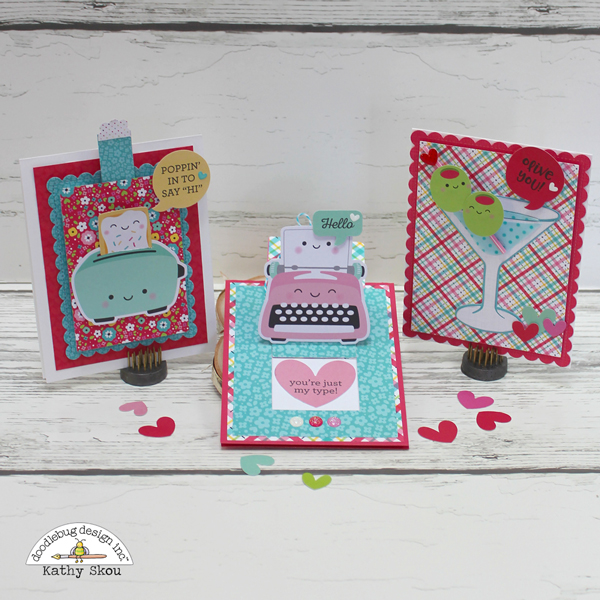
Hi Everyone!  I have some fun cards I created for Doodlebug today!  I just love how easy card making has become now that we have the Chit Chat pieces!  Along with the Odds & Ends, they have made it SO easy to put together an awesome card!  I decided to make a few interactive cards focusing on the Chit Chat pieces from the So Punny collection.  Take a peek...


I had such a fun time with these cards!  The first card is a slider card.  I cut a slot in the toaster piece so that the pop tart could "pop out" when the slider tab is pulled.  All I needed to complete the card is the adorable chit chat sentiment!  


My next card is also a type of slider card.  I started with the base of this cut file, and then added the fun typewriter from the Odds & Ends and the two sentiments from the Chit Chat Pieces.  The great thing about the Chit Chat speech bubbles is that if you like, you can cut off the "tail" and just have the sentiment !  I did that with the heart "just my type" piece.  All you do is pull the tag piece of the card and the Chit Chat Sentiment is revealed!


For my last card I used some Action Wobble Mini Springs to make the olives like little bobble heads!  When you tap them they wobble!


All I needed to complete the card is the "olive you" Chit Chat speech bubble and I also added some of the little Chit Chat hearts as well.

Since seeing the cards in action is much more fun than still pictures, I put together this fun little video showing the cards in action.


That's it for me today, thanks for stopping by to peek!


Monday, February 5, 2018

Doodlebug Design: So PunnyTreat Bags

When my daughter was in grade school I used to love sending in fun, homemade treats and crafts to her class.  She's a sophomore in college now, so I've had to switch gears!  Instead of class treats, I go for dorm treats!  Her friends always appreciate a little something sweet!  For this Valentine's Day I put together little treat bags featuring the So Punny Collection from Doodlebug Design... take a peek!


How cute are these little bags??  The bag was created using the Lawn Fawn Goodie Bag Die some of the papers from  So Punny.  To finish them off, I added some fun So Punny Odds & Ends and Chit Chat pieces to tags (and of course those ADORABLE Tiny Hearts Sprinkles) and tied them together with some Doodle Twine!  Here are some close-ups of each bag...


I know the girls will probably roll their eyes at the puns...but we all know that they secretly love them! Now to box them up and send them in a care package!  That's it for me today, thanks for stopping by to peek!


Monday, January 29, 2018

Lori Whitlock: Pop Up Kitty Card


Hi Everyone! Today I'm showcasing one of Lori Whitlock's new Pop Up Card Cat (SVG, Silhouette) !  Being a crazy cat lady, this card was right up my alley!! This card is super easy to assemble (see the video tutorial here)  I decided to customize it for my friend Jenn who has a sassy black and white kitty named Mr. Harley.


To add the black patches, I cut the face, tail and body of the cat from both black and white cardstock.  I then cut the black cardstock to reflect Mr. Harley's coloring and gave him a bow-tie as well.  To finish, I cut some decorative panels for the inside of the card from some Doodlebug Design's So Punny papers.( they are sized 3.875" x 5.125").  There's also a dog version of this card (SVG, Silhouette) ... you could customize for your "dog mom" friends! Here is a picture of the real Mr. Harley... you can follow his antics on Instagram here!


 I can't wait to send it to my friend!  That's it for me today, thanks for stopping by to peek!

Wednesday, January 17, 2018

Doodlebug Design: So Punny Cards

Hi Everyone! Today I have some fun cards featuring the new So Punny Collection from Doodlebug Design!  It's no secret, I love a good pun and this collection does not disappoint!  The Chit Chat Pieces and Odds & Ends make putting together cards so quick and easy!  Take a peek...


For my first card, I made a shadow box type card by layering different sized frames, with pop dots between the layers for dimensions.  I added the little tomatoes from the Odds & Ends and the speech bubble from the Chit Chat Pieces.  To finish, I added one of the Tiny Heart Sprinkles and done!


For my next card, I started with this card base cut with my Silhouette.  For the center I attached 2 of the soda can Odds & Ends back to back over a piece of Doodle Twine so that they floated in the middle.  Then I just added the "soda-lightful" saying from the Chit Chat pieces and done!  


Finally for my last card, I used a center box card base to showcase the adorable sewing machine and thread Odds & Ends Pieces.  The speech bubble and the Just Because Banner are from the Chit Chat Pieces. 


I really love how this collection is great for both everyday and Valentine's themed projects!  I've listed the products used for each card below.  That's it for me today, thanks for stopping by to peek!