Showing posts with label Chit Chats. Show all posts

Thursday, July 16, 2020

Doodlebug Design | Bar-B-Cute Clean & Simple Cards

Although most of my projects are 3D, or more involved, I do have a love for clean and simple cards.  Clean and Simple cards are uncluttered, lots of white space with one main focal point.  Doodlebug's Odds & Ends along with the Chit Chat Pieces are the perfect combination to make this type of card.  I used the new Bar-B-Cute Collection to make a few...take a peek...


These cards really went together in a flash.  I die-cut some rectangles from white cardstock and a slightly larger rectangle from the Bar-B-Cute 6x6 Pad and layered onto a card base for each card.  All that was left was to add the Odds & Ends and a coordinating Chit Chat Sentiment.  I popped them up with some foam tape because.. well I needed some dimension lol.  Here are some close ups...


There are so many great combinations of Odds & Ends and Chit Chat pieces .  You could make dozens of cards with them along with some patterned paper.  It would make such a fun gift to package them all together with some envelopes!  That's it for me today, thanks for stopping by to peek!

DOODLEBUG PRODUCTS USED:
Bar-B-Cute Collection

OTHER:
Rectangle dies
Foam Tape


Monday, December 3, 2018

Doodlebug Design | Christmas Town Cut File Cards

Christmas Card season is in full swing!!  When I saw the new Doodlebug Design  Christmas Town Cut File Collection, I just knew I had to get cutting!  The only problem was how to narrow down my selections, all of the little icons are just too cute!  I will definitely be making more soon... but I was able to narrow it all down for these cards...


As soon as I saw the adorable Snowman Look Up File, I knew I had to use it!!  His cute little face was too much cuteness to resist!  I decided to make a shaped card, and added a little banner using the Snowflake cut file from the Milk & Cookies Collection.  I used some Lily White Teensy Type letters to add the word JOY to the banner. I used some of the new Dot-Stripe Petite Prints to piece him together.


My next card is a box card I created using the Present Mouse cut file.  I made a box of the present file and had the little mouse pop up from inside!  The tag is from the Christmas Town Chit Chat pieces.  I also added some Doodlebug Sequins in Ladybug to the holly berry for a bit of sparkle!


Since there were so many cute little icons, I wanted to make a little scene card to showcase more of them!  I made a center box card using the base from this cut file from Lori Whitlock and made my own little scene using the Squirrel, Red House, Winter Tree, Tree with Snow, and Snowman with Hat files. Take a peek...


I added some Stickles to the snow for some shine and topped it off with the 'Tis the Season Banner from the Chit Chat pieces.  I love how this card folds flat, but then opens up to such a fun dimensional look!
Be sure to check out all of the Christmas Town Cut files in the Lori Whitlock SVG Shop Here and they will be coming soon to the Silhouette Store!  If you make something using one of the files, be sure to tag Doodlebug Design on Social media so we can see! That's it for me today, thanks for stopping by to peek!


Monday, November 26, 2018

Doodlebug Design | Christmas Town Countdown Step Card Tutorial

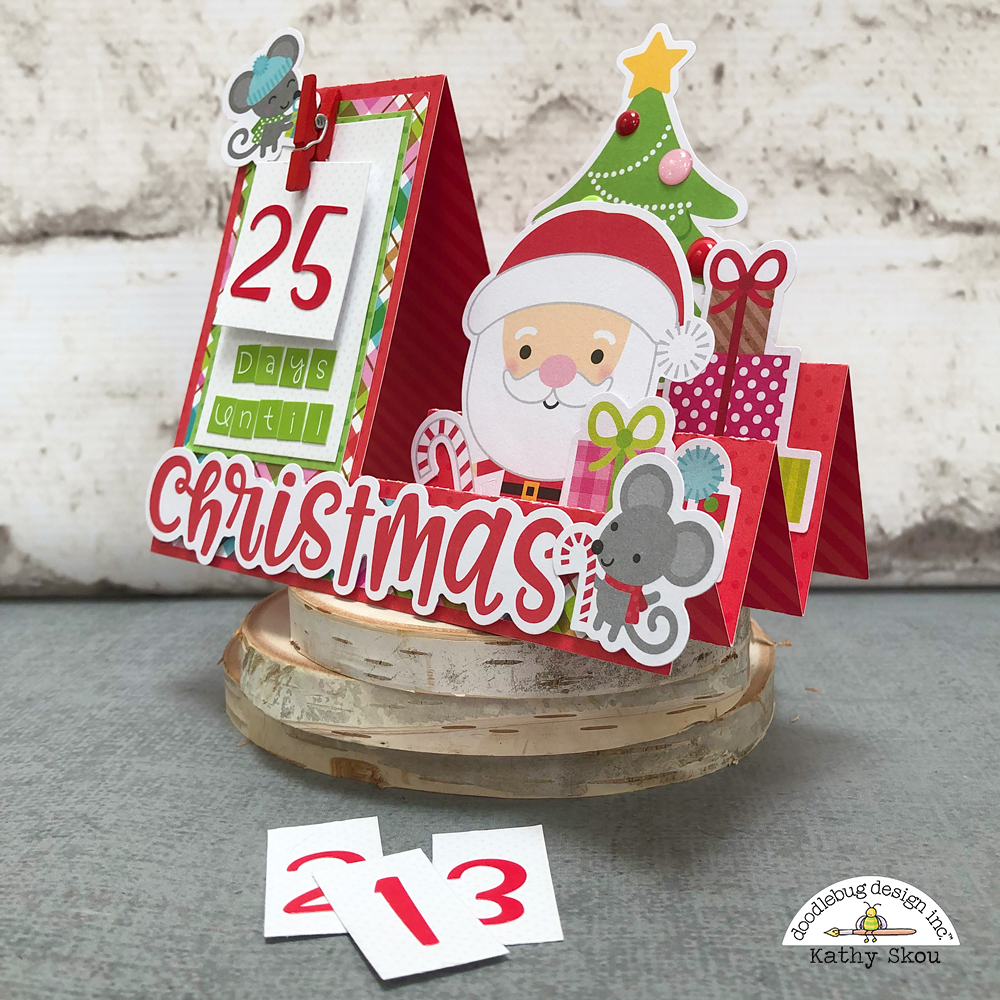
I think that one of my favorite all time Doodlebug Products are the Odds & Ends packs!  They make it so easy to create fun little embellishment clusters and scenes!  I decided to combine them with a fun side step card base to create a fun Christmas Town Christmas Countdown card!  You could send this card to family & friends or just use it to count down to Christmas in your own house!  Take a peek...


How cute is this little calendar??  When my daughter was little it would be a big deal to change the countdown number every day!!  The card looks complicated, but it's really pretty simple to make.  I started with the base from this side step card by Lori Whitlock (SVG, Silhouette).  If you don't have an electronic cutter, you can still make the base with a score board or a trimmer and scoring tool.  I've done out the measurements for you here (the dotted lines are score lines, and the solid line is a cut line)


Once you've cut and scored the base piece, all that is really left is to decorate!!  For my card, I added the different Christmas Town Odds & Ends and Chit Chat pieces onto the different steps of the card to create a little scene.


For the numbers, I cut the lily white Dot-Stripe Petite Prints paper from the 6x6 pad into  0.75"x 1.5" pieces and added numbers from the Ladybug Abigail Stickers. (you will need 2 each of the numbers 1 & 2, then one each of 0 and 3-9 for a 25 day countdown) I cut a small frame for the countdown base, measuring 2"x3" and added some Limeade Teensy Type letters to the bottom. To hold the numbers on the card, I glued on one of the Christmas Mini Clothespins.  I used glossy accents to glue it to make it very secure. 


Finally I added a little pocket to the back of my card to hold the numbers.  I used this file from Lori Whitlock (SVG, Silhouette) which I re-sized to be approximately 2.25" x 3.25".  You could use a small envelope or bag as well.

I had so much fun making this card, I decided to make a couple of more to show the versatility! In place of the countdown you could also add your Christmas Photo like I did on this card.


I used a piece of transparency (available in your local office supply store) and glued it to the last step.  I added some snowflake stickers from the Christmas Town Icon Stickers.  They look like they are floating in the air above the card! I also used a piece behind the chit chat piece as well.   I just trimmed off the extra, but you could leave it if you didn't want to cut it.


Finally I just made a card featuring all Odds & Ends and Chit Chat pieces...


I used a transparency on this card as well to hold the Ho Ho Ho pieces.


These side step cards really are fun to make and when you combine them with the Chit Chat and Odds & Ends pieces, the creative possibilities are really endless!  If you decide to try one please be sure to tag @doodlebugdesign on social media so that we can see your creations!  That's it for me today, thanks for stopping by to peek!


Monday, August 20, 2018

Doodlebug Design: So Much Pun Cards

I can not pass on  a good pun... so when So Much Pun arrived, I dug right in!  My family thought I was crazy... they could hear me laughing from the other side of the house as I sorted through all of the funny puns!  I picked a few of my favorites and set to making some easel cards... take a peek...


As soon as I saw the adorable aliens in the So Much Pun Odds & Ends I thought of a saucer flying through the air.  I decided an easel card with an opening would be the best way to make this happen...


The stars on the Far Out Cardstock made the perfect backdrop. I attached the flying saucer with some monofilament thread so he looks like he's flying.  


I finished the card off with a cute little saying from the Chit Chat Pieces and those adorable sprinkle stars from the Out of This World Shaped Sprinkles.

My next card featured what I think might be my favorite icon from the whole collection... THE SLOTH!!!  He is just too stinking cute!


I stuck with the easel card design, but for this one, I opened both sides of the easel and added some grass and trees using the new Dot Stripe Rainbow Petite Prints 6x6 Pad to the back side of the easel to add dimension.  I think the Best I Ever Plaid paper is my favorite of the collection!  I finished the card with a few of the flowers from the Otterly Adorable Shaped Sprinkles.  Here is a close up...


My last card features another one of my favorite icons... the Otter!!!  I just love his sweet whiskers!  I also used the Dotty side of the Sweet Stuff Cardstock.


I created some waves using the bubble blue paper from the Dot Stripe Rainbow Petite Prints 6x6 Pad and had him float on them holding a Rainbow Heart Shaped Sprinkle.  To the back side of the Easel I added the Sun from the Odds & Ends and made a cloud with some Lily White Sprinkles Vellum.  Here is a close up...


All of these cards fold flat for mailing...


That's it for me today, thanks for stopping by to peek!

Monday, February 19, 2018

Doodlebug Design: Interactive Chit Chat Cards

Hi Everyone!  I have some fun cards I created for Doodlebug today!  I just love how easy card making has become now that we have the Chit Chat pieces!  Along with the Odds & Ends, they have made it SO easy to put together an awesome card!  I decided to make a few interactive cards focusing on the Chit Chat pieces from the So Punny collection.  Take a peek...


I had such a fun time with these cards!  The first card is a slider card.  I cut a slot in the toaster piece so that the pop tart could "pop out" when the slider tab is pulled.  All I needed to complete the card is the adorable chit chat sentiment!  


My next card is also a type of slider card.  I started with the base of this cut file, and then added the fun typewriter from the Odds & Ends and the two sentiments from the Chit Chat Pieces.  The great thing about the Chit Chat speech bubbles is that if you like, you can cut off the "tail" and just have the sentiment !  I did that with the heart "just my type" piece.  All you do is pull the tag piece of the card and the Chit Chat Sentiment is revealed!


For my last card I used some Action Wobble Mini Springs to make the olives like little bobble heads!  When you tap them they wobble!


All I needed to complete the card is the "olive you" Chit Chat speech bubble and I also added some of the little Chit Chat hearts as well.

Since seeing the cards in action is much more fun than still pictures, I put together this fun little video showing the cards in action.


That's it for me today, thanks for stopping by to peek!


Monday, February 5, 2018

Doodlebug Design: So PunnyTreat Bags

When my daughter was in grade school I used to love sending in fun, homemade treats and crafts to her class.  She's a sophomore in college now, so I've had to switch gears!  Instead of class treats, I go for dorm treats!  Her friends always appreciate a little something sweet!  For this Valentine's Day I put together little treat bags featuring the So Punny Collection from Doodlebug Design... take a peek!


How cute are these little bags??  The bag was created using the Lawn Fawn Goodie Bag Die some of the papers from  So Punny.  To finish them off, I added some fun So Punny Odds & Ends and Chit Chat pieces to tags (and of course those ADORABLE Tiny Hearts Sprinkles) and tied them together with some Doodle Twine!  Here are some close-ups of each bag...


I know the girls will probably roll their eyes at the puns...but we all know that they secretly love them! Now to box them up and send them in a care package!  That's it for me today, thanks for stopping by to peek!