Monday, January 21, 2019

Doodlebug Design | French Kiss Gift Set

The little icons in the Doodlebug Design French Kiss Collection are so stinking cute!  One of my favorites is the little Frenchie Dog.  He is just adorable!  When I saw the new French Kiss Cut files I knew I was going to make a card with him!  Take a peek...


I combined the Frenchie with the Box of Chocolates file to make this sweet shaped card.  I used the 6x6 pads for both the French Kiss and Dot Stripe Petite Prints collections to piece him together.  The Chit Chat sentiment was a perfect fit for the card, and then I just finished it wit a heart and matte sprinkle!


I used the 12x12 versions of the plaid and navy papers from the French Kiss Collection to make the fun little Valentine's nugget box.  The box was made from an SVG file by Lori Whitlock, I've linked to it below. To finish it off I added a little bow sticker from the Icons sheet.


It opens up and holds 3 mini candy bars!  I was thinking I might make another to hold some dog biscuits for my friend's pup!


The new French Kiss Files will be available in the Lori Whitlock SVG Shop tomorrow, and in the Silhouette Store soon!  Have you made something with the French Kiss Collection or Cut files?  Be sure to tag Doodlebug Design on Instagram (@doodlebugdesign) or Facebook (@Doodlebug Design), we'd love to see your projects!  That's it for me today, thanks for stopping by to peek!

Products Used
Doodlebug French Kiss Cut Files ** COMING SOON (SVG, Silhouette)

OTHER


Thursday, January 17, 2019

Lori Whitlock | Valentine Truck Box Card

Valentine's Day will be here before we know it, so it's the perfect time to start crafting! (as if we need an excuse!)  I love Lori's Whitlock's Truck Box Cards, she has one for Christmas, Easter, Fall... and now Valentine's Day!  Take a peek...


I put this card together using some Dot Stripe Petite Prints and Heart Sprinkles from Doodlebug Design.  This adorable card is available is available in SVG format in Lori's shop here and also in the Silhouette Store here.  It folds flat and fits into an A2 Envelope for easy mailing!  There is a great assembly tutorial for Lori's Truck Box Cards here.

That's it for me today, thanks for stopping by to peek!

Wednesday, January 16, 2019

Doodlebug Design | French Kiss Pop Up Cards

Doodlebug Design's Valentine/Love themed collections are always a favorite for me.  So when I received my big box of French Kiss Goodies, I set out to find a fun, new way to feature the adorable icons and gorgeous papers from the collection.  I came up with pop-up "wiper" cards... take a peek...


When the cards are open as shown above, they have a little pop up feature... the perfect way to showcase the adorable Odds & Ends pieces!  Closed, they fit in a regular envelope.  I love how the collection can be used for everyday cards as well as Valentines!


They are better in action, so I dusted off my Photoshop skills and made a little video....


I just love the little pop-ups!  It's like a game of peek-a-boo!  Here are some close-ups of the cards while opened... I think my favorite is that adorable little Frenchie!!


Have you created any projects using French Kiss?  Make sure to tag @doodlebugdesign on social media so we can see!  That's it for me today, thanks for stopping by to peek!

Products Used


Tuesday, January 8, 2019

Lori Whitlock | January Creative Team Blog Hop


Hi Everyone!   It's time for the January Creative Team Blog Hop over at Lori Whitlock!  You should have arrived here from Lori's Blog.  Here's the order for today's hop!

Lori Whitlock
Kathy Skou {You are here}
Anita Mulcahey
Brandie Adams
Brigit Mann
Michelle Zerull
Aimee Kidd
Ashley Cook
Cathy Harper
Corri Garza


I made Lori's new Valentine's Mailbox 2 file!  It's so cute and it can hold a little treat!


The papers and heart sprinkles are from Doodlebug Design's So Punny Collection.

I put together a quick tutorial showing how to assemble the mailbox.


1. Cut pieces and add decorative panels to the mailbox base and door. I added 1/4" score tape to the tabs.
2. Add the door to the mailbox base by tucking the tab to the back of the base piece and securing with adhesive.
3. Use the edge of your table or a dowel to curl the mailbox top, and adhere to mailbox base.  Add the handle by inserting into slots and gluing in place.
4.  Add the bottom piece to the mail box base, folding the mailbox base around it and securing.  Fold up the final side of the mailbox and secure.
5. Add the top shoot inside support piece inside the box, flush with the bottom score line of the mailbox opening.
6.  Bring mailbox top up and around the top of the base, gluing the tabs inside the box to complete.


There's a sale happening in the Lori Whitlock SVG Shop!  Use code JAN2019 to get 25% off all SVGs and Commercial Licenses!


Also, how about a free file!!  This file is free for today only!  No code or minimum required.


Finally, how would you like to win a $20 Coupon to Lori's SVG Shop!


a Rafflecopter giveaway

That's it for me today, your next stop on the hop is Anita!  Have a great day!


Wednesday, January 2, 2019

Doodlebug Design | Daily Doodles TN Scrapbooking

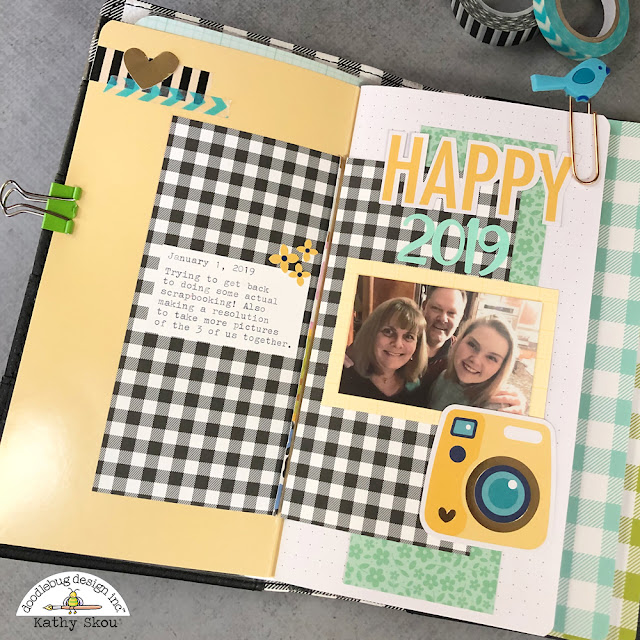
Do you make New Year's Resolutions?  This year my crafty resolution is to get back to more actual scrapbooking!  Over the last couple of years I've moved away from more traditional scrapbooking and more into general paper crafting, and I miss documenting those memories!  I thought that scrapping my favorite photo each week along with Paper Issues 52 Friday Favorites Challenge would be a good way to get back into the swing of things, and Doodlebug's Daily Doodles Travel Planners are the perfect platform for this type of scrapping! 


 I started by creating a dashboard for my 2019 memories.  I cut a piece of  Floral-Graph Petite Prints in Pistachio to measure 9.75" x 8.5", and then scored the file at 4.5" and again at 5.25" to make the "binding" wide enough to hold 3 of the Daily Doodle Travel Planner Inserts.  I decorated the cover using a couple of Lily White Doodlebug Doilies, papers from the So Punny and Dot-Stripe Petite Prints 6x6 Pads, Chit Chat Pieces from the Hello Collection and some Abigail Stickers in gold.  Once it was decorated, I laminated the whole thing to make it more durable and inserted it along with 3 of the Travel Planner Inserts into my Buffalo Check Travellers Notebook.


Once my dashboard was ready it was time to get started documenting 2019!  


For my first layout, I used the buffalo check paper from the Down on the Farm 6x6 pad, Petite Prints, Stickers and Odds & Ends from the Hello Collection and some Abigail Stickers.  I even pulled out my trusty typewriter to type up some journaling!   I think I'm off to a good start!  Now if I can keep up with doing this weekly, I'll be in good shape!  Are you documenting your memories in a Doodlebug TN??  We'd love to see what you create!  Make sure to tag Doodlebug Design on social media so we can see!  That's it for me today, thanks for stopping by to peek!


Products Used:

Other
Laminating Machine