Showing posts with label Gingham Linen Petite Prints. Show all posts

Monday, July 23, 2018

Doodlebug Design: Sweet Summer Box Cards

Have you seen the Doodlebug Design Sweet Summer Cut Files?  They are just about the cutest files ever!  I love the fun and retro feel, they remind me of summers in the 1980s (yes, I have just dated myself...)!!  I decided to take a few of the files and make some box cards.  I just love box cards, they make such cute decorations!  Take a peek...


I used a combination of Gingham Linen Petite Prints and Sweet Summer papers to put these cards together.  I then added some stickers from the Sweet Summer Mini Icons and the This and That sheet and sentiments from the Sweet Summer Chit Chats Pack.  Here are close-ups of the individual cards...


Sweet Summer Radio (SVG, Silhouette)


Ice Cream Truck (SVG, Silhouette)


Pineapple (SVG, Silhouette)

Converting the files to be box cards isn't a hard process, below are some graphics showing how I converted the Radio card...


I started by resizing the base file so that it was a standard card size.  In this case the width was 5.5".


Next I ungrouped the file and created the "layers" of the box card.  In this case the center "layer" is the blue piece of the file  with the handle and buttons.  The front "layer is the face of the radio.  For the back piece, I made a copy of just the yellow portion of the front piece.


The blue piece of the original cut file had a small bump out on the bottom.  I want my card to stand flat so I cut this piece off using the knife tool in Silhouette.  You could also hand cut this piece.


To create the side pieces of my card, I drew a rectangle measureing approximately 1.9" high by 1.5" wide.  I added score lines .25" in from each side.  You could also hand score these lines.


To be able to adhere the center insert, I needed to add a couple of tabs to the sides of this piece.  I drew two triangles measuring 1" high by .375" wide, lined them up on the sides of the center piece and welded them to the sides.  Be sure to separate the buttons and handles pieces before welding.


Once all of this was done, I cut the pieces, and assembled the face of the radio and added the handle and buttons to the center.  To assemble the card, I created a box by gluing the sides to the front and back, making sure everything is aligned.  I folded the tabs of the blue insert forward, inserted it into the radio box shape and glued the tabs to the sides of the box, towards the front.

If you decide to try your hand at making a box card from a Doodlebug Cut file, make sure to share them on the Doodlebug Design Facebook page!  That's it for me today, thanks for stopping by to peek!


Wednesday, July 4, 2018

Doodlebug Design: Happy 4th of July!

Happy Fourth of July everyone!  To celebrate I decided to create a fun table centerpiece using the Yankee Doodle Wagon and Flower Cut files!  These files can be found in the Lori Whitlock SVG Shop (Wagon, Flower Cluster) as well as the Silhouette Store ( Wagon, Flower Cluster).  Take a peek...


I will admit, converting a 2D file to be a 3D project was a challenge, but it certainly was fun!  I was just so happy that it turned out like I had envisioned in my head!  For papers, I used some Gingham Linen Petite Prints in Ladybug, Bubble Blue, Blue Jean, Limeade and Beetle..  I also used Starry Stripes and Declaration Dots from Patriotic Parade;  Colors of Courage and Land that I Love from Patriotic Picnic; and Horsin' Around from Down on the Farm.  I embellished the wagon with some Red, White & Blue Star Sprinkles (side of wagon); Red, White & Blue Matte Sprinkles (wheels) and Silver Glitter Sprinkles (for the rivets) Here are some more close-ups:


I've put together some instructions on how I converted the Wagon and Flower Cut files to go from 2D to 3D in Silhouette.  I will say this is not a beginner project!  You do need to be comfortable with your Silhouette and it's design functions.


I've included wagon assembly instructions on the image. 


Below is how I assembled the flowers...

I started by curling the petals with the handle of a paint brush.  I then added glue to one of the petals next to the cut line, and overlapped the petals so that the flower formed a "bowl".  I did this for all three layers of the flower then stacked them, with some foam tape between the layers for more dimension.


For the stem, I took a piece of flower wire, bent it so there was a small circle at the top and inserted it through the hole in the center of the stacked flowers.  I wrapped floral tape under the flower to hold the wire in place.  I then added some of the greenery to the wire using floral tape.


I finished the flower off with a center that I borrowed from this flower in the Lori Whitlock SVG shop.


If you decide to take the challenge to make this, we would love to see your projects!  That's it for me today, thanks for stopping by to peek!


Monday, June 25, 2018

Lori Whitlock: Birthday Cake Pop Up Card

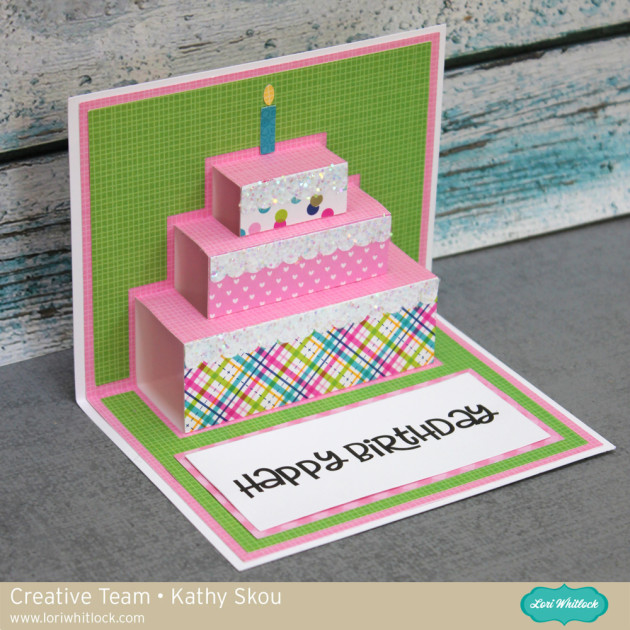
Hi Everyone! I've got quite a few summer birthdays that always seem to "pop up" quickly and without warning, so I've decided to start building up my stock of birthday cards so I will be prepared!   I just love Lori's Pop Up Cards, they're so simple but make a big impact. I used her Three Tier Birthday Cake Pop Up Card (SVG File, Silhouette) file for this card...


The other great thing about this card is it can be made for a woman or a man, simply by changing up the color scheme!  Now if I can only remember to mail my card, I'll be in great shape!  That's it for me today, thanks for stopping by to peek!


Monday, June 11, 2018

Doodlebug Design: Insta Mini Album

I just love my Instax Camera and Instax printer.  The little pictures, that pop out automatically just make me smile! They give such a retro feel to any project!  When I saw the Insta Camera Cut file from the Hello Collection (available in the Lori Whitlock SVG Shop) , I knew I had to make something with it!  I decided to design a little mini album featuring some fun pictures I took on a recent vacation to Aruba... and the Sweet Summer Collection was the perfect complement to my pictures!


The album itself was put together using some Gingham Linen Petite Prints and a paper from the Hello 6x6 Pad. For a fun twist, I created a slider... the little "insta" picture pulls from the top of the camera base showing my album title (and the adorable Steven "Seagull" !)  Here are a couple of more views of the album itself...


I created some accordion pages for the inside of the album.  Each page is layered with a different paper from the Sweet Summer Collection.  I also designed a frame file to cover the Insta pictures, to add a little more color.   Then came the fun part... mixing and matching This and That stickers, Icons Stickers, Odds & Ends, Chit Chats, and Tropical Punch Shaped Sprinkles from the Sweet Summer Collection to go along with my pictures!  Here are some close ups of the inside pages...


The cute little cactus is a Cute Clip from the Fun in the Sun Collection.


The anchor sticker is from the Anchor's Aweigh Icon Sticker Sheet.


The sailboat sticker is also from the Anchor's Aweigh Icon Sticker Sheet.
I'm so excited that this project turned out as I had imagined!  It's always a good creative day when that happens!  That's it for me today, thanks for stopping by to peek!

Monday, May 21, 2018

Lori Whitlock: Customized Graduation Cards

Hi Everyone! Today I'm on the Lori Whitlock Blog with some fun Graduation cards.  We have at least 4 graduation parties coming up and I wanted to use the new Flexi Card Congrats Grad (SVG, Silhouette).  I decided to embellish them a bit and also to add a gift card pocket to the back of the card.  I used the Graduation Cap with Year (SVG, Silhouette), and the pocket piece from the Gift Card Purse (SVG, Silhouette) to customize my cards.


I looked up the colors for each of the schools and used those colors for the frame and background piece on the Flexi Cards.  The papers I used are Doodlebug Design's Gingham Linen Petite Prints.  I resized the graduation cap and year to fit the front of the card and added them with some foam tape to make them pop a bit.  I used a Doodlebug gold glitter sprinkle to top off the tassel.


I resized the pocket from Gift Card Purse to fit on the back of the card, this way I can add a little something to the card!


Below, I've highlighted the pieces I resized so you can see how big to make them if you wish to recreate this card. (you can also use the pocket on the other cards in the Flexi Card Sentiment Bundle as well)


(Measurements:  Hat: 1.161"h x 2.25"w    Year:  1.140"h x 1.0"w   Pocket:  1.991"h x 4.463"w)

That's it for me today, thanks for stopping by to peek!

Wednesday, April 18, 2018

Doodlebug Cut Files: Happy Birthday Mr. Harley Card

It's always fun when you find friends that are as crazy as you are when it comes to their pets.  My friend Jenn has a sassy kitty named Mr. Harley, who has his own Instagram.  To celebrate Mr. Harley's 10th Birthday, Jenn pledged to give $1 to the MSPCA of Cape Cod for each birthday card Mr. Harley received.  So, you know I had to play along, being the mom of 2 shelter kitties myself.  I made this fun card using a few cut files from Doodlebug Design:  (for a tutorial on how to make a shaped card in Silhouette, see my post here)


I started with the Fun in the Sun Caravan File from the Lori Whitlock SVG Shop which I put together using some Gingham Linen Petite Prints and some Glitter Sprinkles for the lights.  I added a little print and cut license plate to wish Mr. H a happy birthday.  The two kitties (Mr. Harley driving the caravan, and his adopted little brother Gus in the passenger seat...) were cut using the Kittens and Green Kitty SVG files form the Kitten Smitten Collection.  Of course they had on their signature bow ties!     Entirely too cute!  I gave the card to Jenn this past weekend, and was so happy that she loved it!  That's it for me today, thanks for stopping by to peek!

Monday, April 16, 2018

Doodlebug Design: Sprinkle Cards

I'm kicking off a couple of weeks of  projects focusing on embellishments on the Doodlebug Design Blog this week.  I have to admit, I have a hoarding issue when it comes to Doodlebug Sprinkles.  Original, Glitter, Shaped... I absolutely love them all and I make sure that every project I use them on is "sprinkle worthy."  So when the Design Team was challenged to feature Sprinkles and other embellishments I set out to come up with some very "worthy" projects... take a peek...


I love using sprinkles with Doodlebug's Cut Files, they are the perfect way to "dress" them up.  I started with the new Sweet Summer Strawberry Margarita SVG file from the Lori Whitlock SVG Shop for my first card. I used papers from the Gingham Linen Petite Prints, Down on the Farm and So Punny 6x6 Pads.  I added some Ladybug Glitter Sprinkles to the "dots" on the strawberries, some Cupcake and Bubblegum Glitter Sprinkles for the cheeks and some Beetle Black Sprinkles for the eyes. To finish it off I added a "sugared rim" to my margarita using some Lily White Chunky Glitter.


For my next card, I started with this SVG file for the card base.  I added a porthole circle to the front with some sprinkles "rivets" from the Black and White Assortment Glitter Sprinkles Pack.  I wanted it to look like my fish were floating so I cut the inserts for the card from transparency material.  For my under sea scene I used the Sea Weed SVG from the Under the Sea cut files, one of the Minnows Mini Doodle-pops and some Anchor's Aweigh and Under the Sea Shaped Sprinkles.


For my last card, I started with the Jar of Hearts SVG file from the Flea Market Collection to create a shaker card.  I added a few of this flower from the Easter Express collection. To embellish the flowers, I added the smallest sprinkles around the centers (Limeade Glitter Sprinkles, Bumblebee Glitter Sprinkles, Tangerine Glitter Sprinkles and Lily White Sprinkles.   I added some larger glitter sprinkles to my Jar for the "marbles" and finished it off with a Ladybug Shaped Sprinkle!  The sweet sentiment is a speech bubble from the So Punny This and That Sheet.  I cut off the tail, and punched a hole so I could tie it on with twine.


Be sure to stop by the Doodlebug blog over the next couple of weeks for more Embellishing ideas from the Design Team!  That's it for me today, thanks for stopping by to peek!


Tuesday, April 10, 2018

Lori Whitlock: April Creative Team Blog Hop


 Hi Everyone!   It's time for the March Creative Team Blog Hop over at Lori Whitlock!  You should have arrived here from Lori's Blog.  Here's the order for today's hop!

It looks like spring might finally be showing up here in New England!  I've seen robins hopping around my yard and some of my bulbs are popping up!  The birds made me think of this adorable Bird Shaped Card (SVG, Silhouette) and this Milk Carton Bird House (SVG, Silhouette).  So springy!!!


I used papers from Doodlebug Design for both pieces.


Also, how about a free file!!  This file is free for today only!  No code or minimum required.


Finally, how would you like to win a $20 Coupon to Lori's SVG Shop!


a Rafflecopter giveaway

That's it for me today, your next stop on the hop is Anita!  Have a great day!


Monday, March 26, 2018

Doodlebug Design: Down on the Farm Cut Files

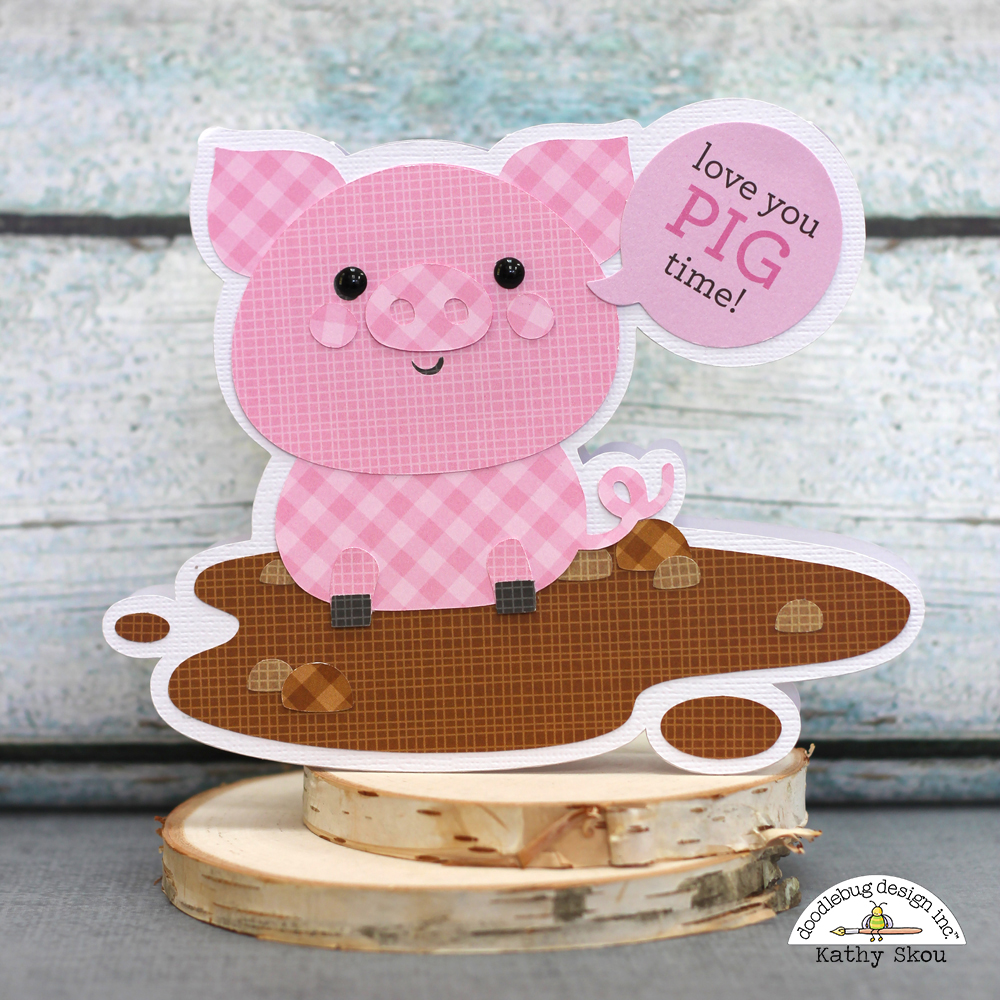
I recently attended the Crop on the Cape with friends, and decided to make a fun shaped card using one of the new  Doodlebug Design Down on the Farm Cut files which are available at the Lori Whitlock SVG Shop..  As soon as I made one, my friends kept asking for more and more each person picking their favorite animal!  Soon I ended up with a farms-worth of shaped cards!  Take a peek...


These files are just so stinking cute!  I used Gingham Linen Petite Prints for these cards, the colors are perfect, and the sentiments are from the Down on the Farm Chit Chat Pack.  Here are some close-ups..

.
 This card was made using the Lamb file.  I used an embossing folder to make him appear a bit more fluffy and added some Beetle Back Sprinkles for his eyes.  


I've said it before, I'll say it again... ONLY Doodlebug can make a bug cute.  This little fly is no exception.  I used the Flies File and gave him some faceted fly-eyes by using some Beetle Black Jewels


.I just love this little chick in the egg... he's soooo tweet!  (sorry, couldn't resist)  I used the Chicks file for him.


This little pig in the mud puddle just makes me smile.  He was created using the Pig #3 File.  


The cow was actually the first card I created with the files.  I love his cute face and the What's Moo sentiment makes me laugh every time I see it!  He was created using the Cow #2 File.
I had such a fun time making these cards!  That's it for me today, thanks for stopping by to peek!

Monday, January 29, 2018

Lori Whitlock: Pop Up Kitty Card


Hi Everyone! Today I'm showcasing one of Lori Whitlock's new Pop Up Card Cat (SVG, Silhouette) !  Being a crazy cat lady, this card was right up my alley!! This card is super easy to assemble (see the video tutorial here)  I decided to customize it for my friend Jenn who has a sassy black and white kitty named Mr. Harley.


To add the black patches, I cut the face, tail and body of the cat from both black and white cardstock.  I then cut the black cardstock to reflect Mr. Harley's coloring and gave him a bow-tie as well.  To finish, I cut some decorative panels for the inside of the card from some Doodlebug Design's So Punny papers.( they are sized 3.875" x 5.125").  There's also a dog version of this card (SVG, Silhouette) ... you could customize for your "dog mom" friends! Here is a picture of the real Mr. Harley... you can follow his antics on Instagram here!


 I can't wait to send it to my friend!  That's it for me today, thanks for stopping by to peek!