There's something about the cute little cameras in the Hello Cut File Collection (SVG, Silhouette) that just makes me smile! I decided to create a fun slider card using the Hello Polaroid Camera (SVG, Silhouette) You could create this card using almost any collection for any occasion! I used the Hello Collection for mine. Take a peek...


The slider pulls right through from the camera slot on the bottom of the card for a nice surprise greeting!

I also added a sentiment from the Hello This and That Sheet on the inside of the card. Here are some close-ups of the front...


I put together a tutorial showing how to make this card using Silhouette. These instructions would need to be slightly altered for other cutting machines such as Cricut, since not all of the same functions are available (specifically release compound path). First I show how to edit the file to make it a slider in Silhouette, then how I assembled the pieces.
I started by resizing the file so that the finished card would fit in a standard sized envelope. In this case, I resized it so that it was 6" wide (be sure to click the lock next to the sizing so that it will resize uniformly) The end result is a card that will fit in a 6x6 envelope.

Next, I created the card base. To do this, I made a copy of the navy layer in the cut file (which is the shape of the whole card)

I made a second copy of the navy piece, right mouse clicked on the piece and selected flip vertically.

Next, I maneuvered the 2 pieces so they were aligned and overlapped slightly, then after selecting both pieces, right mouse clicked and selected weld to make them one large piece.

Lastly, for the card base, I added a dashed line to the center and selected group. This will give you a score line to fold the card base.

The next few slides show how I added a slot to be cut into the camera "face" so that the picture slider could slide out. I started by un-grouping the pieces of the camera face. Next I selected the slot on the bottom portion of the camera(the navy piece) and resized it to be 0.15"h x 4.5"w.

Since the slider part of the card needs to go through all layers of the front of the camera, I needed to copy the "slot" to the layers underneath the top layer. First I selected both the slot and the small navy bottom piece and copied them. I then clicked on the copied pieces and right clicked and selected Make Compound Path. This gave me the completed the navy piece. I deleted the original small navy piece, leaving just the slot over the light blue piece of the camera.
I repeated the above process with the light blue piece... Copy both the slot and the light blue piece. Select both parts of the copy (light blue and slot) and right mouse click, and select make compound path. (this completes the light blue piece) Delete the original light blue piece, leaving just the slot over the bottom-most navy piece.

Lastly Select both the larger Navy piece and the slot, right mouse click and select make compound path. This adds the slot to the bottom most piece.

I added the slot in this fashion to make sure that the slots on all 3 pieces were perfectly aligned.

Next I created my slider piece. I started by creating two rectangles, both 3.875"H x 4.275"W. To the top of the one on the left, I added a slim rectangle, (0.25" H x 4.65"W), overlapping them slightly, the selecting both, right mouse click and select weld.

For the right hand piece I added a rectangle (2.7"H x 3.825"W) centering it horizontally and towards the top of the existing rectangle. I selected both pieces, right mouse clicked and selected make compound path.
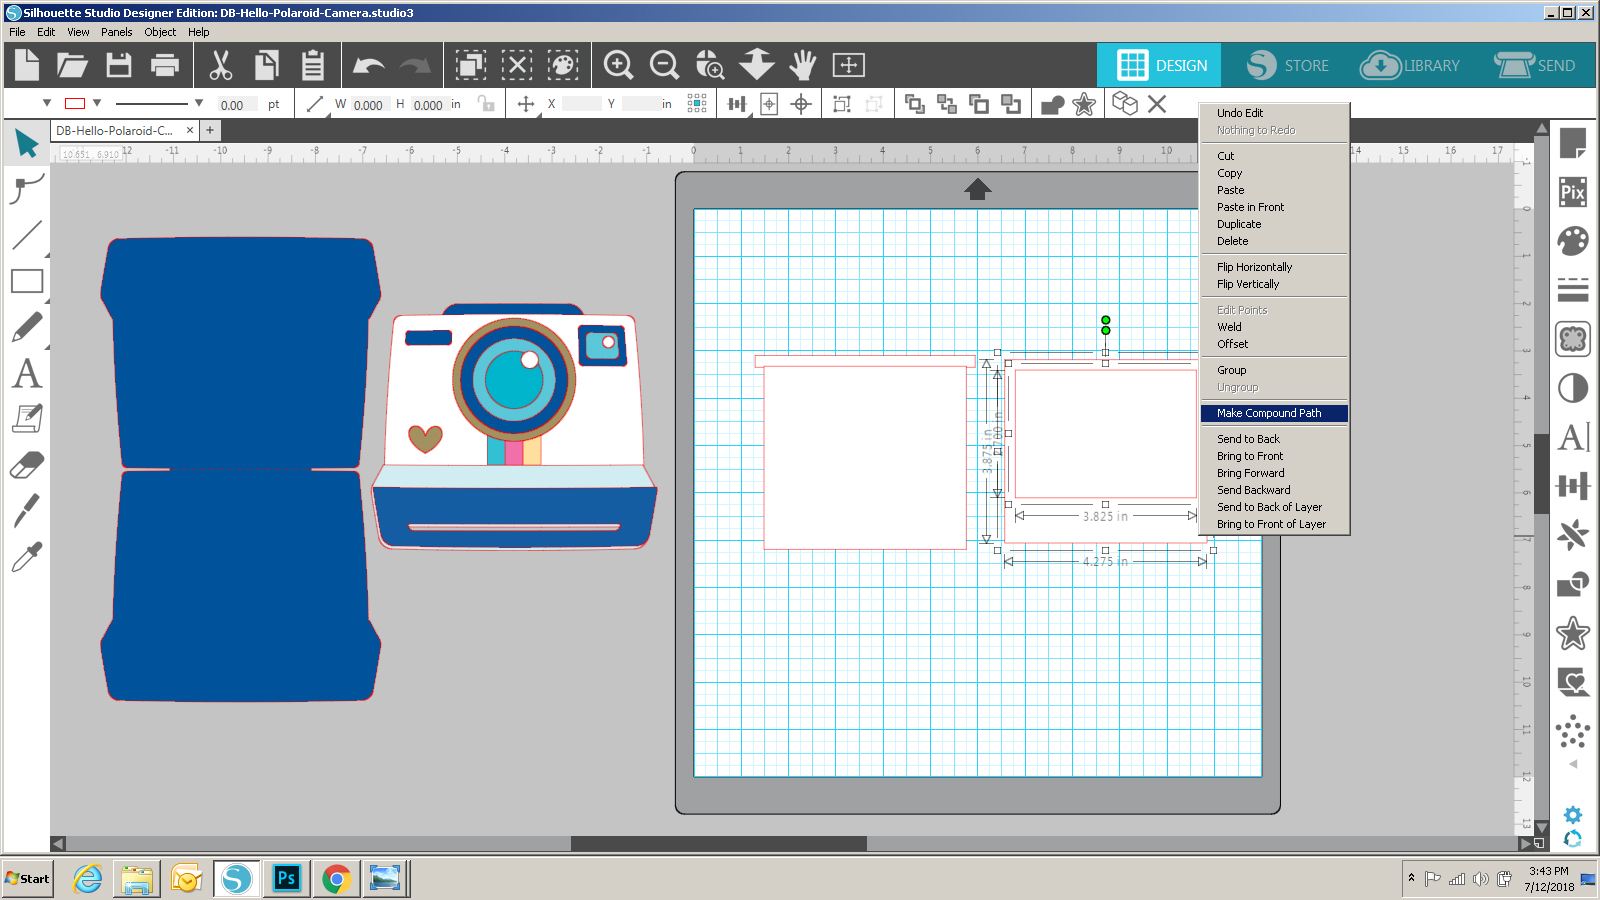
The result of the above steps gave me the two pieces that make the slider portion of the card.

Once I cut all the pieces, I started assembling the card. On the camera face, I added some foam tape under the top to circles of the lens to add dimension. For the camera slider piece, I created a little scene inside the photo frame using stickers and patterned paper, then glued the whole thing onto the other rectangle.

To create the slider mechanism, first layer the camera face over the card base and trace the slot onto the base. This will not be seen once the card is complete.

Next, Using the widest part of the slider piece, mark lines on the bottom by the slot, and then on the top about .675" down from the top (5/8 of an inch)

Draw lines connecting all of the marks. This gives you your guides for adding foam tape.

Add a double layer of foam tape just slightly outside the lines drawn. Do not overlap the lines, this will prevent your slider from moving up and down.

Before removing the top cover from my tape, I used a powder tool to go over the edges of the tape. This will help the slider to move more smoothly.

Before adding the Camera Face to the base, slip the slider piece through the slot in the camera face from front to back.

Once this is done, add the camera face to the card base, making sure everything is aligned... be patient, it'll all be worth it! I hope you're inspired to try one of your own, be sure to post if you do we'd love to see your creations! That's it for me today, thanks for stopping by to peek!