Showing posts with label Slider Card. Show all posts

Monday, May 18, 2020

Doodlebug Design | Graduation Cards

Graduation season is upon us!  In-person graduations from kindergarten to college are all cancelled this year, but that just makes it more important to celebrate these milestones.   I decided that the Doodlebug Design Hey Cupcake, and Party Time stamps could be used for more than just birthdays, so I mixed them with some of the new Doodle Cuts and came up with a couple of fun graduation cards!  Take a peek...


I thought the first card would be cute for a little person!!!  I made a slider card using the big tag from the Large Tags Doodle Cuts Dies, and the Congrats is from the All Occasions Doodle Cuts Dies.  The stamps and papers are from the Party Time Collection.  I love how when you pull the tag up the little monkey floats up!


I made the second card for my daughter who is graduating from college on Friday.  She loved the little llama from the Hey Cupcake Party Animals stamps... kept trying to steal it when I colored it in lol.  So I added it to this fun pop up card...


In addition to the Hey Cupcake Party Animals stamps, I used the new Alex Alphabet Dies and some of the new mini jewels to add some sparkle.


Here are the card fronts.   I used the Borders and Edges dies on the front of my pop-up card.


The new stand alone dies are really great for card making, and of course the new mini jewels add the perfect bit of sparkle!  If you've used any of the new stamps and dies in your projects, be sure to tag Doodlebug on Facebook and Instagram!  We'd love to see what you create!  That's it for me today, thanks for stopping by to peek.

DOODLEBUG PRODUCTS USED:

Hey Cupcake Collection
Party Time Collection
Party Animal Boy Stamps & Dies
Party Animal Girl Stamps & Dies
Alex Alphabet Dies
Borders & Edges Dies
Large Tags Dies
All Occasion Doodle Cuts Dies
Mini Jewels
Doodle Twine
Ginham Linen Petite Prints

OTHER:
Copic Markers
Sizzix Big Shot


Monday, September 3, 2018

Doodlebug Design: More So Much Pun Cards

There are so many puns in the So Much Pun Collection, it's perfect for a pun-fanatic like me!  The only problem I have is choosing which ones to use next!  I finally narrowed down my selection to make these "punny" cards!


Every time I see the sweet little faces on the pill bottle and pills I laugh.  I decided to add them all along with the tissue box from the Odds & Ends into a doctor bog box card.  Who wouldn't "pill" better looking at these cute faces!  The bag was assembled using some of the new Dot Stripe Petite Prints.


I fell in love with all of the adorable dinosaurs in the Odds & Ends and knew I wanted to use a few of them on a card.  I decided to make a little shadowbox so that I could feature a bunch!  I used the Palm Tree side of the T-Riffic Cardstock and the Kraft Dot-Stripe Petite Prints for the box and then added a few of the dinosaurs to the various layers.  As always, there was the perfectly punny sentiment in the Chit Chat Pieces.


Like the pills, the faces on the pieces of pop corn make me smile!  I made a fun slider card where one of the cute little popcorn pieces pops up out of the popcorn container!  I love the Check side of the Fantas-Taco Cardstock and the Order pad side of the Perfect Combo Cardstock!  I mixed them with the Ladybug and Lily White Floral-Graph Petite Prints to make some fun layers!


Make sure to stop by the Doodlebug Design blog all this week for more So Much Pun Inspiration!  That's it for me today, thanks for stopping by to peek!


Monday, August 6, 2018

Doodlebug Design: Hello Polaroid Camera Slider Card Tutorial

There's something about the cute little cameras in the Hello Cut File Collection (SVG, Silhouette) that just makes me smile!  I decided to create a fun slider card using the Hello Polaroid Camera (SVG, Silhouette)  You could create this card using almost any collection for any occasion!  I used the Hello Collection for mine.  Take a peek...


The slider pulls right through from the camera slot on the bottom of the card for a nice surprise greeting!


I also added a sentiment from the Hello This and That Sheet on the inside of the card.  Here are some close-ups of the front...


I put together a tutorial showing how to make this card using Silhouette.  These instructions would need to be slightly altered for other cutting machines such as Cricut, since not all of the same functions are available (specifically release compound path).  First I show how to edit the file to make it a slider in Silhouette, then how I assembled the pieces.

I started by resizing the file so that the finished card would fit in a standard sized envelope.  In this case, I resized it so that it was 6" wide (be sure to click the lock next to the sizing so that it will resize uniformly)  The end result is a card that will fit in a 6x6 envelope.


Next, I created the card base.  To do this, I made a copy of the navy layer in the cut file (which is the shape of the whole card)


I made a second copy of the navy piece, right mouse clicked on the piece and selected flip vertically.


Next,  I maneuvered the 2 pieces so they were aligned and overlapped slightly, then after selecting both pieces, right mouse clicked and selected weld to make them one large piece.


Lastly, for the card base, I added a dashed line to the center and selected group.  This will give you a score line to fold the card base.


The next few slides show how I added a slot to be cut into the camera "face" so that the picture slider could slide out.  I started by un-grouping the pieces of the camera face.  Next I selected the slot on the bottom portion of the camera(the navy piece) and resized it to be 0.15"h x 4.5"w. 


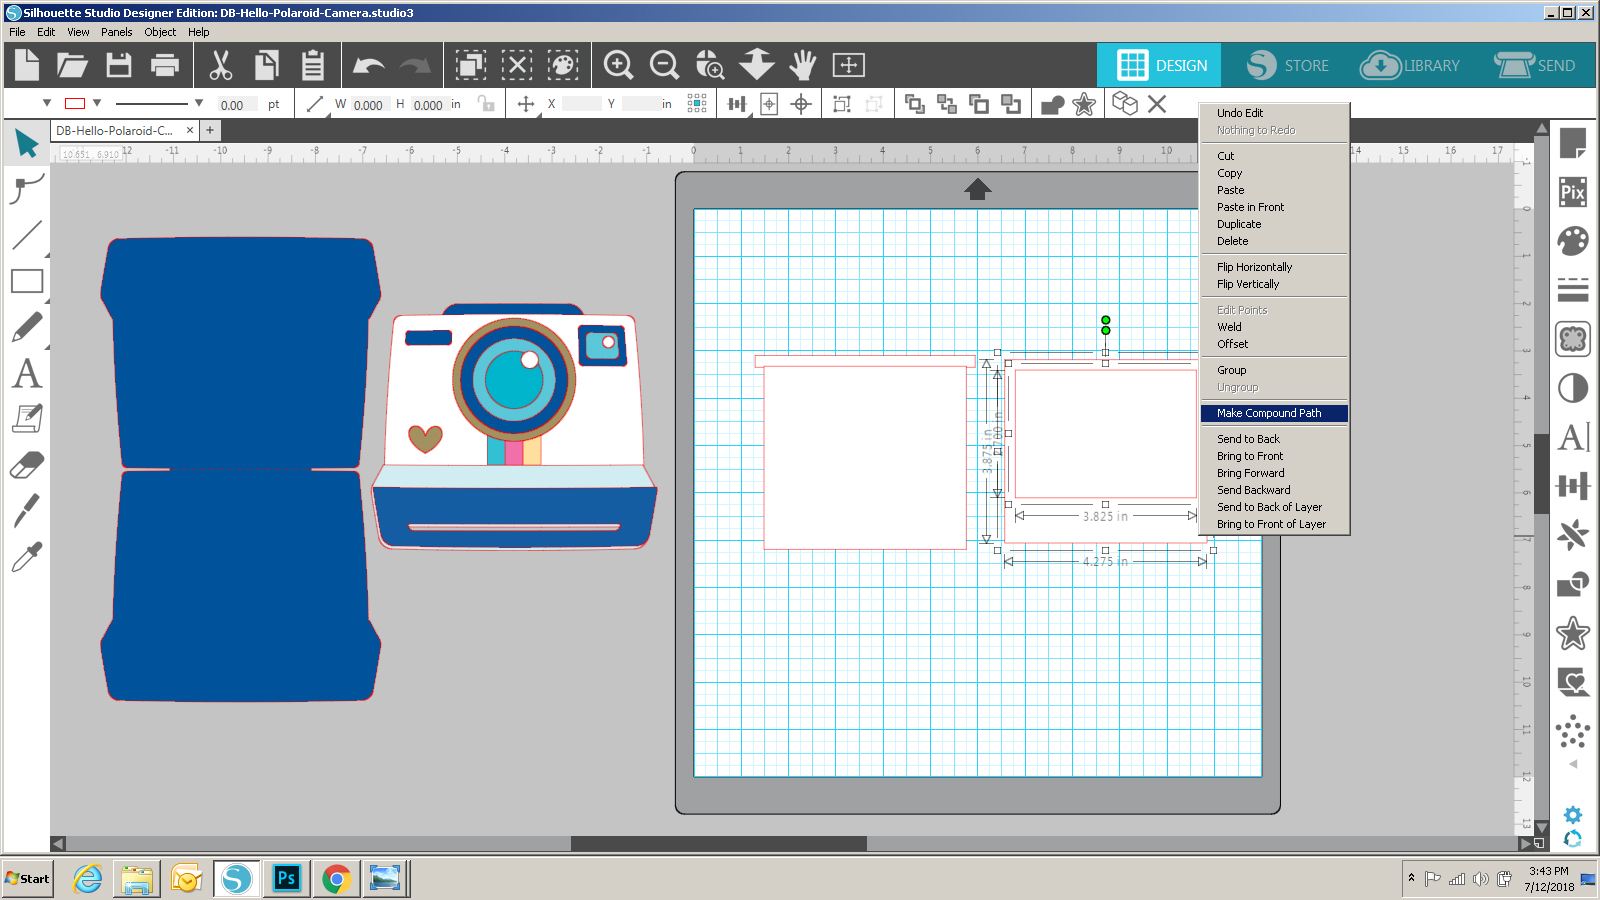
Since the slider part of the card needs to go through all layers of the front of the camera, I needed to copy the "slot" to the layers underneath the top layer.    First I selected both the slot and the small navy bottom piece and copied them.  I then clicked on the copied pieces and right clicked and selected Make Compound Path.  This gave me the completed the navy piece.  I deleted the original small navy piece, leaving just the slot over the light blue piece of the camera. 

I repeated the above process with the light blue piece... Copy both the slot and the light blue piece.  Select both parts of the copy (light blue and slot) and right mouse click, and select make compound path. (this completes the light blue piece)  Delete the original light blue piece, leaving just the slot over the bottom-most navy piece.  


Lastly Select both the larger Navy piece and the slot, right mouse click and select make compound path.  This adds the slot to the bottom most piece. 


 I added the slot in this fashion to make sure that the slots on all 3 pieces were perfectly aligned. 


Next I created my slider piece.  I started by creating two rectangles, both 3.875"H x 4.275"W.  To the top of the one on the left, I added a slim rectangle, (0.25" H x 4.65"W), overlapping them slightly, the selecting both, right mouse click and select weld. 


 For the right hand piece I added a rectangle (2.7"H x 3.825"W) centering it horizontally and towards the top of the existing rectangle.  I selected both pieces, right mouse clicked and selected make compound path.


The result of the above steps gave me the two pieces that make the slider portion of the card.


Once I cut all the pieces, I started assembling the card.  On the camera face, I added some foam tape under the top to circles of the lens to add dimension.  For the camera slider piece, I created a little scene inside the photo frame using stickers and patterned paper, then glued the whole thing onto the other rectangle.


To create the slider mechanism, first layer the camera face over the card base and trace the slot onto the base.  This will not be seen once the card is complete.


Next, Using the widest part of the slider piece, mark lines on the bottom by the slot, and then on the top about .675" down from the top (5/8 of an inch)


Draw lines connecting all of the marks.  This gives you your guides for adding foam tape.


Add a double layer of foam tape just slightly outside the lines drawn.  Do not overlap the lines, this will prevent your slider from moving up and down.


Before removing the top cover from my tape, I used a powder tool to go over the edges of the tape.  This will help the slider to move more smoothly.


Before adding the Camera Face to the base, slip the slider piece through the slot in the camera face from front to back.


Once this is done, add the camera face to the card base, making sure everything is aligned... be patient, it'll all be worth it!  I hope you're inspired to try one of your own, be sure to post if you do we'd love to see your creations!  That's it for me today, thanks for stopping by to peek!

Monday, March 5, 2018

Doodlebug Design: Abigail Font Stickers

Hi Everyone!  Today I have some fun cards I created for Doodlebug Design.  I love a good font and the Abigail Font Stickers do not disappoint!  They are a sweet, handwritten font that are fun to mix and match with other Doodlebug Font Stickers and words from the This and That Sticker Sheets!  I used them to make some punny (I can't resist a good pun...) cards, take a peek!


I love making and receiving interactive cards!  For my first card, I created a penny slider easel card using the Rainbow with Clouds cut file from the Fairy Tales Collection and the cute little acetate sun from the Spring Things Odds & Ends Collection..  The cloud paper is from the Spring Things 6x6 Pad and the other papers are from the Petite Prints Collections.


The Abigail Font Stickers in Bumblebee were perfect for my sentiment!  And when you tip the card, the little sun moves along the rainbow!


My next card is a slider card I created using the base of this cut file from Lori Whitlock and papers, stickers and Odds & Ends from the Kitten Smitten Collection.


The Abigail Stickers in Bumblebee coordinated perfectly with the word sticker from the Kitten Smitten This and That Sticker Sheet!  Now for the fun part, when you pull the tab of the card, the kitties get close together!  So cute!!


My last card is a bobble card featuring Papers, Stickers, Odds & Ends and Tiny Heart Shape Sprinkles from the So Punny Collection.


The little tea cup is on a spring and wobbles!  The Abigail stickers in Cupcake were perfect for my sentiment!
Be sure to stop by the blog over the next couple of weeks for more projects featuring the Abigail Font Stickers!  That's it for me today, thanks for stopping by to peek!