Showing posts with label Note Cards. Show all posts

Monday, April 29, 2019

Doodlebug Design | Spring Note Card Set

Today it seems that all communication is done electronically.  We rely on text, email and social media messages, forgetting how much it means to others when we send a little hand-written note or card, and how much we enjoy receiving them!  I thought it would be fun to create a little set of note cards in a box to give as a gift.  This would make a great present for a mom, friend or teacher...take a peek...

I used a few of  the new Doodlebug Stamp Sets to create the cards.  I kept them pretty simple... just a small 3x3 card with an image and a sweet sentiment, backed with papers from the Simply Spring and Hoppy Easter 6x6 pads.  I even made little coordinating envelopes from the 12 x 12 coordinating papers.  Here are some close-ups of the cards...


To house them I created a little box using Silhouette Model Maker.  I decorated it with some of the flowers from the Garden Flowers Craft Kit, the Spring Fling Odds & Ends and a cute little butterfly from the Little Critters Shaped Sprinkles.


The cards and envelopes fit perfectly!


If you would like to make a set for yourself, I have the Silhouette files for the box and envelope on my blog here.  If you do use the files, be sure to tag Doodlebug on social media, we'd love to see what you make!  That's it for me today, thanks for stopping by to peek!

PRODUCTS USED:
Simply Spring Collection - Sprinkles - Little Critters
Spring Garden Collection - Craft Kit - Garden Flowers
Simply Spring Collection - Odds and Ends - Die Cut Cardstock Pieces
Simply Spring Collection - Clear Photopolymer Stamps - Flower Girl
Simply Spring Collection - Metal Dies - Flower Girl
Simply Spring Collection - Clear Photopolymer Stamps - Oh Boy!
Simply Spring Collection - Metal Dies - Oh Boy!
French Kiss Collection - Clear Photopolymer Stamps - You're Sweet
Simply Spring Collection - 6 x 6 Paper Pad
Hoppy Easter Collection - 6 x 6 Paper Pad
Simply Spring Collection - 12 x 12 Double Sided Paper - Hoppy Spring
Simply Spring Collection - 12 x 12 Double Sided Paper - Playful Plaid
Hoppy Easter Collection - 12 x 12 Double Sided Paper - Jellybean Plaid
Hoppy Easter Collection - 12 x 12 Double Sided Paper - Sunday Dress
Hoppy Easter Collection - 12 x 12 Double Sided Paper - Hoppy Easter

Thursday, February 15, 2018

Lori Whitlock: Using Pattern Fills in Silhouette

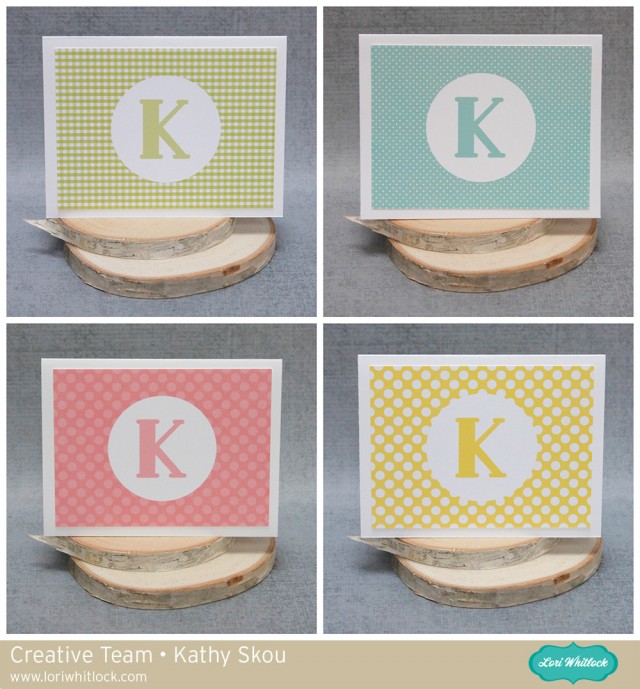
Hi Everyone!  Today I have some fun monogrammed note cards I created using Lori Whitlock's Pattern Fills and my Silhouette.  When I was younger, I always had note cards lying around in case I needed to write a thank you or thinking of you card.  These days with email and texting, it seems like a lost art, but I still think it's important to send a hand written note for some situations!  I created these to have on hand, in case nothing but a hand written note would do!


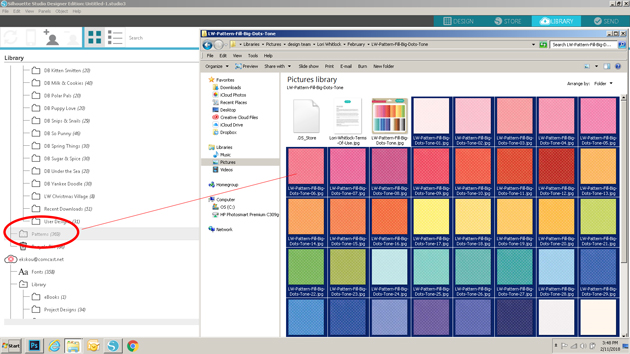
Before I show how I created the cards, I thought it would be helpful to show how to add these patterns to your Silhouette Library.  Once you've purchased the files from Lori's Shop (they are not available through the Silhouette Store) you want to unzip the file.  Next you will want to open your Silhouette Library, and also open another window showing the Fill files on your computer.  To add them in bulk to your library, select all of the files at once, click and drag them over to the Patterns category of your library as shown below...


This will add all of the files to your Silhouette library at once, and they will be available for use through the Patterns category of the Fill function.  Now for the cards themselves.  I actually didn't create the whole card in Silhouette, just the front layer.  By creating just this layer, it enabled me to get more per piece of paper since I wasn't cutting the entire card.  I started by opening my Silhouette software and creating a 3.75" x 5" rectangle.  This is the size of my front layer and allows for a .25" border all around. (my note cards are standard A2 sized or 5.5" x 4.25")


Next, I added the fill to this rectangle.  To do this I clicked on the fill button (the paint palate icon), then selected fill pattern (the dotted button).  This brings up all of the fills I've loaded to my Silhouette Library.  I scrolled down until I found the pattern.  I clicked on my shape to select it, then clicked on the pattern fill I wanted.


The next step was to create the Monogram Circle.  I started by drawing a circle using the shape tool.  I sized it to be 2.5".   I filled that circle with white using the Fill function, selecting the circle and clicking on the white square.


For the letter I chose Lori's Deco Font (Lori's Shop, Silhouette) and sized my letter to 100.


I wanted my letter to be the same color as my background.  To do this, I first selected my letter by clicking on it, and opened the Fill Window.  I clicked on the dropper icon, then moved over to a blue area on my background piece and clicked.  This added the background color to my letter.


The last steps of design were simply to center everything for printing.  I first centered the letter in my circle using the Transform Panel.


Using the same buttons, I then centered the circle on my background.


Once everything was centered, I selected all portions of the design, right mouse clicked and selected group.  This is a very important step.  It allows you to cut just the outside of the design when using the Silhouette  print and cut function.


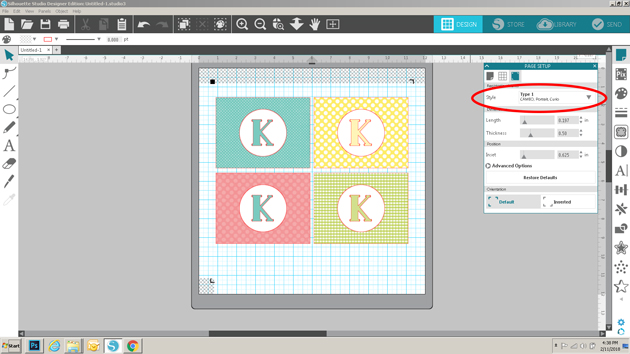
I created a few different cards using the same method and some different fills.  I then set up the printer registration marks by selecting Page Set Up, Registration marks and Type 1 Cameo.  I have a wide format printer, so I can print 12" x 12".  If you're using a standard printer, you would set up the paper size to be 8.5" x 11" (from the page set up menu) and you would need to print 2 per page rather than 4.


I then sent the file to print.


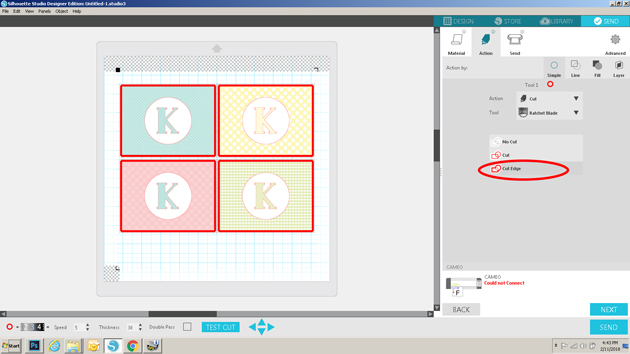
Once printed, I clicked on send, selected my media, then most importantly selected cut edge under action.  Since I grouped each of the cards to be one file, this will insure that only the edges of the card fronts are cut.  I then sent it to cut.


To finish my cards, I glued the front layers to a standard A2 Card ( paper cut to 5.5" x 8.5" then folded in half for card).


These would make a fun gift for a friend or family member!  I've also used the same process to make thank you notes for my daughter to send to companies she has interviewed with for her summer internship!  The possibilities are endless.   That's it for me today, thanks for stopping by to peek!