Showing posts with label Love Notes. Show all posts

Monday, February 24, 2020

Doodlebug Design | Typewriter Box Card

I love typewriters.  They are so retro and fun.  I have a 1950's teal typewriter in my craft room, it just makes me happy.  It's my love of typewriters that made me determined to create a box card based on the adorable little typewriter icon in the Doodlebug Design Love Notes Collection.  It took a few tries, but I finally found success... take a peek...


How cute is this card??!! I originally thought it would be great for Valentine's Day, but when I thought more, this card could be used for any number of occasions.  I created 3 different typed sentiments.  Here are some close-ups...


The card even folds flat to fit into a standard 5x7 envelope.


I created an SVG file for this card, which includes all 3 sentiments (it does not include the envelope).  It is available exclusively in the Lori Whitlock SVG Shop here.


I also put together a quick assembly tutorial.


1) Start by cutting the pieces.  The paper with the sentiment is done using Print and Cut.  Add the roller bar, paper and paper guide to the main piece as shown.  Add the keys and space bar to the typewriter key inserts.
2)  Add the dark grey rectangle to the back of the insert with the notch as shown.  Add the light grey "keys" to the top center of that piece.
3)  Add the front strip to the main typewriter piece to form the "box" for the box card.  The tabs are glued on the inside.
4)  Add adhesive to the biggest insert's tabs.  Insert into the box, aligning the edge tabs with the back of the box.  It should be flush to the bottom of the box.  Press the tabs to the typewriter sides to secure.


5)  Add the front (shortest) keyboard insert.  Add adhesive to the tabs, insert towards the front of the box.  A good guide is to use the tabs from the front of the box to align.  Press the tabs to the side to secure.
6) Repeat with the middle-size keyboard piece.  Use the tabs from the front insert as a guide to where to glue.
7) Repeat with the last keyboard piece.

A general note on box cards.  You want the tabs for all of the inserts to be folded in the same direction so your card will fold flat.

If you make one of these Typewriter Box Cards, be sure to tag Doodlebug Design on Facebook and Instagram!  We would love to see your creations!  That's it for me today, thanks for stopping by to peek!

Doodlebug Products Used
Dot Stripe Petite Prints Collection
Gingham Linen Petite Prints Collection

Other
Silhouette Cameo

Tuesday, February 11, 2020

Lori Whitlock | February Creative Team Blog Hop


Hi Everyone!   It's time for the February Creative Team Blog Hop over at Lori Whitlock!  You should have arrived here from Traci's Blog.  Here's the order for today's hop!

Lori Whitlock
Traci Penrod

Kathy Skou {you are here!}
Anita Mulcahey
Brandie Adams
Aimee Kidd
Ashley Cook

I made the Box Card Valentine Truck Back End (SVG, Silhouette)


I pieced this card together using some Love Notes and Petite Prints from Doodlebug Design.
There's a sale happening in the Lori Whitlock SVG Shop!  Use code FEB2020 to get 30% off all SVGs , Fonts and Commercial Licenses!


Also, how about a free file!!  This file is free for today only!  No code or minimum required.


Finally, how would you like to win a $20 Coupon to Lori's SVG Shop!

a Rafflecopter giveaway

Your next hop stop is Anita!  That's it for me today, thanks for stopping by to peek!

Monday, February 10, 2020

Doodlebug Design | Love Notes Flower Mason Jar Box Card

I love fresh flowers, they really brighten up a room.  We have a farm stand near us that sells little bunches of flowers in Mason jar vases.  They are so fun, and make the perfect gift!  When I saw the jar with flowers in Doodlebug's Love Notes Odds & Ends pack, I thought it would make a fun card... flowers that would always be bright and cheery!


I used a combination of Petite Prints and Love Notes Papers for the card.  The jar sides are made from transparency material.  I finished it off with a little tag from the Kissing Tag Paper and some Doodle Twine.  The card folds flat for mailing.


I created an SVG for this card and it is available exclusively in the Lori Whitlock SVG Shop.  Here is a quick tutorial to help you piece it together.

1)  Start by cutting the pieces.  Glue the jar shapes to the 2 larger transparencies.  Add the stems to the smaller transparency.  Add the flowers to the top piece and the inside pieces to the jar lid.
2)  Fold the base piece as shown.  Glue the two sides of the Jar to the base.
3)  Add the longer folded strip to the bottom of the jar, making sure it is centered.
4)  Add one of the smaller folded strips to the top of the transparency with the stems.
5)  Glue the transparency with the stems to the inside of the jar lids as shown.  Make sure it is centered.
6)  Add the cover to the Jar, gluing in place.  Add a little adhesive to the folded strip on the bottom of the card to hold the bottom of the transparency insert.
7)  Add the remaining folded strip to the back of the flowers piece and fold out the ends.  
8) Glue to the top of the jar lid, centering.

This card can be used for a number of occasions including Valentine's Day, Mother's Day, Birthdays and "just because."  If you make one, be sure to tag Doodlebug Design on Facebook and Instagram, we would love to see your creations!  That's it for me today, thanks for stopping by to peek!

Doodlebug Products Used
Love Notes Collection
Linen Gingham Petite Prints

Other
Transparencies


Monday, January 27, 2020

Doodlebug Design | Love Notes Box Card

Valentine's crafting is some of my favorite crafting and I'm having so much fun playing with the new Doodlebug Design Love Notes Collection.  The little icons are just the cutest!  I especially loved the love letter piece from the Odds & Ends and decided to turn it into a Box Card.  Take a peek...


As soon as I saw the I Love You print on the Secret Admirer paper I knew I had to use it!  I combined it with the hearts side of the Rose Garden paper and some Cherry Petite Prints to make my envelope. 


The Heart to Heart shaped sprinkles are awesome, I love their slightly wonky shapes!


I finished the card with some pieces from the Odds and Ends.  The little birdies are adorable!  Now for the fun part!  I created an SVG for this file and it is available exclusively in the Lori Whitlock SVG Shop here!


Here is a tutorial showing how to assemble the card... it's really easy!

1.  Start by adding the decorative layers to the main body pieces of the envelope and the letter as shown.
2.  Add the triangle piece to the "V" piece to form the front of the envelope.
3.  Attach the sides to the front of the card, gluing the tabs inside, then attach to the back piece of the card.  The bottoms of the sides should be flush with the bottoms of the front and back pieces.
4. Fold the tabs on the insert back, add adhesive to the outside of the tabs.  Slide it into the envelope "box" and press to the sides.  I made the tabs flush with the back of the card.
5. This is the finished card.  There is also a print and cut sentiment piece that says Happy Valentine's Day. (see my finished card)

If you make one of these cards be sure to tag Doodlebug Design on Facebook and Instagram, we always love to see your creations!  That's it for me today, thanks for stopping by to peek!

Monday, January 20, 2020

Lori Whitlock | Memorydex Box and Cards

Hi Everyone!  I'm excited to bring you some brand new files that are in the Lori Whitlock SVG shop and coming to the Silhouette Store!  Memorydex scrapbooking is making a comeback!  They are perfect for documenting weekly favorite photos, December daily, recipes,  events... whatever!  I decided to use this Memorydex box for my weekly photos.  My goal is to do a card a week in 2020 documenting my favorite picture of that week.  Take a peek...


I started with the new Memorydex Box and Cards file (SVG, Silhouette).  I decorated the base box using some Doodlebug Design Love Notes collection and Abigail Alphas.  I then created cards for my first two weeks of 2020.

For week one, I used one of the new Memorydex Foldover Cards (SVG, Silhouette)  I love how you can decorate the front of the card, and add extra photos on the inside!  It's great for when you can't pick just one photo to document!  The base of my cards are Doodlebug Design Petite Prints.  I used some Sweet Summer Stickers to document our recent trip to the Keys.


For week 2 I used one of the new Memorydex Scalloped Cards (SVG, Silhouette)


I made a set of all the new cards that coordinate with the Memorydex Box, so that it's easier for me to keep up with documenting my year!


Memorydex Foldover Cards (SVG, Silhouette)


Memorydex Scalloped Cards (SVG, Silhouette)


Memorydex Envelopes (SVG,Silhouette)

I put together a quick tutorial showing how to assemble to box, you can find it over on the Lori Whitlock Blog.  


If you make a Memorydex box using this file, we would love to see your projects!  Be sure to tag Lori Whitlock on Facebook and Instagram so we can see!  That's it for me today, thanks for stopping by to peek!

Monday, January 13, 2020

Doodlebug Design | Love Notes 3D Mailbox

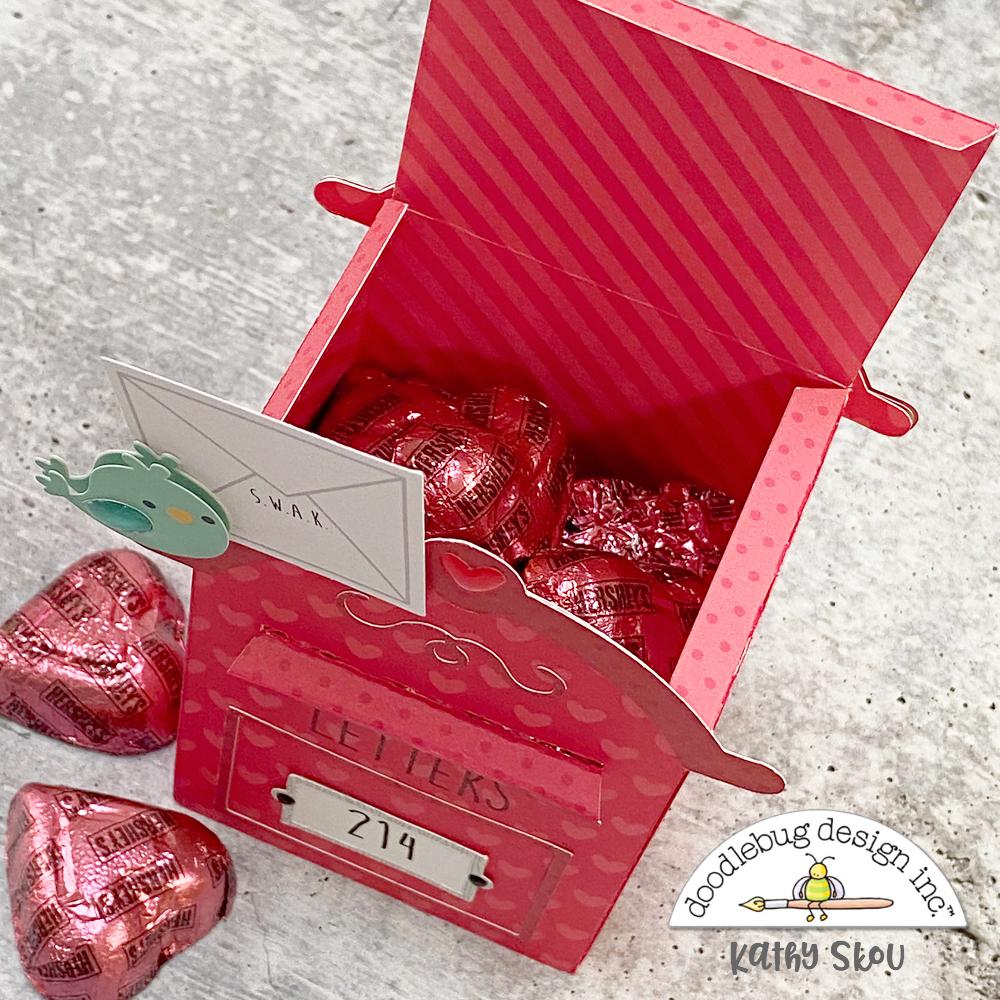
Valentine's Day is just a month away... what better way to celebrate than to get crafting with Doodlebug Design's new Love Notes Collection!  This collection is just so cute!  The colors, the icons...everything!  As soon as I saw the little mailbox in the Odds & Ends pack, I knew I had to make a 3D version.  Take a peek...


This fun little mailbox can be used to hold little love notes (the opening is 1.75" wide...the Mini Love Notes fit perfectly!) or a treat!  The finished box size is approx 2.5"W x 3.25"H x 2.25"D.  I added the birdie from the Tweethearts Doodlepops and a love note from the Odds & Ends package.  The heart in the top center is from the new Heart to Heart Shaped Sprinkles.  Here are some close-ups...


Now for the fun part!  The SVG I created for this project is available exclusively in the Lori Whitlock SVG Shop here, so you can make your own mailbox to give!


If you make one, be sure to post it and tag Doodlebug Design on Facebook and Instagram.  We love to see your creations!  That's it for me today, thanks for stopping by to peek.

Doodlebug Products Used
Love Notes Collection
Dot Stripes Petite Prints Collection
Beetle Black Sprinkles