Showing posts with label 3D Card. Show all posts

Monday, December 26, 2022

Doodlebug Design | Candy Cane Lane Happy 2023 Pop Up Card

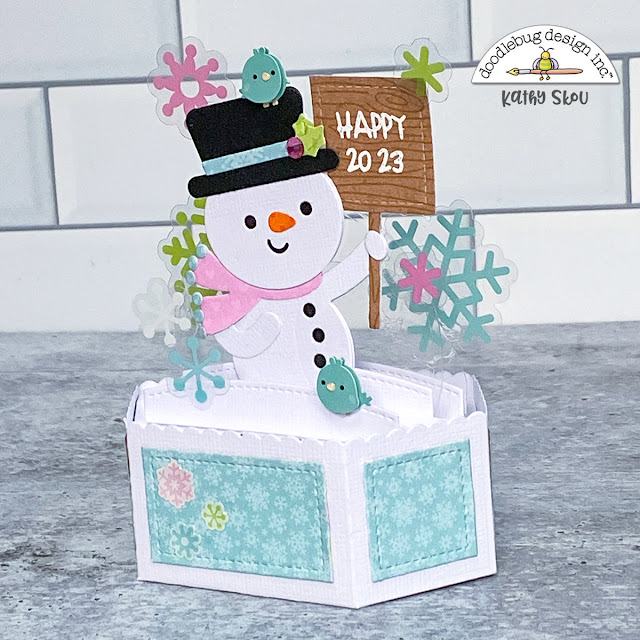
I hope everyone had a wonderful holiday!  We are still in the swing of things with another family party today!  Before the craziness set in I got to play with the Candy Cane Lane Collection.  I knew my project would post after Christmas so I wanted to do a New Year's themed project.  I came up with this fun little snowman pop up card.  Take a peek...


For my snowman, I used the Snow Sweet Doodle Cuts.  I cut off the Christmas tree top of the die cut, and added a little square sign in it's place.  The trunk of the tree worked perfectly as a sign post!


I added some transparency half circles to my card inserts so that I could add a whole "flurry" of the acetate snowflakes from the Bits & Pieces pack.  I love how they look like they're floating.  To attach them I used some clear glaze.  I also added the two birdies from the Love You Deerly Doodle Pop.


The happy on my sign is from the Happy Birthday Doodle Stamp set.  For the year, I used the date stamps from the Handwritten Calendar Doodle Stamps.  I stamped them in white, and added some white embossing powder so they would stand out a bit more.


I finished the base with a few snowflakes from the Frosted Flurry shaped sprinkles.  

I hope that everyone has a Happy and Healthy New Year!  I will be back in 2023 with more Doodlebug goodness! Thanks for stopping by to peek!


DOODLEBUG PRODUCTS USED

Candy Cane Lane Collection
Snow Cute Doodle Cuts
Happy Birthday Doodle Stamps
Handwritten Calendar Doodle Stamps

OTHER

Lawn Fawn Pop Up Platform Card Dies
Liquid Glaze
 Lawn Fawn Stitched Square Die
White Pigment Ink
White embossing powder
Acetate

Monday, June 27, 2022

Doodlebug Design | My Happy Place Stamped Pop Up Cards

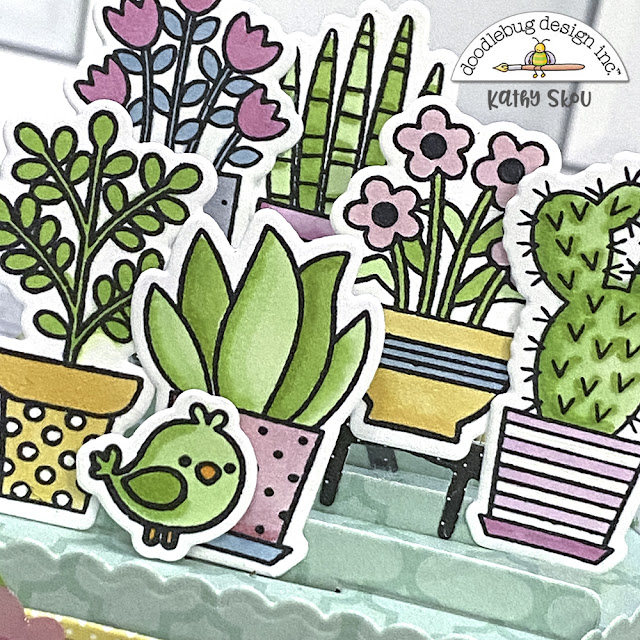
Have you seen the stamp sets that are part of the My Happy Place Collection?  There are 2 new ones... Happy Home and Garden Girl.  They are full of super cute images!  As soon as I saw them I knew I had to make a couple of fun pop up cards.  Take a peek...


I started with the Garden Girl Doodle Stamps.  I love all of the fun plants!  They make me think of my dad's green house!  I made the base of my card with the blue side of the Enjoy the Ride paper.  I stacked my plants on some cute little benches, and then added the birdie.  I love the "you grow girl" sentiment!  I added a few of the In the Garden shaped sprinkles to complete the look.


For my next card, I used the Happy Home Doodle Stamps and Doodle Cuts.  I have friends moving into a new house, and thought this would be a fun card to help celebrate their new "happy" place.  I made a little scene with one of the houses, some trees, the fence and that adorable little car.  I added more of the In the Garden shaped shaped sprinkles .


I just love that little car!!!  Have you made any projects using the new stamps?  Make sure to tag Doodlebug Design on Facebook and Instagram.  We always love to see your creations!  That's it for me today, thanks for stopping by to peek!

DOODLEBUG PRODUCTS USED

My Happy Place Collection
My Happy Place Coordinating Petite Prints

OTHER

Lawn Fawn Platform Pop Up Dies
Lawn Fawn Banner Die
Copic Markers
Acetate


Monday, June 13, 2022

Doodlebug Design | My Happy Place Birdcage Card

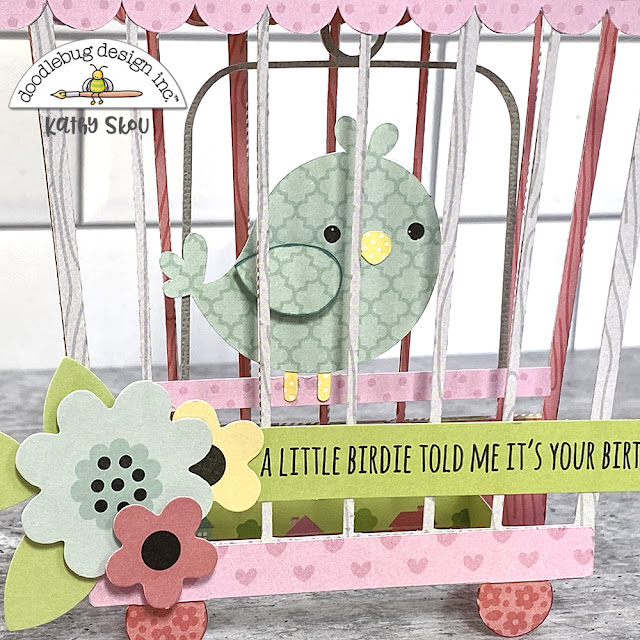
The new My Happy Place Collection is so much fun!  (How could I not love it when my blog is named the same!) The colors, the icons.... and the cut files!  If you know me, you know I love Doodlebug's cut files, and When I saw the Bird in Cage file I immediately had an idea for a fun box card.  Take a peek.... 

I turned the flat birdcage into a 3D shape, where the little birdie hangs down!  In addition to using some papers from the collection, I also added some of the flowers from the Bits & Pieces pack.  These flowers are perfect to embellish just about anything!  I also used the perfectly punny sentiment from the Chit Chat pack.


To make the cage stand up, I added 2 thin strips of cardstock, folded into a box shape to the top and bottom of the cage pieces, then I layered the back piece of the cage so they were centered. To attach the bird, I glued a strip the same thickness as the top and bottom boxes and about 1" wider than the folded box.  I scored glued the bird and his perch to the center, then folded back about 1/2" on each side of the strip and glued the folded sections to the side of the box on the top.  This way he hangs freely.

Since the top and bottom "box strips" are centered and the same size, the card can fold flat for mailing.  I thought this would also make a darling anniversary or wedding card.  You could create another birdie, mirror image and add it to the perch with his friend!

Have you created any projects using the My Happy Place Collection or cut files?  Be sure to tag Doodlebug Design on Facebook & Instagram.  We love to see what you create!  That's it for me today, thanks for stopping by to peek!

DOODLEBUG PRODUCTS USED


My Happy Place Collection
My Happy Place Coordinating Petite Prints
Buffalo Check/Woodgrain Petite Prints (Cherry, Gray)
My Happy Place - Bird in Cage SVG

OTHER

Silhouette Cameo
Adhesive/Pop Dots

Thursday, April 1, 2021

Doodlebug YouTube Hop with EricaRose Creates

Today I'm participating in a fun Doodlebug YouTube Hop organized by Erica Thompson from EricaRose Creates.  I have a video showing how to make this fun card featuring Doodlebug's Hippity Hoppity Collection....

There are 10 designers in the hop today.  Here is the Hop order...

Lisa Fonseca Lacey Igo Gasper Ashley Bright Shellye McDaniel Fiona Hogben Jody Compton Kathy Skou Fran Long Lori Whitlock Erica Thompson

Make sure to stop by each of their channels, subscribe and leave some love to be entered to win a fun Doodlebug Prize Pack!

Thursday, March 11, 2021

Lori Whitlock | Easter Bunny Truck Card

 Hi Everyone!  I'm up on the Lori Whitlock Blog today with a tutorial showing how to assemble her new Box Card Truck Front End Easter Bunny file (SVG, Silhouette).  Take a peek...


How stinkin' cute is this card?  The bunny paws on the steering wheel just kill me!  No more hopping down the bunny trail... it's all zoom-zoom now!  I used some Petite Prints from Doodlebug Design to piece it all together.

The card also folds flat and fits into a 5x7 envelope.  For the full assembly tutorial, head over to this post on Lori's Blog.  That's it for me today, thanks for stopping by to peek!


Wednesday, March 3, 2021

Lori Whitlock | Unicorn Rectangle Pop Up Card

 It's all sunshine, unicorns and rainbows on the blog today... because let's face it, we could use some cheer!  I pieced together Lori Whitlock's new Unicorn Rectangle Pop Up Card (SVG, Silhouette) using some papers from Doodlebug Design... take a peek...


These cards are so fun... they look great on a shelf, and they fold flat for mailing!  This card fits in a 6x6 envelope.  


Lori has a number of pop up cards, for all types of occasions.  You can find tutorials for all of Lori's Pop Up type cards here on her YouTube Channel.  That's it for me today, thanks for stopping by to peek.


Tuesday, August 11, 2020

Lori Whitlock | August Creative Team Blog Hop


Hi Everyone!   It's time for the August Creative Team Blog Hop over at Lori Whitlock!  You should have arrived here from Traci's Blog.  Here's the order for today's hop!

Lori Whitlock
Traci Penrod
Kathy Skou {you are here!}
Anita Mulcahey
Brandie Adams
Ashley Cook
Cathy Harper

I made the Record Card (SVG, Silhouette (coming soon))  It's such a fun little card!  I pieced it together using some papers from Doodlebug Design's Party Time and Hey Cupcake Collections.


There's a sale happening in the Lori Whitlock SVG Shop!  Use code AUG2020 to get 30% off all SVGs , Fonts and Commercial Licenses!


Also, how about a free file!!  This file is free for today only!  No code or minimum required.


Finally, how would you like to win a $20 Coupon to Lori's SVG Shop!


a Rafflecopter giveaway

Your next hop stop is Anita!  That's it for me today, thanks for stopping by to peek!

Monday, July 27, 2020

Doodlebug Design | Bar-B-Cute Picnic Basket Box Card

There's something special about a picnic... yummy food, outside in the fresh air, with friends!  That's what inspired this fun box card.  Even better, this picnic has no calories!  Take a peek...


I filled my basket with a bunch of the food icons from the Bar-B-Cute Odds & Ends pack, I just love the smiles,they really make me happy!    I used the red & white check paper from the 6x6 pad for my table cloth, and the sentiment is from the Chit Chat Pieces.  Here's a close-up...


And of course I had to complete the look with an ant from the Picnic Parade Sprinkles.  They are the only ants that don't require a call to the exterminator! 


Have you made any projects using the Bar-B-Cute Collection?  Be sure to tag Doodlebug Design on Facebook and Instagram.  We love to see your creations.  That's it for me today, thanks for stopping by to peek!


Monday, June 29, 2020

Doodlebug Design | Land That I Love Shadow Box Card

The Fourth of July will be here before we know it!   Most of the fireworks around where I live have been cancelled, but I was able to make may own using the Land that I Love Collection.  Take a peek...


I altered the base of this shadow box card from Lori Whitlock to make the base of the card.  I covered the outside of the card with the fireworks side of the Summer Celebration paper.  For the night sky inside, I used the Hip Hip Hooray paper.


Inside the card, I added some of the fireworks Odds & Ends pieces along with stickers from the Icons sheet in the shadow box.  I love the dimension of a shadow box card, it looks like a night sky full of lights!


To finish  I popped out the cute little eagle on the front and added a firework sticker from the Icons sheet to his "wing" so it looks like he's setting off more fireworks.  I also added the sentiment banner from the set.  The best part of this card is it folds flat for mailing.  Have you made any projects using the new Land That I Love Collection?  Be sure to tag Doodlebug Design on Facebook and Instagram, we love to see your creations!  That's it for me today, thanks for stopping by to peek!

DOODLEBUG PRODUCTS USED:
Land that I Love Collection

Tuesday, June 9, 2020

Lori Whitlock | June Creative Team Blog Hop


Hi Everyone!   It's time for the June Creative Team Blog Hop over at Lori Whitlock!  You should have arrived here from Traci's Blog.  Here's the order for today's hop!

Lori Whitlock
Traci Penrod
Kathy Skou {you are here!}
Anita Mulcahey
Brandie Adams
Aimee Kidd
Ashley Cook
Cathy Harper

I made the new Vespa Box Card  (SVG, Silhouette)  It's such a fun little card!  I pieced it together using some papers from Doodlebug Design.


There's a sale happening in the Lori Whitlock SVG Shop!  Use code JUN2020 to get 30% off all SVGs , Fonts and Commercial Licenses!


Also, how about a free file!!  This file is free for today only!  No code or minimum required.


Finally, how would you like to win a $20 Coupon to Lori's SVG Shop!


a Rafflecopter giveaway

Your next hop stop is Anita!  That's it for me today, thanks for stopping by to peek!

Monday, March 9, 2020

Doodlebug Design | Kitten in a Cup

If you're a cat lover like me, you probably fell in love with the Doodlebug Design Kitten Smitten Collection from a few years ago.  I'm happy to "revisit" that collection often (in fact I may be hoarding some of it in my stash!)   The same goes for the Kitten Smitten Cut files.  I played with the cut files recently and designed this fun box card... a kitten in a teacup.. could it be any cuter?


The tea bag tag is blank in the card so I decided to use two stamps from the the new Love You Stamp set to add a sentiment.


If you haven't seen the new Occasions Stamp Sets, you're in for a treat!  There are SO many different sentiments in all sizes and fonts... you can mix and match with all of the Doodlebug Stamp sets to make a card for any occasion!


My card even folds flat to fit in a 5x7 envelope.


I created an SVG file for this card and it is available exclusively in the Lori Whitlock SVG Shop here.


Here is a quick assembly tutorial for the card...

1)  Start by cutting the pieces of the card.  Stamp a sentiment on the tag if desired.
2)  Glue the cat face onto the insert piece.  The black piece goes behind the face to show through the eyes and mouth.  Add the hearts and paws to the cup.  I used some foam tape behind the paws to give them some dimension.  Fold the "box" into shape and glue.
3)  Add the cup front and back to the box.  Fold the tabs on the kitty insert and add adhesive to the tabs.
4)  Slide the kitty insert into the box.  It should be flush with the bottom of the card.  Press the tabs to the sides of the box to adhere.

All that's left is to send the card off to your favorite crazy cat lady (or man....)!


That's it for me today, thanks for stopping by to peek!

Doodlebug Products Used:
Doodle Stamps Love You
Simply Spring Collection
Dot Stripe Petite Prints Collection
Gingham Linen Petite Prints Collection


Other Products:
Silhouette Cameo
Black Ink

Monday, December 16, 2019

Doodlebug Design | Winter Wonderland Snow Globe Card

I am so excited to be kicking off a couple of weeks of Winter Wonderland inspiration on the Doodlebug Design Blog.  If you haven't seen this collection yet, you're in for a treat!  The colors, the icons, the patterns... its all so yummy.  The whole collection immediately made me think of a snow globe, so I designed this card to showcase some of the cute icons.


I have to say, not much makes me happier than a Doodlebug Snowman... and this collection is full of them!   Isn't he adorable?    I combined some elements from the Odds & Ends, with some stickers from the Icons Sticker Sheet to make this fun little scene.  To finish the look, I added some of the acetate Snowflake Odds & Ends. If you look close, they seem to be floating!  The winter wonderland sticker is from the This and That Stickers.  Here is a close-up of the scene...


Would you like to make a snow globe card?  Well you can!  I created an SVG file for the card base, and you can fill it with Doodlebug Odds & Ends, Stickers and more!  This SVG file is available exclusively through the Lori Whitlock SVG Shop here.  Here's a quick tutorial showing how I put it all together.


 1)  These are the pieces included  with the SVG File.**  I cut 2 of the back piece so I could have the patterns I wanted showing.  I simply glued them together to form the back piece.
**The remaining pieces are from the Winter Wonderland Odds & Ends, Snowflake Odds & Ends, Icon Stickers and This & That Stickers.
2)  Glue the acetate piece to the snow globe frame.
3)  Add the snow mounds to the background piece as shown
4)  Fold the side pieces along the score lines.


5)  Glue the side pieces to the back of the card as shown.  You want the bottom of the side to be flush with the bottom of the back piece.
6)  Repeat with the other side piece
7)  Next I added the trees.  The larger is from the Odds & Ends Package and the smaller is from the Icons Sticker Sheet.
8)  I then decorated the insert.  The Snowman and bird are from the Odds & Ends pieces and the bunny is from the Icon Stickers.


9)  Fold the tabs on the insert back, and adhesive to just the tabs.  Slide it between the sides of the card, pressing to stick the tabs to the sides.  The bottom of the insert should be flush with the bottom of the back piece.
10)  Add adhesive to the other tabs on the side pieces and add the front of the card to the tabs.  The front is placed in the same manner as the back in steps 5 & 6.
11)  As an afterthought, I added some of the acetate snowflakes to the card.  I glued some on the inside of the acetate piece so they looked like they were floating, some to the back ground piece and a couple others to the snowman and trees.

If you make a Doodlebug snow globe card, we would love to see it!  Be sure to tag Doodlebug Design on Facebook and Instagram, so we can view your creations!  That's it for me today, thanks for stopping by to peek.

DOODLEBUG PRODUCTS USED
Winter Wonderland Collection

OTHER PRODUCTS
Acetate Sheets
Cutting Machine
Foam Tape