With all of the fun papers that Echo Park has out this holiday season, (I own all three collections!!) I thought it would be fun to try for their Fresh Faces Design Team again. This time, my projects are all Christmas themed... a little bit of everything, decor, gifts and of course, a layout! Take a peek...
Christmas Canvases
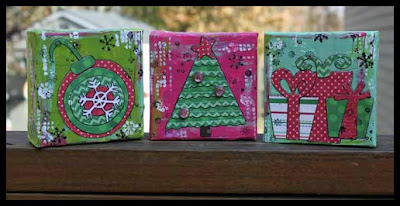 (Supplies Used: Echo Park Holly Jolly Christmas: Stockings Hung, Up on a Housetop, Glad Things, Fa la la la la, Journaling Cards, Decorative Brads
Claudine Hellmuth Studio: Multi-medium Matte, Studio Paints: Blank Canvas, Sky Blue, Dab of Yellow, Yellow Pastel, Dash of Red
Ranger Archival Ink Black, Canvases: Michaels.
iDiecuts: Holly Jolly Ornaments, Holly Jolly Presents, Holly Jolly Tree)I have been bitten by the multi media canvas craze and when I saw the cute little Echo Park Holly Jolly Christmas die cuts at iDiecut.com, I knew I had to use them in a project! If you've never created on canvas before... it's really easy and tons of fun! First, I covered the canvas with scraps of torn paper using Studio multi-medium. This give it some texture. Next I painted over the paper. I used a piece of note card to scrape the paint across the canvas. This allows for some of the paper to show through. I dipped my finger in the paint and covered the sides, then added some colors from the other canvases. I then added the die cut shapes in layers using the Multi medium again.
Once these steps are done, the fun begins! Using stencils and stamps, I added paint and ink all around the canvas. The last step was to doodle a bit around the shapes to make them pop a bit more.  As a final touch, I couldn't resist adding the Holly Jolly Decorative Brads to the tree!
Wine Charms
 (Supplies Used: Echo Park Holly Jolly Christmas: Snowy Tree Tops
Ranger Glossy Accents
Jewelry Findings: Wine Glass Rings, Jump Rings, assorted beads and tiny jingle bells)
I'm always looking for that easy & fun hostess gift idea during the holidays, and it doesn't get much easier than these adorable wine charms! You won't believe how simple they are to make!
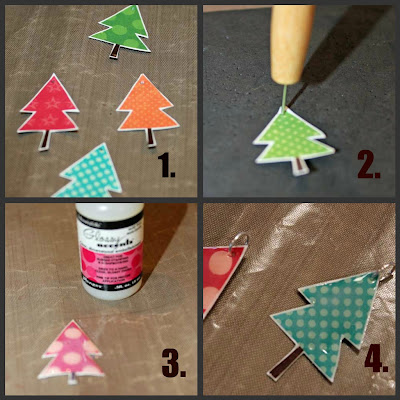
To start, I cut a few Christmas Trees from the Snow Tree Tops paper. I left a little white edge to make the colors stand out. Next, I poked a hole in the top. I then covered the entire tree with Glossy Accents. I added two coats to make the trees sturdier. It's like making your own epoxy stickers. Once dry, I added a jump ring through the hole. All that's left to do is to add the trees and some beads to the wine rings and voila!
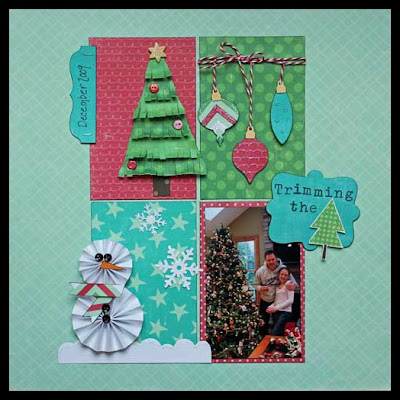 (Supplies Used: Echo Park Holly Jolly Christmas: Snowy Treetops, Snowy Sidewalks, Glad Tidings, Yuletide Blue, Holiday Wrap, Stockings are Hung, Dash Away, Fa la la la la
Card stock: Bazzill
Twine: Maraschino from the Twinery
MFT Die namics: Pleated Rose, Snowflakes, Ornaments, Wonky Border, Bracket Tab, 4-Point Label, Loopy Bloom
Buttons: Stash
Stickles) I had so much fun creating this layout... And the picture is one of my favorites: my husband and daughter trimming the tree.
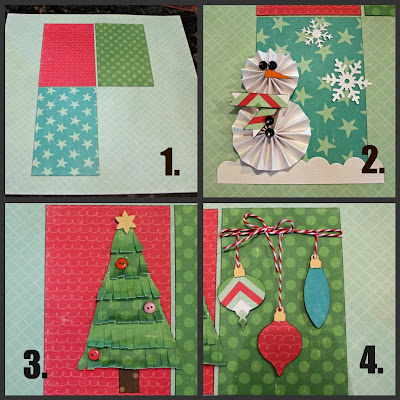
To create the layout, I first adhered 3 1/4"x 5" pieces of the Dash Away, Fa la la la and Glad Tidings Papers to the Snowy Sidewalk background page. I then created a "scene" in each block. The snowman is made from two pleated flowers I created from card stock. I decorated him with buttons and a strip of paper for his scarf. The tree was created by adding layers of fringed paper to a triangle backing. I completed the look with a die cut star, some buttons and a stem. Finally, I die cut the ornaments and "hung" them from a baker's twine bow.
To complete the layout, I added a tab for the date, a title label and Stickles!
I had a lot of fun putting these projects together, and the process definitely got me in a holiday mood! Keeping my fingers crossed!

 I based this layout on a sketch by Frances Sylvia. The picture is of my daughter and friend apple picking at Dowses' Orchard in Sherborn, MA. I finally got to use my apple Whimsy pin!
 For the journalling, I stitched lines on a tag.
 My next layout was based on Creative Scrappers Sketch 182. The picture is from the same day, we went to their farm stand store. Loved the pumpkins!

 That's all for today... I'll be back soon with some December Projects!


