With all of the fun papers that Echo Park has out this holiday season, (I own all three collections!!) I thought it would be fun to try for their Fresh Faces Design Team again. This time, my projects are all Christmas themed... a little bit of everything, decor, gifts and of course, a layout! Take a peek...
Christmas Canvases
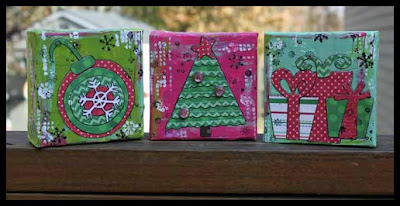 (Supplies Used: Echo Park Holly Jolly Christmas: Stockings Hung, Up on a Housetop, Glad Things, Fa la la la la, Journaling Cards, Decorative Brads
Claudine Hellmuth Studio: Multi-medium Matte, Studio Paints: Blank Canvas, Sky Blue, Dab of Yellow, Yellow Pastel, Dash of Red
Ranger Archival Ink Black, Canvases: Michaels.
iDiecuts: Holly Jolly Ornaments, Holly Jolly Presents, Holly Jolly Tree)I have been bitten by the multi media canvas craze and when I saw the cute little Echo Park Holly Jolly Christmas die cuts at iDiecut.com, I knew I had to use them in a project! If you've never created on canvas before... it's really easy and tons of fun! First, I covered the canvas with scraps of torn paper using Studio multi-medium. This give it some texture. Next I painted over the paper. I used a piece of note card to scrape the paint across the canvas. This allows for some of the paper to show through. I dipped my finger in the paint and covered the sides, then added some colors from the other canvases. I then added the die cut shapes in layers using the Multi medium again.
Once these steps are done, the fun begins! Using stencils and stamps, I added paint and ink all around the canvas. The last step was to doodle a bit around the shapes to make them pop a bit more.  As a final touch, I couldn't resist adding the Holly Jolly Decorative Brads to the tree!
Wine Charms
 (Supplies Used: Echo Park Holly Jolly Christmas: Snowy Tree Tops
Ranger Glossy Accents
Jewelry Findings: Wine Glass Rings, Jump Rings, assorted beads and tiny jingle bells)
I'm always looking for that easy & fun hostess gift idea during the holidays, and it doesn't get much easier than these adorable wine charms! You won't believe how simple they are to make!
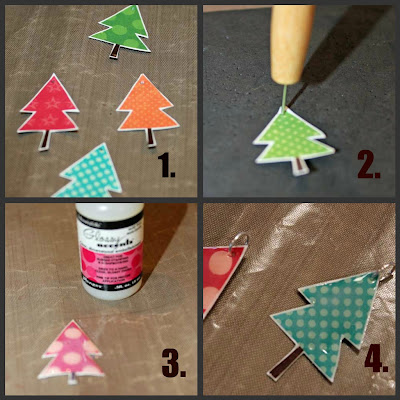
To start, I cut a few Christmas Trees from the Snow Tree Tops paper. I left a little white edge to make the colors stand out. Next, I poked a hole in the top. I then covered the entire tree with Glossy Accents. I added two coats to make the trees sturdier. It's like making your own epoxy stickers. Once dry, I added a jump ring through the hole. All that's left to do is to add the trees and some beads to the wine rings and voila!
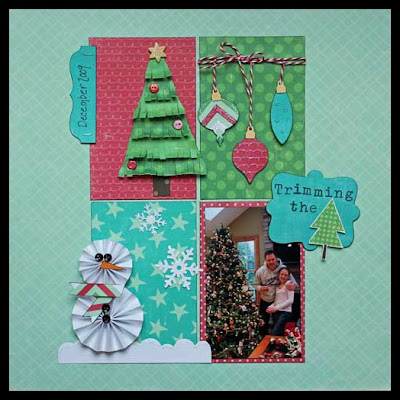 (Supplies Used: Echo Park Holly Jolly Christmas: Snowy Treetops, Snowy Sidewalks, Glad Tidings, Yuletide Blue, Holiday Wrap, Stockings are Hung, Dash Away, Fa la la la la
Card stock: Bazzill
Twine: Maraschino from the Twinery
MFT Die namics: Pleated Rose, Snowflakes, Ornaments, Wonky Border, Bracket Tab, 4-Point Label, Loopy Bloom
Buttons: Stash
Stickles) I had so much fun creating this layout... And the picture is one of my favorites: my husband and daughter trimming the tree.
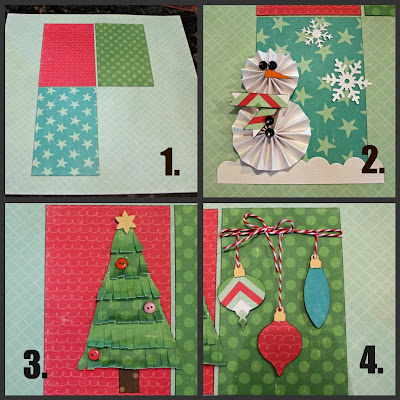
To create the layout, I first adhered 3 1/4"x 5" pieces of the Dash Away, Fa la la la and Glad Tidings Papers to the Snowy Sidewalk background page. I then created a "scene" in each block. The snowman is made from two pleated flowers I created from card stock. I decorated him with buttons and a strip of paper for his scarf. The tree was created by adding layers of fringed paper to a triangle backing. I completed the look with a die cut star, some buttons and a stem. Finally, I die cut the ornaments and "hung" them from a baker's twine bow.
To complete the layout, I added a tab for the date, a title label and Stickles!
I had a lot of fun putting these projects together, and the process definitely got me in a holiday mood! Keeping my fingers crossed!

 I just cut a piece of Echo Park Dots and Stripes Christmas to fit over the top of a lunch bag. I added a snowflake and some Twinery twine and DONE! The little birdie is new from Poppystamps.com and comes with a coordinating die... too cute!
 Next up was all the gift cards for teachers and nieces and nephews (too hard to get them what they want anymore!) I hate to give just a gift card, it needs to be pretty so I came up with these ornament holders. I used the Echo Park Holly Jolly Ornament SVG from iDiecuts.com as the base and just sewed a half circle on the back to hold the card. I finished it off with some Twinery Twine and the dog tag Die namic from MFT.


