Monday, October 29, 2018

Doodlebug Design | Pumpkin Party Cut Files

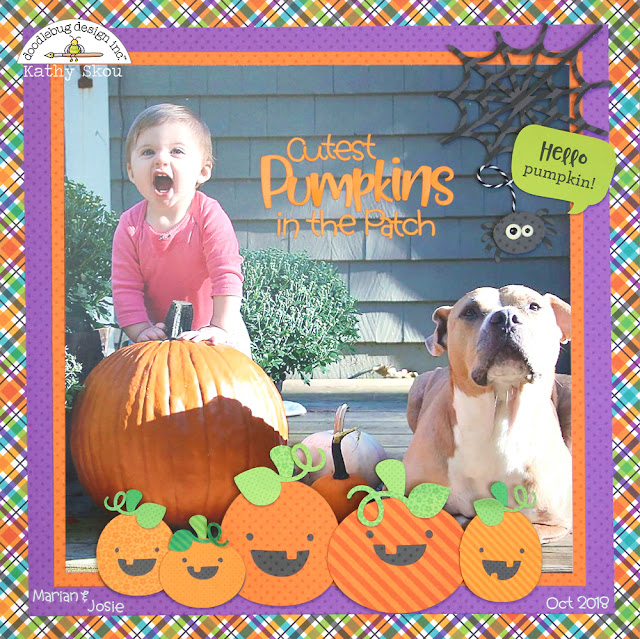
Not long ago, my niece sent me this fabulous picture of my great-niece and great-niece-pup.  As soon as I saw it, I knew I was going to have to scrap it!  When I saw the new Pumpkin Party Cut files which are available in the Lori Whitlock SVG Shop and the Silhouette Store I was immediately inspired!  Take a peek...


That face!!!  Such personality!  I wanted the picture to be the focus so I enlarged it to be 9.5" x 9.5".  I backed it with some new Dot-Stripe Petite Prints in Mandarin and Lilac, and then with the Party Plaid Paper from the Pumpkin Party Collection.  I cut the Pumpkin Party - Pumpkins in a few different sizes from some Dot-Stripe and Floral-Graph Petite Prints in Mandarin.     Here's a hint to make the pumpkins look different... In addition to resizing them I also used the flip horizontally function in Silhouette to make the same file slightly different.


I also added the Web and spider from the Pumpkin Party Web Lantern file to the corner of my layout using some Beetle Black Dot Stripe Petite Prints.  I made the spider 3D by cutting two of the spiders, then cutting one so that it was just the body.  I then layered them with some foam tape between the layers for dimension.  The eyes are from the Eerie Eyes Shaped Sprinkles and the speech bubble is from the Pumpkin Party Chit Chats.


I finished off my layout with my title which was made from Tangerine Abigail and Teensy Type Alpha Stickers.  I love mixing fonts!  Have you created a project using the Pumpkin Party Collection or Cut Files?  Be sure to tag Doodlebug Design on Social Media so that we can see your creations!  That's it for me today, thanks for stopping by to peek!


Monday, October 22, 2018

Lawn Fawnatics | Challenge 39 Bling it Out

Hi Everyone!  I was able to play along with the current challenge over at Lawn Fawnatics... Bling it Out!  The challenge was to add some sparkle to your project.  I had to make a 30th Anniversary card for some friends so I decided to make a box card for them (inspired by this card by Chari Moss for Lawn Fawn)  take a peek...


I used a number of Lawn Fawn stamps and dies for this card including the Scalloped Box Card Pop Up Dies, Happy Happy Happy, Party Balloons, and Louie's ABCs & 123s.  I used papers from the following Lawn Fawn Collections:   Perfectly Plaid Fall, Polka Dot Mon Amie, Perfect Plaid Chill and Knit Picky Fall.  For my bling, I added sequins to the balloons and 30 and I also used my Nuvo Glitter Gloss brush pen to add some sparkle to the 30 and hearts.  The happy couple loved the card!

That's it for me today, thanks for stopping by to peek!
Monday, October 15, 2018

Doodlebug Design | Pumpkin Party Treat Box

I just love Halloween... it's such a fun time, and there is candy!! ( I have no will power...)  And what better way to package up a sweet treat than with some Pumpkin Party goodies!  I made this cute little house to hold some treats for a friend, take a peek...


I started with this file from Lori Whitlock for the house and tree shapes.  I constructed the house using the Midnight Masquerade and Party Plaid Papers.  I added some Dot-Stripe Petite Prints in Beetle BlackLilac and Citrus for the Tree, Roof and Trim.


Now for the fun part!  I embellished the house with goodies from the Icons Sticker Sheet and the Odds & Ends!  Here are some close-ups...


I just love that kitty!!!!


As a final touch I added one of the Silly Spiders Shaped Sprinkles to the chimney!


The bottom of the box opens up to hold some sweet treats!


Stop by the Doodlebug Design blog all of this week for more Pumpkin Party inspiration!  That's it for me today, thanks for stopping by to peek!


Tuesday, October 9, 2018

Lori Whitlock | October Creative Team Blog Hop


 Hi Everyone!   It's time for the October Creative Team Blog Hop over at Lori Whitlock!  You should have arrived here from Traci's Blog.  Here's the order for today's hop!

Lori has a number of fun new Halloween files in the shop!  I made the adorable Halloween Treat Boxes:  Pumpkin (SVG, Silhouette) and Mummy (SVG, Silhouette).  They are getting sent as part of a care package to my daughter this year!


The papers are the new Dot-Stripe Petite Prints and the mouse and spider are from Doodlebug's Pumpkin Party collection.

There's a sale happening in the Lori Whitlock SVG Shop!  Use code OCT2018 to get 30% off all SVGs and Commercial Licenses!


Also, how about a free file!!  This file is free for today only!  No code or minimum required.


Finally, how would you like to win a $20 Coupon to Lori's SVG Shop!


a Rafflecopter giveaway

That's it for me today, your next stop on the hop is Anita!  Have a great day!


Friday, October 5, 2018

Lawn Fawnatics | Challenge 38 Awesome Autumn

Hi Everyone!  Fall is my favorite season.. hands down.  I love the colors, the food the temperatures... everything.  It is also the time of year when we got married, so I decided to make a a fall themed anniversary card for my husband for the Lawn Fawnatics Awesome Autumn Challenge!  Take a peek...


I used a number of different stamps & dies for this card including:  Forest Feast, Toadally Awesome, Jump for Joy, Happy Happy Happy, Nutty or Nice, Stitched Scalloped Circle Frames, Outside In Stitched Rectangle Frames, Birch Trees, Simple Stitched Hillside Borders, Shadow Box Card, Spring Showers and Fancy Folded Banners.  I also used papers from Sweater Weather, Perfectly Plaid Fall, Knit Picky Fall and Watercolor Wishes.  Here's a view of the inside of the card...


That's it for me today, thanks for stopping by to peek!

Thursday, October 4, 2018

Lori Whitlock | Shutter Card Tutorial

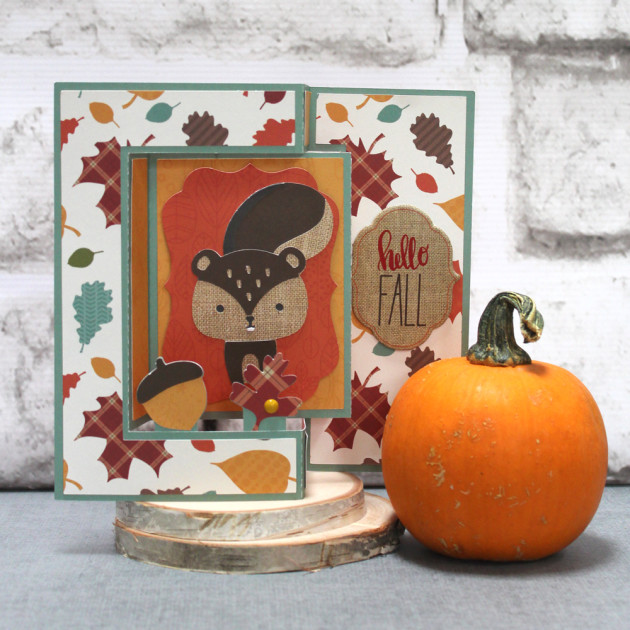
Happy Fall Everyone!  Today I have a quick assembly tutorial for Lori Whitlock's new Shutter Cards.  These cards are such fun and have some great dimension.  I used the Shutter Card Squirrel file (SVG, Silhouette) for my tutorial along with some papers and embellishments from Echo Park's Celebrate Autumn Collection.


The actual assembly of these cards is pretty simple, it's mostly the folds that need some attention.  I started by cutting out the pieces of my card.


Next I added the patterned paper panels to the different sections of the card.  I like to do this before folding because I think it helps me to visualize how things should be.


Once the panels were added, I folded the card along the score lines.


Here is a view of the folds from the top of the card.


I put together this graphic showing how the folds should be.  The upside down V means mountain fold (popping up when lying flat) and the V is a valley fold (pointing down when lying flat).


Once the card was folded, I added the additional embellishments.  I started with the squirrel on the bracket shape.  I added some foam tape under the bracket to give it a little more dimension.


Next, I added the insert with the leaf and acorn.  I started by adding adhesive to the bottom front strip of the piece.


I then tucked this piece in behind the front strip on the card base as seen below.


I finished the card with a cute chipboard piece sentiment from the Celebrate Autumn Chipboard Phrases.


This card folds flat and will fit into an A7 (5.25" x 7.25") envelope (Lori has a set here in her shop) .  That's it for me today, thanks for stopping by to peek!

Monday, October 1, 2018

Doodlebug Design | Pumpkin Party Cards

Doodlebug Halloween Collections are ALWAYS my favorites, and Pumpkin Party does not disappoint!  The candy, the trick or treaters, the kitty, even the spiders are cute!! (this coming from a girl who would burn her whole house down just to make sure a spider is dead...)  It took a little time, but I was finally able to narrow down my choices to make a few cards... take a peek!


I just love all of the Odds & Ends, they make it so easy to make a little scene on a card!  For my first card I created an inside shadow box card.  There's a front to the card, but when you open it, there's a little dimensional scene.  Here is the front of the card.  I used one of the Odds & Ends, stickers from the This and That Sheet and one of the ADORABLE little spiders from the Silly Spiders Shaped Sprinkles.  The papers are from the Pumpkin Party 6x6 pad and a sheet of Orchard Dot-Stripe Petite Prints.


And when you open the card, you get a fun little scene using more of the Odds & Ends, a Chit Chat greeting and sprinkles!  


My next card is a shutter card.  I used the base of a card from Lori Whitlock (here) and combined it with some Odds & Ends and Chit Chat pieces to make a fun scene...


I just adore the kitty trick or treater!!! And that little mouse, cuteness overload!  The background of the card is made up of the Pumpkin Party Double Sided Cardstock and Limeade Dot-Stripe Petite Prints.  The fun stars are from the Halloween Night Sprinkles.

My last card is another shadow box type card.  I knew I just had to make a card featuring those spiders!


The base of the card was made using Beetle Black Dot-Stripe Petite Prints.  I added the spider web using the plaid side of the Jack and Friends Cardstock.  The spider is from the Odds & Ends and the eek and Happy Halloween are from the Chit Chats.  My favorite thing about this card is that I added some of the spooky Eye See You Shaped Sprinkles inside the card!  

  That's it for me today, be sure to stop by the Doodlebug Design Blog over the next couple of weeks for more Pumpkin Party inspiration!  Thanks for stopping by to peek!