Monday, April 30, 2018

Doodlebug Design: Hello Collection Mother's Day Cards

I'd like to say a big HELLO to the Hello Collection!  I'm kicking off a couple of weeks of Mother's Day inspiration on the Doodlebug Blog using this FABULOUS new collection!  The colors and embellishments are so perfect, I know I'm going to need to get more!  I made some fun Mother's Day cards using Hello, take a peek....


I have to say, I'm in love with the new Hello Odds & Ends.  The flowers, the hints of gold, the acetate pieces... SO MUCH FUN!   I decided to start by featuring the Odds & Ends in a Box Card.


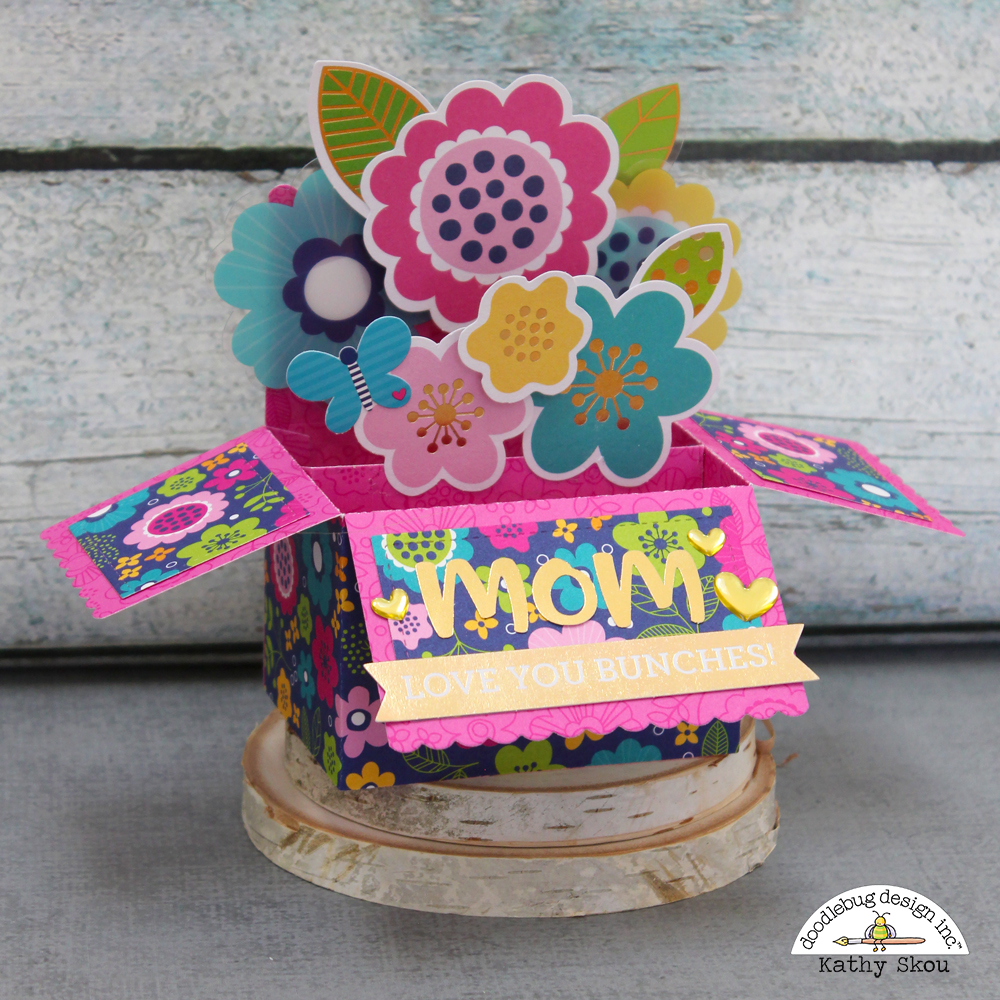
The body of the box card is made from the Beautiful Blooms Paper.  In addition to the Odds and Ends, I used a butterfly sticker from the Icons Sticker Sheet,  a sentiment strip from the Chit Chat Pieces, the gorgeous new Heart of Gold Shaped Sprinkles and some Gold Abigail Font Stickers for mom.

My next card is a Pop Twist type of card.  I decorated the outside using the Navy Stripe Paper from the Hello 6x6 Pad, the Gold YOU and the hearts are from the Chit Chats, the love sticker from the This and That Sheet and some Beautiful Blossoms Shaped Sprinkles.


And when you open the card, you get a big surprise!  I embellished the inside with the bird and flowers from the Odds & Ends pack and the sentiment from the Chit Chat pack.  The Cupcake Chippers coordinated perfectly!


For my last card, I started with this cut file from Lori Whitlock.  I changed it a bit so that I could add the Odds and Ends Flowers.

P

I used the Hello There, Poppy Plaid and Lovely Papers for the pot, and then added the flowers, butterfly and bow from the Odds & Ends.  The top of the card pulls up, you could add a sentiment or even cut slots to hold a gift card for mom.


Be sure to check the Doodlebug Blog over the next couple of weeks for more Hello Mother's Day inspiration from the Design Team!  That's it for me today, thanks for stopping by to peek!


Thursday, April 26, 2018

Lori Whitlock: A2 Pop Up Birthday Cake Card

Hi Everyone!  I'm up on the Lori Whitlock Blog today with a tutorial showing how to fold and assemble this fun A2 Pop Up Birthday Cake Card. (SVG, Silhouette)  This is a great card that can be made for anyone, depending on what colors you use!


I wanted to make it bright and cheery so I used the new Hello Collection from Doodlebug Design.  For full details and the tutorial, head over to Lori's Blog here.  That's it for me today, thanks for stopping by to peek!

Wednesday, April 18, 2018

Doodlebug Cut Files: Happy Birthday Mr. Harley Card

It's always fun when you find friends that are as crazy as you are when it comes to their pets.  My friend Jenn has a sassy kitty named Mr. Harley, who has his own Instagram.  To celebrate Mr. Harley's 10th Birthday, Jenn pledged to give $1 to the MSPCA of Cape Cod for each birthday card Mr. Harley received.  So, you know I had to play along, being the mom of 2 shelter kitties myself.  I made this fun card using a few cut files from Doodlebug Design:  (for a tutorial on how to make a shaped card in Silhouette, see my post here)


I started with the Fun in the Sun Caravan File from the Lori Whitlock SVG Shop which I put together using some Gingham Linen Petite Prints and some Glitter Sprinkles for the lights.  I added a little print and cut license plate to wish Mr. H a happy birthday.  The two kitties (Mr. Harley driving the caravan, and his adopted little brother Gus in the passenger seat...) were cut using the Kittens and Green Kitty SVG files form the Kitten Smitten Collection.  Of course they had on their signature bow ties!     Entirely too cute!  I gave the card to Jenn this past weekend, and was so happy that she loved it!  That's it for me today, thanks for stopping by to peek!

Monday, April 16, 2018

Doodlebug Design: Sprinkle Cards

I'm kicking off a couple of weeks of  projects focusing on embellishments on the Doodlebug Design Blog this week.  I have to admit, I have a hoarding issue when it comes to Doodlebug Sprinkles.  Original, Glitter, Shaped... I absolutely love them all and I make sure that every project I use them on is "sprinkle worthy."  So when the Design Team was challenged to feature Sprinkles and other embellishments I set out to come up with some very "worthy" projects... take a peek...


I love using sprinkles with Doodlebug's Cut Files, they are the perfect way to "dress" them up.  I started with the new Sweet Summer Strawberry Margarita SVG file from the Lori Whitlock SVG Shop for my first card. I used papers from the Gingham Linen Petite Prints, Down on the Farm and So Punny 6x6 Pads.  I added some Ladybug Glitter Sprinkles to the "dots" on the strawberries, some Cupcake and Bubblegum Glitter Sprinkles for the cheeks and some Beetle Black Sprinkles for the eyes. To finish it off I added a "sugared rim" to my margarita using some Lily White Chunky Glitter.


For my next card, I started with this SVG file for the card base.  I added a porthole circle to the front with some sprinkles "rivets" from the Black and White Assortment Glitter Sprinkles Pack.  I wanted it to look like my fish were floating so I cut the inserts for the card from transparency material.  For my under sea scene I used the Sea Weed SVG from the Under the Sea cut files, one of the Minnows Mini Doodle-pops and some Anchor's Aweigh and Under the Sea Shaped Sprinkles.


For my last card, I started with the Jar of Hearts SVG file from the Flea Market Collection to create a shaker card.  I added a few of this flower from the Easter Express collection. To embellish the flowers, I added the smallest sprinkles around the centers (Limeade Glitter Sprinkles, Bumblebee Glitter Sprinkles, Tangerine Glitter Sprinkles and Lily White Sprinkles.   I added some larger glitter sprinkles to my Jar for the "marbles" and finished it off with a Ladybug Shaped Sprinkle!  The sweet sentiment is a speech bubble from the So Punny This and That Sheet.  I cut off the tail, and punched a hole so I could tie it on with twine.


Be sure to stop by the Doodlebug blog over the next couple of weeks for more Embellishing ideas from the Design Team!  That's it for me today, thanks for stopping by to peek!


Tuesday, April 10, 2018

Lori Whitlock: April Creative Team Blog Hop


 Hi Everyone!   It's time for the March Creative Team Blog Hop over at Lori Whitlock!  You should have arrived here from Lori's Blog.  Here's the order for today's hop!

It looks like spring might finally be showing up here in New England!  I've seen robins hopping around my yard and some of my bulbs are popping up!  The birds made me think of this adorable Bird Shaped Card (SVG, Silhouette) and this Milk Carton Bird House (SVG, Silhouette).  So springy!!!


I used papers from Doodlebug Design for both pieces.


Also, how about a free file!!  This file is free for today only!  No code or minimum required.


Finally, how would you like to win a $20 Coupon to Lori's SVG Shop!


a Rafflecopter giveaway

That's it for me today, your next stop on the hop is Anita!  Have a great day!


Thursday, April 5, 2018

Lori Whitlock: Making a Shaped Card in Silhouette Tutorial


Happy April Everyone! Today I'm on the Lori Whitlock Blog with a tutorial showing how to make a shaped card from a one-dimensional file using my Silhouette.  I make a lot of these cards, and always get asked how I do them, so I decided it was time to write it all out!  For my card, I started with Lori's new Cute Dog File (SVG, Silhouette)  I thought it would make a sweet card!


Start by loading the file into Silhouette.  I then  sized it so it was 6" wide.  ( I wanted my card to be able to fit into a 6.5" square envelope when done)


Next, select the image by clicking on it, and then select the offset button. (the button that looks like a star with a line around it)  The default offset is .125, which was fine for my project, click apply.  This will create a shape around your original shape which is slightly larger.


Move the original file off of your mat, and copy the offset shape two more times.

Click on one of the copies, right mouse click and select flip vertically.


Move the flipped shape down so that it overlaps the other offset shape.  Where they intersect will eventually be where the card folds.  Select both the "top and bottom" shapes, click on the transform button then click on the left justify button.  This will make sure your card sides are properly aligned.


Once the pieces are aligned, make sure they are still both selected, right mouse click and select weld.  This will make them one solid piece.


To add a score line, select the line tool, and draw a line in the center of the intersect.  Change the line to a dashed line.


Lastly, select the line and the card base, right mouse click and select group.


After I created the file, I cut all the pieces.  I assembled the dog shape, then layered it on the single offset piece.  This is then layered onto the folded base.


What you end up with is a cute puppy-shaped card!  I used Lori's Sweet Baby Girl collection for Echo Park paper for the card.


That's it for me today, thanks for stopping by to peek!

Monday, April 2, 2018

Doodlebug Design: Down on the Farm Layout

Hi Everyone!  Today I have a new layout featuring Doodlebug's Down on the Farm Collection!  Having a daughter away at college has really cut into my photo taking!  I am lucky however that she is agreeable to sending pictures to me.  Last year when she went apple picking at a local farm, she sent me a bunch of pictures saying, "I knew you'd want to scrap some of these!"  So as soon as I saw the On the Farm Collection, I immediately thought of these pictures of her with the baby goats!


 I started with the wood grain side of the Country Garden double sided cardstock and the Farmer Flannel papers for my background.  I added some strips from the Down on the Farm paper, I just love the bandanna and the buffalo check patterns!  I then had lots of fun with the Odds and Ends!  Those little goats are just too cute!  I also added a couple of stickers from the Icons Stickers Sheet, the mouse and fly... because that fly is adorable and needs to be part of every Down on the Farm project!  And...Yes, my title (made from Abigail Font Stickers in Lily White)   is a pun.  I'd like to be able to blame it on the So Punny Collection, but to be honest, I've never been able to resist a good pun!   Here are some close-ups...


This collection is just too stinking cute!  That's it for me today, thanks for stopping by to peek!