Anyone who knows me, knows that I absolutely adore
Echo Park. I've been so astounded by the fabulousness (made up word, yes, but it fits) of their collections! They fit my scrapping style to a tee! So... when EP announced they were holding a Fresh Faces Monthly Design Team call... I just couldn't resist! A couple of these projects have been shown on my blog before, so I'll start with something "Fresh"!!!
LOGAN 
Supplies: From Echo Park Little Boy: PPs Rad Plaid, Journaling Cards, Strawberry & Sky, Denim & Lizard, Rockstar, Buttons, Element Stickers
Other: buttons: Cosmo Cricket and BasicGrey; Ribbon: Bo Bunny; Twine: The Twinery, DMC Floss; Cricket Cartridge: Mickey Font; Frame: AC Moore
I have a daughter, no boys, but when I saw the wonderful colors and adorable element stickers of Little Boy, I couldn't resist buying it! When my good friend had her third boy, it gave me the perfect excuse to have purchased the collection! I made this frame for her little cutie!

This is really a simple project.. and it makes a wonderful gift. I purchased a frame from AC Moore, took out the glass and used the cardboard insert as my background which I covered with the Sky Card stock. I then cut the letters from the various Little Boy patterns using my Cricut Mickey Font (4" letters). I used the Denim Blue as a shadow to make the letters pop a bit more, and I put foam tape between the layers to make it more dimensional.

I flossed some buttons from my stash and glued them on. I also used some of the absolutely adorable Little Boy element stickers to add more pizazz! A little bow completed the letters!

I thought I was done, but just couldn't resist adding the little plane with a floss swirl to the frame! In all, it didn't take me very long, but I know my friend will appreciate the effort!
My next project actually won the Facebook Fan Friday award over on Echo Park's blog on June 25th. I was so flattered they picked my layout. I always look to see what folks have posted, and let me tell you , the work is fantastic. I never expected to be among the winners!
I Scream...

Supplies Used: From Echo Park's Summer Days Collection: PPs Big Dots, Rainbow,Banners, Double Sided Blue, Quilt, Scallops, Ice Cream. Chipboard pieces, Rub Ons, Cardstock Alphabet.
Other: Maya Road Daisy Trim; Shimmerz Chalkboard Spritz (peacock); Twine: The Twinery: MFT Die namics Sun and Flat Clouds; Pin: My Little Bit of Whimsy; Buttons: Joann Fabrics; SVG Cuts Lacy Shapes.
As soon as I saw the Summer Days Collection, I thought these pictures. Every year on the last day of school, I take my daughter and friends for lunch and an ice cream at a local restaurant. As you can see... they are so very camera shy!
As a background for the pictures, I cut a rectangle lacy shape from the purple side of the banner paper using my SVG Cuts Lacy Shape collection and my Cricut. The pink and green scallop circles also come from that collection. To give my layout a layered look, I added a smaller rectangle using the quilt paper and matted my photos on the pink side of the scallops paper. I completed the look with a strip of green from the quilt paper. To make the colors pop , I lightly inked the edges in black... I think it makes the colors really stand out!

I colored the daisy trim using some Shimmerz Chalkboard Spritz, and added the adorable chipboard flowers. The little buttons completed the look! I also added some twine and one of my favorite stick pins from my Whimsy collection!

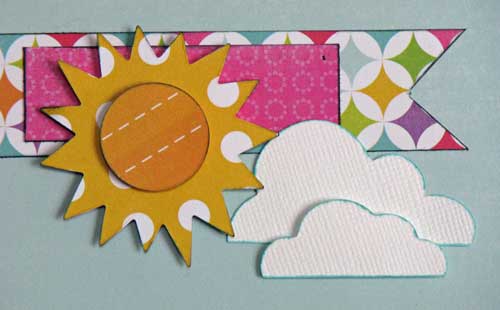
The letter stickers and rub-on from the Summer Days collection made a title easy! To complete the layout I added a strip of the quilt paper that I cut into a penant shape and a scrap of the pink from the scallop paper. I topped it with a sun I made using the MFT Sun Die namic and the Big Dots and Ice Cream papers and a couple of white cardstock clouds.

I have to say, this is one of my favorite layouts this year!
My final project is a layout I completed just recently for the design team at Right at Home Scrapbooking using the fun Splash! collection. I was so excited when I was given this line to work with... I LOVE the little fishies! The pictures are of my daughter and husband trying to keep cool on a recent trip to Florida. (July + Florida = UBER HOT!!)
Staying Cool... In the Pool

Supplies Used: From the Echo Park Splash! Collection: PPs Journaling paper, Splash, Borders, Diagonal Stripe, Big Dots; Element Stickers, Alpha Stickers
Other: Cardstock Bazzill; Cat's Pajama's Easy Daisy Die, MFT Die namics Sun and Flat Clouds, Liquid Pearls, DMC Floss; Karen Foster Scrapbookers Floss
This layout was really easy to put together. I started with 4" squares from each of the Pink grid from Journaling paper, the waves from the Diagonal Stripes paper, the blue side of the Big Dots Paper and the blue side of the Fish paper. I mounted them a bit askew on the kraft cardstock and then the fun began!

For the top left square, I cut the banner pieces from the Borders paper and created a banner using some twine and my tiny attacher. I used foam tape to pop it. The fish are from the sticker and border sheets and the fun word stickers are from the alphabet sticker sheet. I finished off with some bubbles using the liquid pearls.

I added another layer of waves to the bottom right square and popped it with foam tape so the fish looked like they were coming out of the waves. The title is made up entirely of stickers from the Element and Alphabet sticker sheets. Again, I added some liquid pearls for shine! Finally the last two squares focus mainly on the pictures with some die cuts and stickers to accent. I love how easy and fun this page turned out to be!
I've worked with so many Echo Park Collections this year, it was hard to narrow my selection down! Some others that I've featured on my blog can be found
here. Thanks for reading, and I'll let you know how it all turns out!

 The banner was created with MFT's Fishtail Banner Die Namic and some twine from the Twinery.
 The banner was created with MFT's Fishtail Banner Die Namic and some twine from the Twinery.
 I hand cut the flowers and added some Whimsy buttons... they coordinated perfectly!
 Finally, I hand cut the tree from the Cute Cuts sheet and added a Bella Blossom and a little birdie Whimsy pin.
 This next layout was created for the DT, using some fun papers from Jillibean Soup Pasta Fagioli line. I also used a bunch of the MFT Die Namics from the September release.
 The corner goodies were created using the MFT Medium Scalloped border, the new Dog Tag and the heart from the new Homespun Birdhouse Collection.
 The new Ticket File Tab is perfect for a date or a little journaling.
 The new Rolled Mums are awesome, and add such a fun touch.
 Finally, I used the Mini Pennant to create a little banner decoration.