Showing posts with label Doodlebug Petite Prints. Show all posts

Tuesday, August 13, 2019

Lori Whitlock | August Creative Team Blog Hop


Hi Everyone!   It's time for the August Creative Team Blog Hop over at Lori Whitlock!  You should have arrived here from Traci's Blog.  Here's the order for today's hop!

Lori Whitlock
Traci Penrod
Kathy Skou {You are here}
Brandie Adams
Michelle Zerull

Aimee Kidd
Ashley Cook

I made Lori's Strawberry Jam Box Card (SVG, Silhouette).  This is such a cute summery card!  I put it together using some Petite Prints from Doodlebug Design.


There's a sale happening in the Lori Whitlock SVG Shop!  Use code AUG2019 to get 25% off all SVGs and Commercial Licenses!


Also, how about a free file!!  This file is free for today only!  No code or minimum required.


Finally, how would you like to win a $20 Coupon to Lori's SVG Shop!

a Rafflecopter giveaway


Your next hop stop is Brandie!  That's it for me today, thanks for stopping by to peek!


Monday, May 27, 2019

Doodlebug Design | Pill Better Stamped Cards

Do you have a large collection of cards?  I must have 100 cards in a basket that I've made for various assignments.  But when I needed a get well card, could I find one... of course not.  I decided I needed to "remedy" the situation (yes, pun intended...) and make a few cards using the fun new Doodlebug Design Pill Better Stamps and Dies.


Instead of coloring my stamped images, I decided to paper piece them.  The combination of cute Doodlebug stamped images and fun papers... it's certain to make anyone feel better!  I started with the band-aid stamp.  I stamped it on both sides of the different petite prints papers, then hand cut the images to add them to my card.


My next card is a fun shaker card.  I paper pieced the prescription bottle and then added some Dot Stripe Petite Prints to half of the cute little pill stamps.  I made a shaker with the pills and some colorful Doodlebug Sequins.


My last card, in my opinion, is the funniest... 

I paper pieced the tissue box with the blue checked paper from the Simply Spring 6x6 pad.
There are so many different images and sayings in this cute set, the possibilities are endless!


That's it for me today, thanks for stopping to peek!

Products Used
So Much Pun Collection - Stamps - Pill Better
So Much Pun Collection - Metal Dies - Pill Better
 Petite Prints Collection - 6 x 6 Paper Pad - Dot and Stripe - Rainbow
Petite Prints Collection - 12 x 12 - Dot and Stripe - Pistachio
Simply Spring Collection - 6 x 6 Paper Pad
Sequins - Ladybug
Sequins - Limeade
Sequins - Bumblebee
Sequins - Bubblegum
Sequins - Tangerine
Sequins - Blue Jean

Other Products
Rectangle & Square Dies
Transparency sheet (for shaker)
Black Ink
Copics

Tuesday, September 11, 2018

Lori Whitlock: September Creative Team Blog Hop


 Hi Everyone!   It's time for the September Creative Team Blog Hop over at Lori Whitlock!  You should have arrived here from Lori's Blog.  Here's the order for today's hop!

Lori has a number of fun new back to school-themed files in the shop!  I made the adorable Sticky Notes Easel Card Pencil (SVG, Silhouette), and added a little note to the first sticky note!  I left this on my daughter's desk when I moved her into her dorm this year.


Here is what the card looks like folded, it's perfect for mailing.


The papers are the new Dot-Stripe Petite Prints and Floral-Graph Petite Prints from Doodlebug Design.

There's a sale happening in the Lori Whitlock SVG Shop!  Use code SEP2018 to get 30% off all SVGs and Commercial Licenses!


Also, how about a free file!!  This file is free for today only!  No code or minimum required.


Finally, how would you like to win a $20 Coupon to Lori's SVG Shop!


a Rafflecopter giveaway

That's it for me today, your next stop on the hop is Anita!  Have a great day!


Thursday, August 2, 2018

Lori Whitlock: Instax Photo Banner Tutorial

Hi Everyone!  Today I have a tutorial showing you how to create a fun banner using Lori Whitlock's Build a Banner Dingbats Font (Lori Whitlock SVG Shop, Silhouette)  My daughter is headed off to study in Scotland for her Junior year and I wanted to make her a little something to decorate her room, that wouldn't take up too much suitcase space!  I thought a banner with some of her favorite photos would be fun.  She loves her Instax camera so I made the banner to hold some of these cute instant photos!


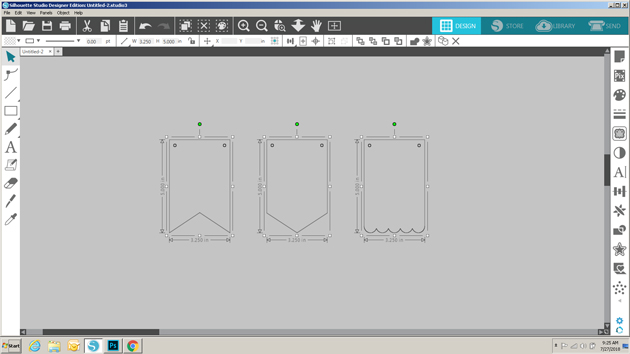
If you're not familiar with Dingbat Fonts, they are fonts that have pictures and shapes in place of the letters.  Lori has a lot of them in her shop, and they really can be used for almost anything including vinyl, HTV and cutting projects like mine.  If you look at the picture below, I've typed out A through Z using the Build a Banner Dingbats Font and the Text tool.


To create my banner I started by choosing 3 of the banner pieces (A, X and U)  I resized each piece to be 5"H x 3.25"W so that each piece would be large enough to hold a picture.


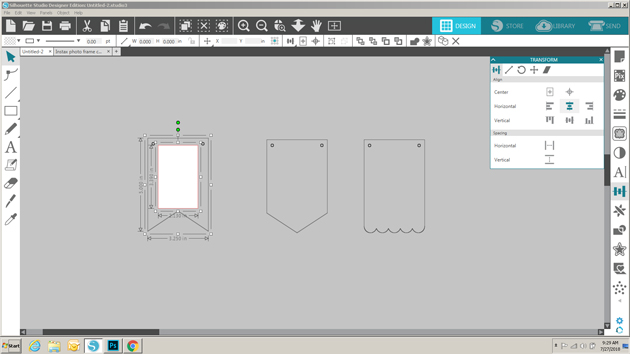
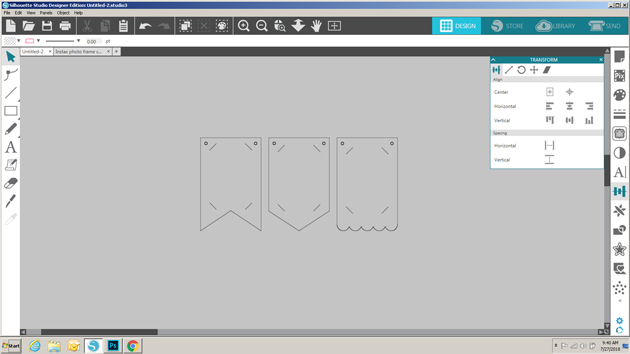
I wanted to make the banner so that my daughter could swap out the pictures if she wanted, so I set out to add small cut lines on the banner pieces to hold just the corners of the picture.  To do this I needed first to know the size of the pictures being used.  Instax pictures are approximately 3.39"H x 2.13"W so I created a rectangle that size using the shape tool.


I placed the rectangle on one of the banner pieces and centered it using the Transform tool.


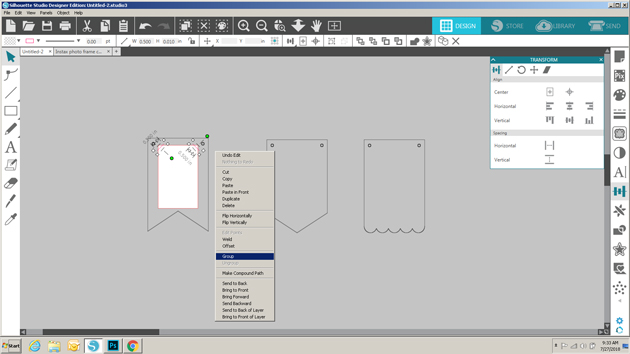
I drew a line 0.5" long and then moved it to one corner of the picture.  Using the green dot, I slanted the line so that it covered one of the corners.


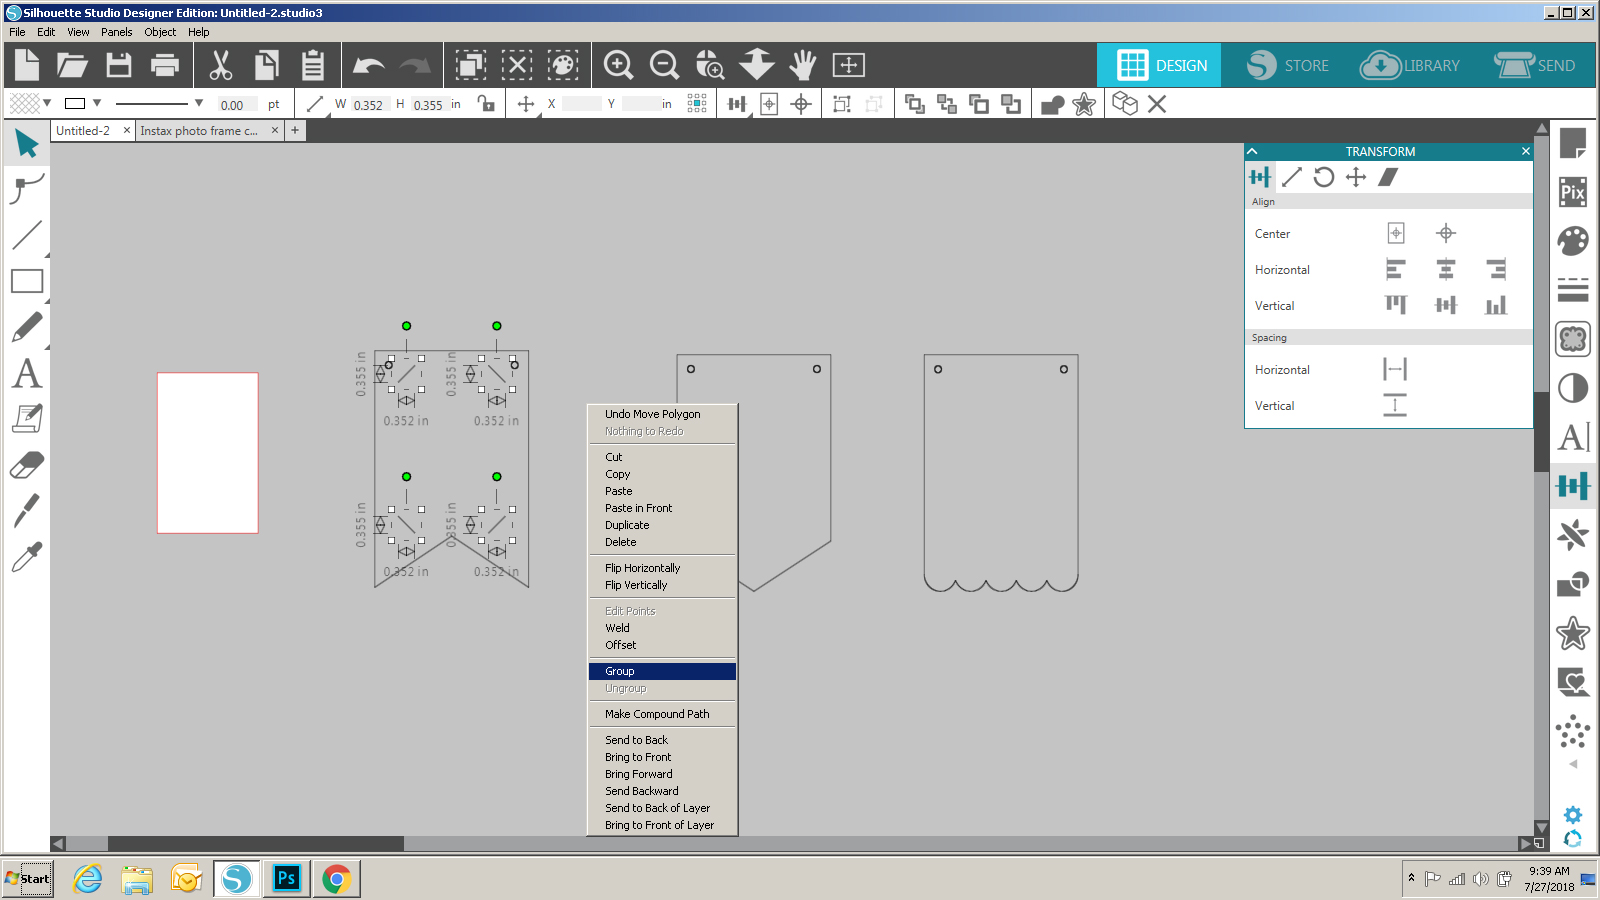
Next, I copied the small line, clicked on the copy, right mouse clicked and selected flip horizontally.  This gave me a line to add to the opposite corner.   I made sure the two lines were properly aligned by using the transform tool.  Once I was happy with the placement, I selected both lines and grouped them.


To create the bottom lines, I made a copy of the grouped top lines, right mouse clicked on the copy and selected flip vertically.  I positioned those lines along the bottom of the rectangle.


Again I made sure that all the lines were aligned correctly within the banner piece using the transform tool.


Once they were all in place, I removed the rectangle, and grouped the slot lines along with the banner piece to make them one.


I copied the lines before grouping and added them to the other banner pieces, centering them using the transform tool.


Once they were all ready, I sent them to cut!  ( All papers are from Doodlebug including the new Petite Prints! )  I added the pictures to the cut pieces, and decorated them using some Rosettes from the Build a Rosette Set 1.5" (SVG, Silhouette) and Build a Rosette Set 2"(SVG, Silhouette).  I strung all of the banner pieces together on a piece of twine, holding them in place with small clothespins.  Some quick hints: 1)  Hot Glue is your friend when making rosettes, and 2) before threading the pieces on the twine, add a little glue to the ends of the twine and let them dry.  This will prevent fraying.

That's it for me today, thanks for stopping by to peek!


Monday, June 5, 2017

Doodlebug Design: Pinspired Floral Arrangement

Hi Everyone!   The Doodlebug Design Team was challenged to find a non-paper related pin on Pinterest that inspired us to create something from our Doodlebug products.  I took a look through my Pinterest Boards and found this pin showcasing some Mother's Day floral arrangements.   I just loved the beautiful flowers and decided to recreate this using some Gingham Linen Petite Prints.


My friend called this an "ambitious" project, she was so right!  However, I'm thrilled with the results, it was worth the effort.


I started with the tea cup cut file here.  I pieced it together using some Lily White and Stone Gray Petite Prints.  I then set to making a number of 3D Paper Flowers using various cut files from the Silhouette Store, and more Petite Prints.  I glued wire to the bases of the flowers and arranged them in the cup using some floral foam.  Here are some other views of the flowers in the cup...


And here are some close-ups of the flowers...


The best part?  I have a pretty floral arrangement that will never wilt!  That's it for me today.  Be sure to stop by the Doodlebug Blog over the next couple of weeks for more Pin-spired projects!  Thanks for stopping by to peek!

Sunday, May 14, 2017

Happy Mother's Day!

Hi Everyone!  Just a quick post to wish all of my friends and family a Happy Mother's Day!! So glad I got to see my college girl yesterday, today she's studying for finals, but we do have lunch planned with my mom!


I made this fun card for my mom and my mother-in-law.  It's Lori Whitlock's Mason Jar Box Card Mom Flowers. (here in the Silhouette Store)  I put it together with some Gingham Linen Petite Prints from Doodlebug Design.  I thought it would look cute on a shelf !  That's it for me today, I hope all of the moms out there enjoy their day!

Tuesday, January 10, 2017

Lori Whitlock: January Creative Team Blog Hop


 Hi Everyone!  It's time for the January Creative Team Blog Hop over at Lori Whitlock!  You should have arrived here from Traci 's Blog.  Here's the order for today's hop!
 
 
 For my project I made Lori's new Pop Up Box card Unicorn which was just released today!  This card is so adorable!!  I know many little girls (and some older girls as well) who would love to receive this card!
 

I used papers from Doodlebug Design's Petite Prints and the new Doodlebug Spring Things Collections.
 
 And now a few things for you!  First, Lori is having a 30% off Sale in her SVG Shop!  Just use code JAN2017 to get the discount!


Also, how about a free file!!  This file is free for today only!  No code or minimum required.


Finally, how would you like to win a $20 Coupon to Lori's SVG Shop!


a Rafflecopter giveaway

That's it for me today, your next stop on the hop is Courtney Lee.  Have a great day! 

Thursday, January 5, 2017

Doodlebug Design: Sugar & Spice Cut Files

Hi Everyone!  Today I have a layout I created using the ADORABLE new Sugar and Spice Cut files (available in SVG here in the Lori Whitlock SVG Shop)  Sugar and Spice is one of my all time favorite Doodlebug Collections, I've been hoarding the paper for years!  I mixed it up with some Petite Prints to make this layout featuring pictures of my girl from a long time ago (she's 18 now!!)  Take a peek...


I started with the Polaroid file (available here in the Lori Whitlock SVG Shop) as the base of my layout. I then added a bunch of the new files.  Here are some close-ups...


I just love the little critters in this collection!  Here is a list of the files I used with links to both the Silhouette Store and Lori Whitlock SVG Shop. 
 
Elephant - Silhouette Store, Lori Whitlock SVG Shop
 
That's it for me today, thanks for stopping by to peek!
 

Wednesday, September 28, 2016

Doodlebug Design: Boos and Brews

Hi Everyone! Today I have a layout using the ADORABLE Boos & Brews Collection from Doodlebug Design.  Doodlebug always knocks it out of the park with Halloween collections, and this one does not disappoint!  I used it to scrap these fun pictures of my daughter and her friend who dressed up as Russell from Up! for Senior dress up day last year.  Take a peek...

I love all the patterns and prints in the collection and thought it would be fun to showcase them in a grid format. 


Seriously, only Doodlebug could make a spider cute and appealing.  I really loved the Spooky Spider Shape Sprinkles and sprinkled them liberally over my layout!  I also loved the little bat from the Cute Critters Mini Doodlepops!


My favorite new character is Ribbit the frog... so stinking cute!  It was also fun to use the Stars and Moons Cute Clips, they add the perfect little touch!


 And of course, I HAD to use the cute little kitty sticker from the Icons Stickers... He looks so sweet peeking out of the frame that was in the Odds & Ends.  That's it for me today, thanks for stopping by to peek!