Monday, August 6, 2018

Doodlebug Design: Hello Polaroid Camera Slider Card Tutorial

There's something about the cute little cameras in the Hello Cut File Collection (SVG, Silhouette) that just makes me smile!  I decided to create a fun slider card using the Hello Polaroid Camera (SVG, Silhouette)  You could create this card using almost any collection for any occasion!  I used the Hello Collection for mine.  Take a peek...


The slider pulls right through from the camera slot on the bottom of the card for a nice surprise greeting!


I also added a sentiment from the Hello This and That Sheet on the inside of the card.  Here are some close-ups of the front...


I put together a tutorial showing how to make this card using Silhouette.  These instructions would need to be slightly altered for other cutting machines such as Cricut, since not all of the same functions are available (specifically release compound path).  First I show how to edit the file to make it a slider in Silhouette, then how I assembled the pieces.

I started by resizing the file so that the finished card would fit in a standard sized envelope.  In this case, I resized it so that it was 6" wide (be sure to click the lock next to the sizing so that it will resize uniformly)  The end result is a card that will fit in a 6x6 envelope.


Next, I created the card base.  To do this, I made a copy of the navy layer in the cut file (which is the shape of the whole card)


I made a second copy of the navy piece, right mouse clicked on the piece and selected flip vertically.


Next,  I maneuvered the 2 pieces so they were aligned and overlapped slightly, then after selecting both pieces, right mouse clicked and selected weld to make them one large piece.


Lastly, for the card base, I added a dashed line to the center and selected group.  This will give you a score line to fold the card base.


The next few slides show how I added a slot to be cut into the camera "face" so that the picture slider could slide out.  I started by un-grouping the pieces of the camera face.  Next I selected the slot on the bottom portion of the camera(the navy piece) and resized it to be 0.15"h x 4.5"w. 


Since the slider part of the card needs to go through all layers of the front of the camera, I needed to copy the "slot" to the layers underneath the top layer.    First I selected both the slot and the small navy bottom piece and copied them.  I then clicked on the copied pieces and right clicked and selected Make Compound Path.  This gave me the completed the navy piece.  I deleted the original small navy piece, leaving just the slot over the light blue piece of the camera. 

I repeated the above process with the light blue piece... Copy both the slot and the light blue piece.  Select both parts of the copy (light blue and slot) and right mouse click, and select make compound path. (this completes the light blue piece)  Delete the original light blue piece, leaving just the slot over the bottom-most navy piece.  


Lastly Select both the larger Navy piece and the slot, right mouse click and select make compound path.  This adds the slot to the bottom most piece. 


 I added the slot in this fashion to make sure that the slots on all 3 pieces were perfectly aligned. 


Next I created my slider piece.  I started by creating two rectangles, both 3.875"H x 4.275"W.  To the top of the one on the left, I added a slim rectangle, (0.25" H x 4.65"W), overlapping them slightly, the selecting both, right mouse click and select weld. 


 For the right hand piece I added a rectangle (2.7"H x 3.825"W) centering it horizontally and towards the top of the existing rectangle.  I selected both pieces, right mouse clicked and selected make compound path.
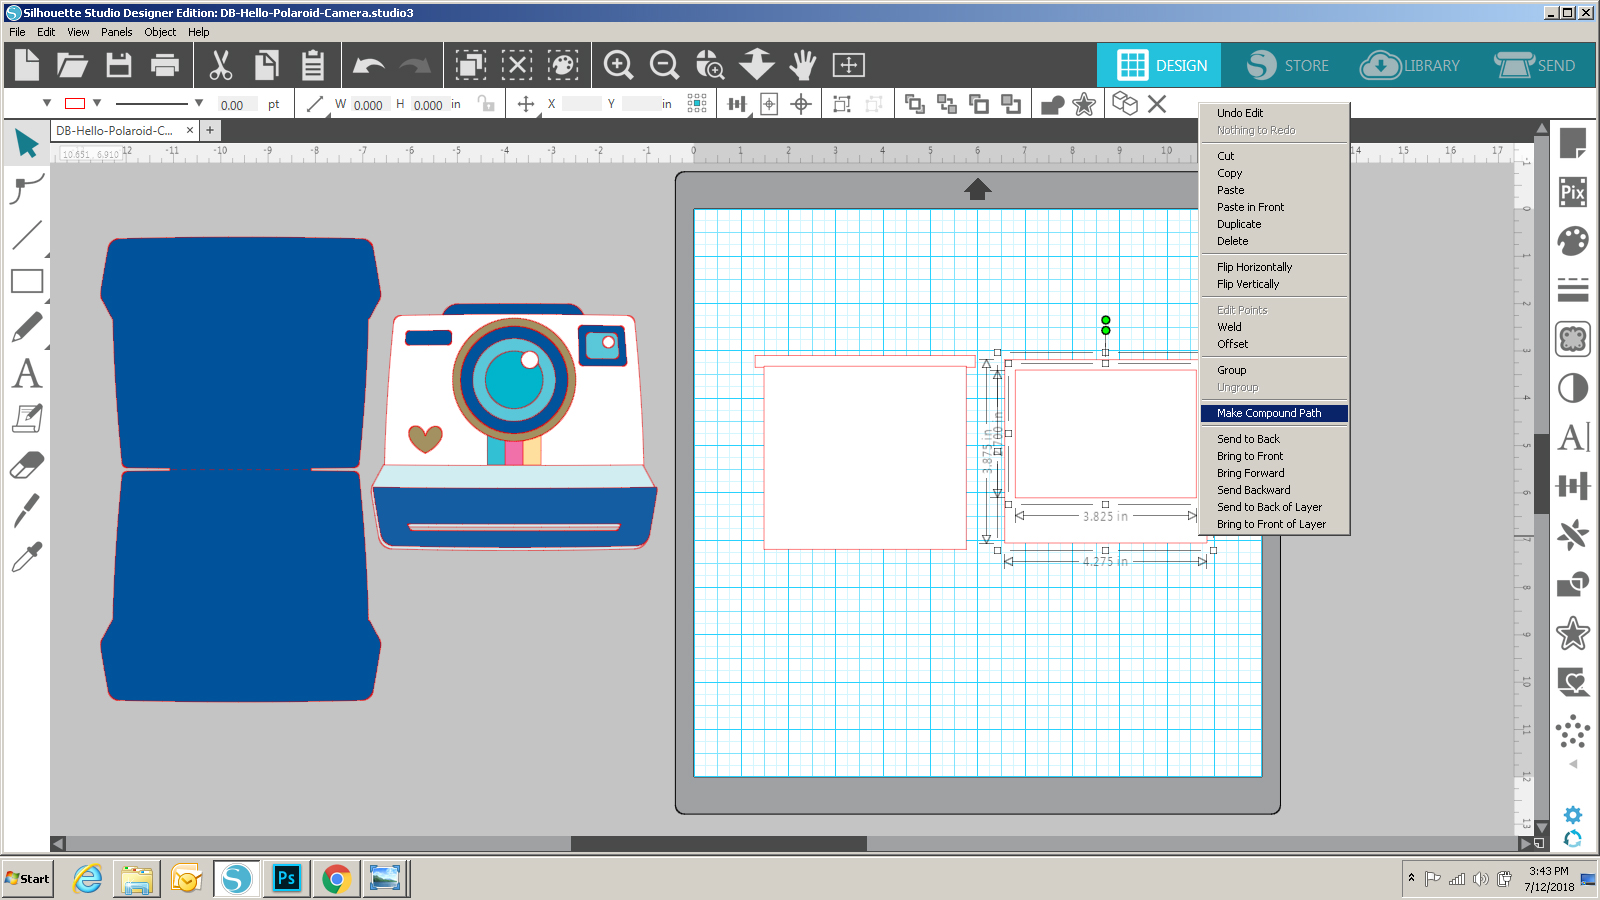

The result of the above steps gave me the two pieces that make the slider portion of the card.


Once I cut all the pieces, I started assembling the card.  On the camera face, I added some foam tape under the top to circles of the lens to add dimension.  For the camera slider piece, I created a little scene inside the photo frame using stickers and patterned paper, then glued the whole thing onto the other rectangle.


To create the slider mechanism, first layer the camera face over the card base and trace the slot onto the base.  This will not be seen once the card is complete.


Next, Using the widest part of the slider piece, mark lines on the bottom by the slot, and then on the top about .675" down from the top (5/8 of an inch)


Draw lines connecting all of the marks.  This gives you your guides for adding foam tape.


Add a double layer of foam tape just slightly outside the lines drawn.  Do not overlap the lines, this will prevent your slider from moving up and down.


Before removing the top cover from my tape, I used a powder tool to go over the edges of the tape.  This will help the slider to move more smoothly.


Before adding the Camera Face to the base, slip the slider piece through the slot in the camera face from front to back.


Once this is done, add the camera face to the card base, making sure everything is aligned... be patient, it'll all be worth it!  I hope you're inspired to try one of your own, be sure to post if you do we'd love to see your creations!  That's it for me today, thanks for stopping by to peek!

Thursday, August 2, 2018

Lori Whitlock: Instax Photo Banner Tutorial

Hi Everyone!  Today I have a tutorial showing you how to create a fun banner using Lori Whitlock's Build a Banner Dingbats Font (Lori Whitlock SVG Shop, Silhouette)  My daughter is headed off to study in Scotland for her Junior year and I wanted to make her a little something to decorate her room, that wouldn't take up too much suitcase space!  I thought a banner with some of her favorite photos would be fun.  She loves her Instax camera so I made the banner to hold some of these cute instant photos!


If you're not familiar with Dingbat Fonts, they are fonts that have pictures and shapes in place of the letters.  Lori has a lot of them in her shop, and they really can be used for almost anything including vinyl, HTV and cutting projects like mine.  If you look at the picture below, I've typed out A through Z using the Build a Banner Dingbats Font and the Text tool.


To create my banner I started by choosing 3 of the banner pieces (A, X and U)  I resized each piece to be 5"H x 3.25"W so that each piece would be large enough to hold a picture.


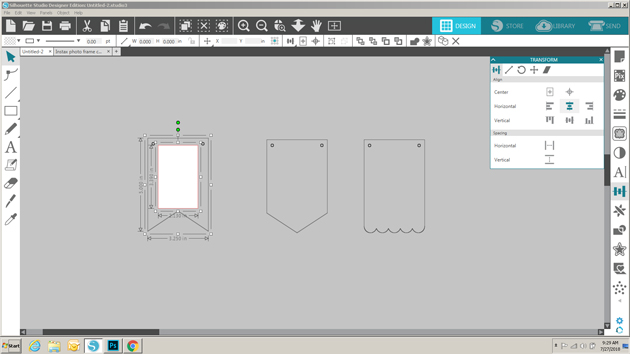
I wanted to make the banner so that my daughter could swap out the pictures if she wanted, so I set out to add small cut lines on the banner pieces to hold just the corners of the picture.  To do this I needed first to know the size of the pictures being used.  Instax pictures are approximately 3.39"H x 2.13"W so I created a rectangle that size using the shape tool.


I placed the rectangle on one of the banner pieces and centered it using the Transform tool.


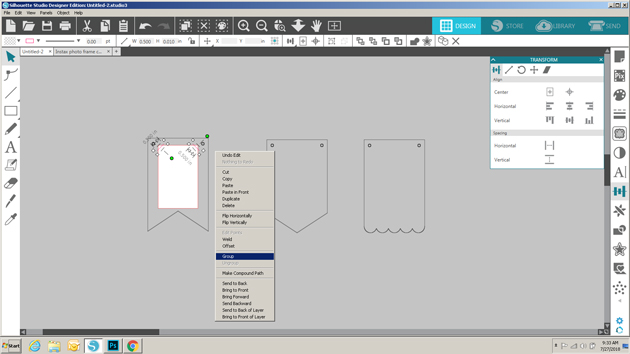
I drew a line 0.5" long and then moved it to one corner of the picture.  Using the green dot, I slanted the line so that it covered one of the corners.


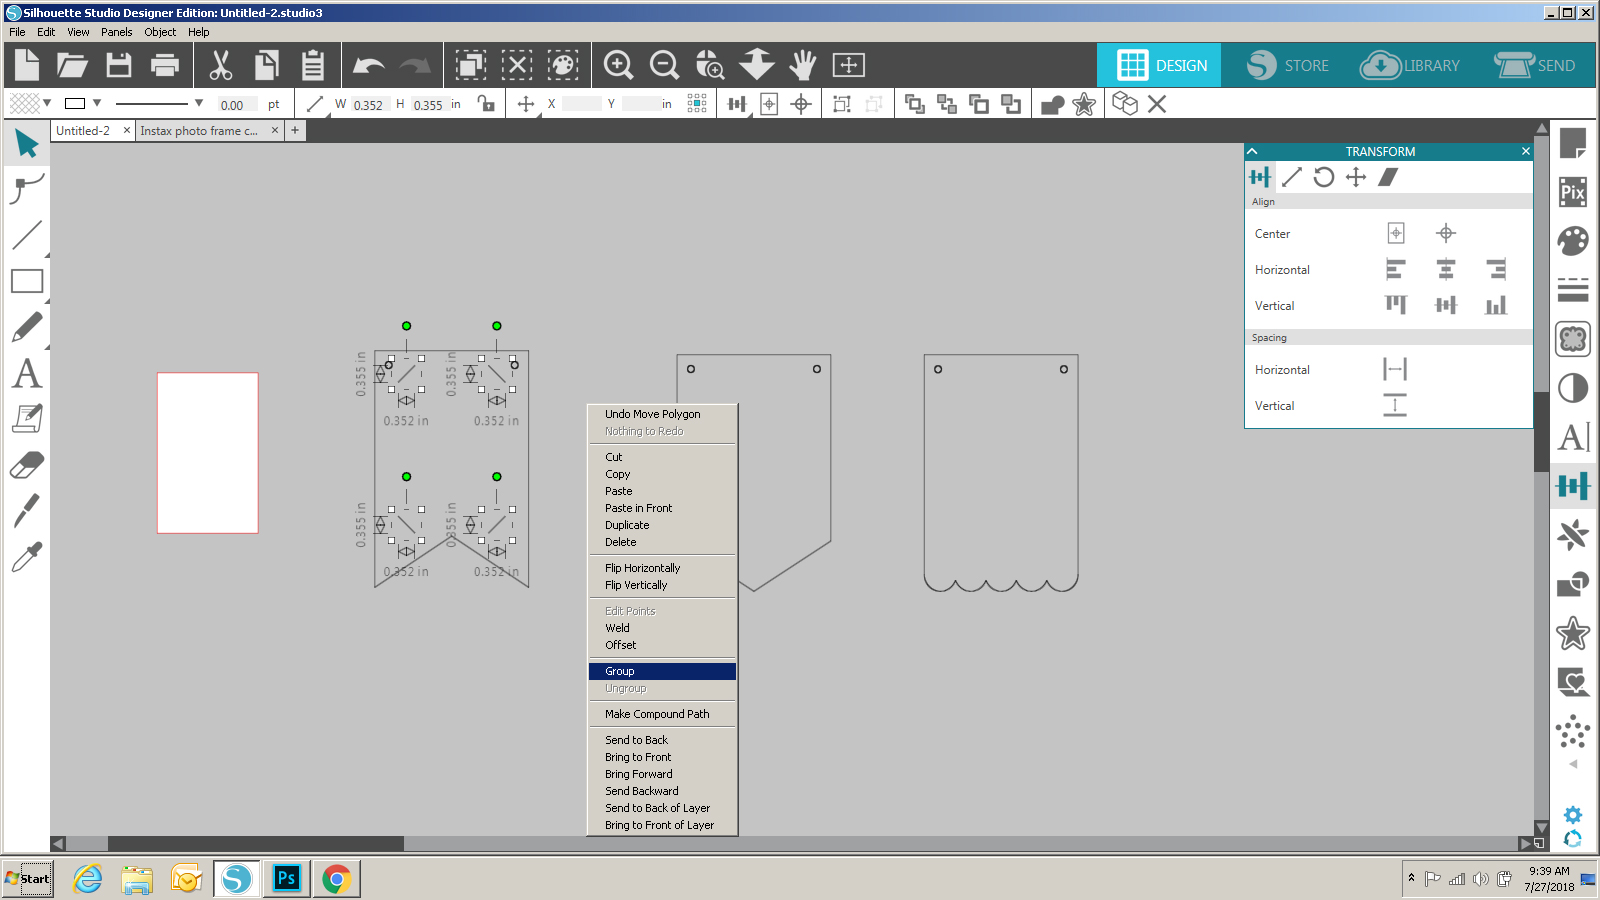
Next, I copied the small line, clicked on the copy, right mouse clicked and selected flip horizontally.  This gave me a line to add to the opposite corner.   I made sure the two lines were properly aligned by using the transform tool.  Once I was happy with the placement, I selected both lines and grouped them.


To create the bottom lines, I made a copy of the grouped top lines, right mouse clicked on the copy and selected flip vertically.  I positioned those lines along the bottom of the rectangle.


Again I made sure that all the lines were aligned correctly within the banner piece using the transform tool.


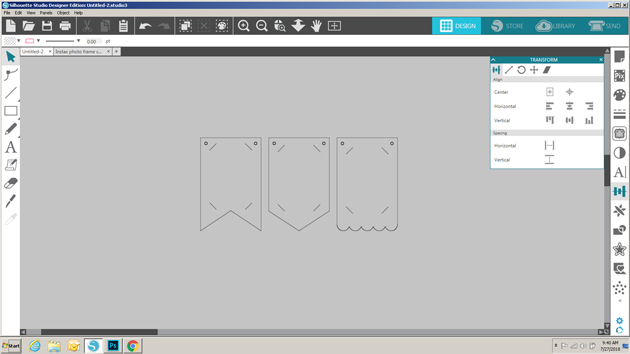
Once they were all in place, I removed the rectangle, and grouped the slot lines along with the banner piece to make them one.


I copied the lines before grouping and added them to the other banner pieces, centering them using the transform tool.


Once they were all ready, I sent them to cut!  ( All papers are from Doodlebug including the new Petite Prints! )  I added the pictures to the cut pieces, and decorated them using some Rosettes from the Build a Rosette Set 1.5" (SVG, Silhouette) and Build a Rosette Set 2"(SVG, Silhouette).  I strung all of the banner pieces together on a piece of twine, holding them in place with small clothespins.  Some quick hints: 1)  Hot Glue is your friend when making rosettes, and 2) before threading the pieces on the twine, add a little glue to the ends of the twine and let them dry.  This will prevent fraying.

That's it for me today, thanks for stopping by to peek!


Friday, July 27, 2018

Lawn Fawnatics: Challenge 33 Fun Folds

Hi Everyone!  I was able to play along with the latest challenge over at Lawn Fawnatics, the Fun Folds Challenge!  I created a double gate-fold birthday card.  Take a peek...


I love how when the card is open you get a whole scene, and it folds up nicely to fit into an A2 Envelope!


I used a few different Lawn Fawn stamp and die sets including You Are Sublime, Fintastic Friends, Life is Good and Mermaid for You.  I also used the Fancy Scalloped Circle Stackables the Stitched Wave Borders and some Watercolor Wishes paper.  I colored the images using watercolor pencils and a water pen.  I love the effects you can get using the pencils as your paint pallette! 

That's it for me today, thanks for stopping by to peek!

Monday, July 23, 2018

Doodlebug Design: Sweet Summer Box Cards

Have you seen the Doodlebug Design Sweet Summer Cut Files?  They are just about the cutest files ever!  I love the fun and retro feel, they remind me of summers in the 1980s (yes, I have just dated myself...)!!  I decided to take a few of the files and make some box cards.  I just love box cards, they make such cute decorations!  Take a peek...


I used a combination of Gingham Linen Petite Prints and Sweet Summer papers to put these cards together.  I then added some stickers from the Sweet Summer Mini Icons and the This and That sheet and sentiments from the Sweet Summer Chit Chats Pack.  Here are close-ups of the individual cards...


Sweet Summer Radio (SVG, Silhouette)


Ice Cream Truck (SVG, Silhouette)


Pineapple (SVG, Silhouette)

Converting the files to be box cards isn't a hard process, below are some graphics showing how I converted the Radio card...


I started by resizing the base file so that it was a standard card size.  In this case the width was 5.5".


Next I ungrouped the file and created the "layers" of the box card.  In this case the center "layer" is the blue piece of the file  with the handle and buttons.  The front "layer is the face of the radio.  For the back piece, I made a copy of just the yellow portion of the front piece.


The blue piece of the original cut file had a small bump out on the bottom.  I want my card to stand flat so I cut this piece off using the knife tool in Silhouette.  You could also hand cut this piece.


To create the side pieces of my card, I drew a rectangle measureing approximately 1.9" high by 1.5" wide.  I added score lines .25" in from each side.  You could also hand score these lines.


To be able to adhere the center insert, I needed to add a couple of tabs to the sides of this piece.  I drew two triangles measuring 1" high by .375" wide, lined them up on the sides of the center piece and welded them to the sides.  Be sure to separate the buttons and handles pieces before welding.


Once all of this was done, I cut the pieces, and assembled the face of the radio and added the handle and buttons to the center.  To assemble the card, I created a box by gluing the sides to the front and back, making sure everything is aligned.  I folded the tabs of the blue insert forward, inserted it into the radio box shape and glued the tabs to the sides of the box, towards the front.

If you decide to try your hand at making a box card from a Doodlebug Cut file, make sure to share them on the Doodlebug Design Facebook page!  That's it for me today, thanks for stopping by to peek!


Thursday, July 12, 2018

Lawn Fawnatics: Color Challenge #32

It's been a while, but I finally found some time to play along with the latest Lawn Fawnatics Challenge!  Challenge 32 is a color challenge, perfect for summertime!


And here is the card I created for the challenge...


I used a few of the new dies and stamps to make my shaker including the You Are Sublime Stamps and Dies, the Porthole Frames and the Stitched Wave Borders.  For papers, I used Lawn Fawn Cardstock in Narwhal, Blue Jay, Peacock and Mermaid along with some Gotta Have Gingham Nellie.  I finished off  the porthole with with some Silver Lining Nuvo Drops.  I love how it turned out!

For details on the challenge see the original post here.  That's it for me today, thanks for stopping by to peek!
Tuesday, July 10, 2018

Lori Whitlock: July Creative Team Blog Hop


 Hi Everyone!   It's time for the July Creative Team Blog Hop over at Lori Whitlock!  You should have arrived here from Traci's Blog.  Here's the order for today's hop!

Lori's Bobble Head Cards just make me smile!  I love how they can really be customized for any occasion!  This month I used Lori's Bobble Head Cow Card.(SVG, Silhouette).  I added a speech bubble from the 3 Thought Bubble Set ( Silhouette) and wrote a fun greeting using the LW Bubble Letter Font ( SVG, Silhouette).


The papers and flower sprinkles are from Doodlebug Design.

There's a sale happening in the Lori Whitlock SVG Shop!  Use code JUL2018 to get 30% off all SVGs and Commercial Licenses!


Also, how about a free file!!  This file is free for today only!  No code or minimum required.


Finally, how would you like to win a $20 Coupon to Lori's SVG Shop!


a Rafflecopter giveaway

That's it for me today, your next stop on the hop is Brandie!  Have a great day!


Wednesday, July 4, 2018

Doodlebug Design: Happy 4th of July!

Happy Fourth of July everyone!  To celebrate I decided to create a fun table centerpiece using the Yankee Doodle Wagon and Flower Cut files!  These files can be found in the Lori Whitlock SVG Shop (Wagon, Flower Cluster) as well as the Silhouette Store ( Wagon, Flower Cluster).  Take a peek...


I will admit, converting a 2D file to be a 3D project was a challenge, but it certainly was fun!  I was just so happy that it turned out like I had envisioned in my head!  For papers, I used some Gingham Linen Petite Prints in Ladybug, Bubble Blue, Blue Jean, Limeade and Beetle..  I also used Starry Stripes and Declaration Dots from Patriotic Parade;  Colors of Courage and Land that I Love from Patriotic Picnic; and Horsin' Around from Down on the Farm.  I embellished the wagon with some Red, White & Blue Star Sprinkles (side of wagon); Red, White & Blue Matte Sprinkles (wheels) and Silver Glitter Sprinkles (for the rivets) Here are some more close-ups:


I've put together some instructions on how I converted the Wagon and Flower Cut files to go from 2D to 3D in Silhouette.  I will say this is not a beginner project!  You do need to be comfortable with your Silhouette and it's design functions.


I've included wagon assembly instructions on the image. 


Below is how I assembled the flowers...

I started by curling the petals with the handle of a paint brush.  I then added glue to one of the petals next to the cut line, and overlapped the petals so that the flower formed a "bowl".  I did this for all three layers of the flower then stacked them, with some foam tape between the layers for more dimension.


For the stem, I took a piece of flower wire, bent it so there was a small circle at the top and inserted it through the hole in the center of the stacked flowers.  I wrapped floral tape under the flower to hold the wire in place.  I then added some of the greenery to the wire using floral tape.


I finished the flower off with a center that I borrowed from this flower in the Lori Whitlock SVG shop.


If you decide to take the challenge to make this, we would love to see your projects!  That's it for me today, thanks for stopping by to peek!